August 31, 2006

JFI- Milk/ Rose Falooda


When Vineela declared Milk as this month's theme for Jihva for Ingredients, I knew what I wanted to post right away.
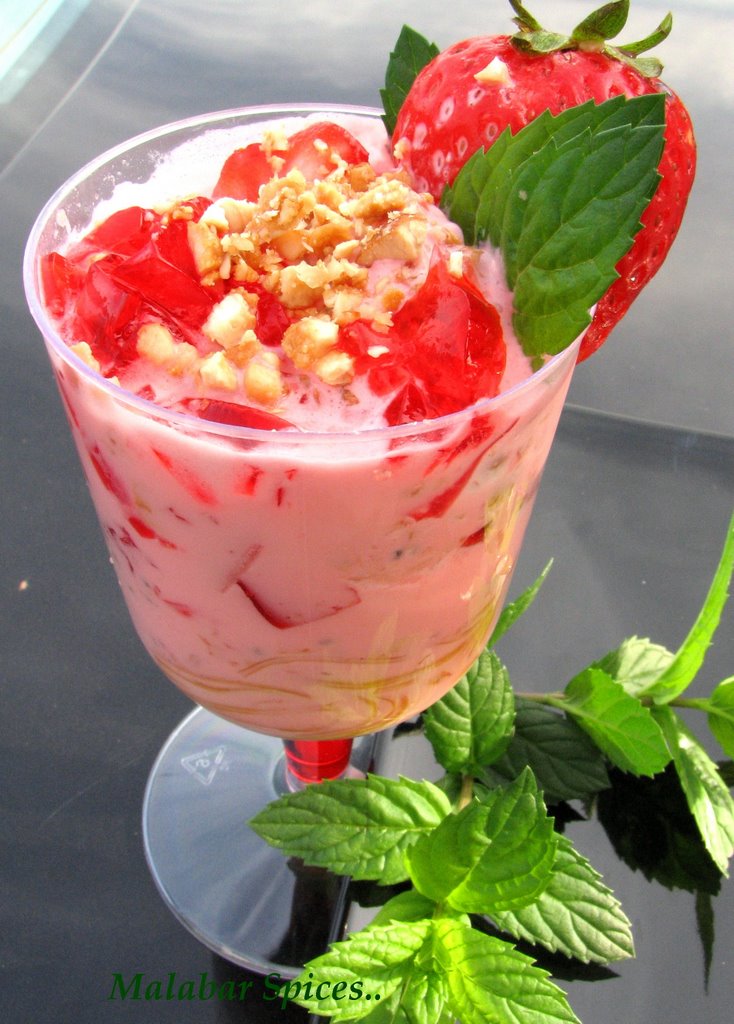
Falooda, the refreshing drink/dessert made by layering the contrasting tastes and textures of noodles, milk, jelly, fresh fruits, icecream, takamaria seeds, crushed nuts etc is a wonderful summer delight. Quite like the American tradition of a sundae.
Falooda, is also the commonly known in North India as the thin transparent noodles which are usually colorless, flavorless and chewy, used to top the kulfi and falooda drink in Delhi. It is Iranian in origin, but is very integral to India now.
It varies in taste across the span of the country, in keeping with the local flavors and preferences. The popular flavors in which falooda are available are rose, pista, mango, chocolate, fig, and many others. One of the best faloodas tasted, is from a place in Chandni Chowk, Delhi, near Paratha wali gali. It was a rabdi falooda, rabdi being milk cooked and reduced to a grainy, thick consistency and then sweetened with sugar. It was decadent enough to linger in memory.
During my childhood, my personal favorite was the falooda from the Park Restaurant at Manachira Tank in Calicut, Kerala. In later visits, as Park restaurant closed, my loyalty shifted to a small place called Kalanthans in S.M.Street. The fruit was fresh, the jelly firm, the ice cream excellent and one of my Uncle’s friends owns it. In my recent trips to Calicut, we still seek out and sample falooda from whichever is the current favorite haunt.
However, I could not quite place it, but something was different. It didn’t match up to our finicky memories. That’s when we started experimenting and creating our own rendition of the taste.
The characteristic taste is the slipperiness of the takmaria seeds and the noodles, both unusual ingredients. Takmaria is the seed of Basil plant, and when soaked in water swells up to a gelatinous mass of bubbles. The thin noodles is made from corn flour. I have tried making it, unsuccessfully and now just prefer to buy it from the Indian store. A close substitute is the Rice cellophane noodles available at all Asian supermarkets.
The rose syrup at the bottom is usually Roof Asfa, a rose concentrate available at any Indian store.
A dash of strawberry syrup is also good if the former is unavailable.The mango brings out the tropical flavor the best, but this time, it’s a rose theme, so the rose essence is offset by the fresh strawberries. As for the ice cream, the Indian store’s flavours work very well, especially the Rose or the Kesar Pista.

You will need ( 4 servings)
Takmaria/Subja Seeds (basil) seeds -2tsp
Falooda sev or Rice noodles-8 ounces
Milk- 1 1/2 cup cold, mixed with 2 tbsp sugar.
Rooafzah syrup- 1 tbsp in each glass.
Ice Cream-1 quart (Vanilla/ Kesar, Falooda)
Honey Roasted Cashewnuts-1/2 cup
Fresh Fruits- Apple, Banana, Mangoes, Strawberries.
Strawberry Jell-O- 3 ounce packet.( Can use Lime Jello too for added color)
Preparation:
1. Make the Jello as per the packet instructions and allow it to set fully. Cut the jello into tiny cubes. Soak the falooda seeds in water for at least 1 hour. They look like poppy seeds and swell up when soaked. Set aside.
2. Boil 1 1/2 cup water and add the noodles or falooda sev. Cook for 4 minutes and take it of the flame. Add ½ cup cold water to set the cooking and let it stay in water till use.
3. Cut the strawberries, bananas, apples and mangoes into very small pieces. Fold the cashews between a paper towel and crush with a glass into pieces. Take care not to crush completely.
4. Use 4 ounce tall glasses for serving. No stirring is to be done while compiling the dessert. Start by drizzling a tablespoon (approx.) of the rose syrup at the bottom of the glass. Lyer 2 tablespoon of the noodles, then ¼ cup milk, then 1 tsp of each fruit and 2 tsp of cut up jello. Add 2 tbsp of vanilla and 2tbsp of rose/strawberry ice cream. Top with crushed nuts.
The quantities of each are relative to the size of the serving glass, so change accordingly. It can be prepared ahead and set out, adding the milk, nuts and ice cream only at the time of serving.
The only other falooda I found was Ashwini's from Food For Thought. If you come across any more, I would be happy to add the link.
,,,

August 29, 2006

GB-2/ Garlic-Parsley toast with Spinach Omelet


My Malabar Spinach is growing wild and I am using them in everything now, a little bit in my lentils, salads, thorans and even in my eggs. What better way to get some fiber in? Toast omelet is my family's weekend breakfast and so this time, I made some modifications to the standard egg. Spinach omelet is still very eggy with just a hint of the spinach flavor coming through. Good for a weekend breakfast. And since it is a weekend, why stop at plain toast? So I went ahead and used my fresh parsley for a herb butter toast. Most of my basil and parsley get used up in the garlic butter at parties, but if you just make the butter, it stays well in the fridge and you can use a little bit as needed. Makes a welcome change from the ordinary spreads.
This is my second entry for the Green Blog Project. I feel this is also an apt entry for Nandita's weekend breakfast blogging hosted this time by Cook's Hideout.

Spinach omlette
You will need:
Spinach- a handful chopped
Parsley-2 tsp chopped
Onion-1
Green chilies/any hot chili -2-3
Eggs-2
Milk-1 tbsp
salt to taste,
oil-1tbsp
Heat the oil and saute the onions and then add the chopped spinach and green chilies. Stir fry till wilted. Beat the eggs with a pinch of salt and pepper and 1 tbsp of milk. Add the spinach, chopped parsley and mix well. Grease the small cast iron skillet/pan with a spray or brush of oil and pour the egg in. Cover the pan and lower the heat to the minimum and cook for 5-7 minutes. Serve with toast.
Parsley-Garlic butter:
5 tbsp melted butter, 1/2 tsp garlic minced or garlic powder, 1/2 tsp pepper and 4 tbsp parsley chopped. Blend all with a fork and refrigate it to set the butter. Spread the butter on a waxed paper and roll it tight before refrigeration if you want it as a log. Spread as needed on toast.
For a lot of garlic toast, preheat the toaster oven. Slice a loaf of bread into 1/2 inch thick slices, spread the butter on one side and toast in the oven for 2 minutes on each side under the broiler.
For a garlic butter loaf, increase the quantity of butter to 6 tbsp. Slice an italian or semolina loaf in half vertically and spread the herb butter on both sides. Now cut the bread into 2 inch wide pieces from the top, taking care not to cut it completely. Cover the bread completely in aluminum foil and bake in the oven at 300 degrees for 5-19 minutes . You could keep this wrapped bread on a grate over coals or gas grill during an outdoor barbeque. Unwrap and serve the wedges.
The garlic butter can be made with any herb.. oregano, basil, our own coriander or thyme mixed with garlic and butter. Add salt only if the butter is not too salty. You could even make this with margarine instead of butter.

August 27, 2006

Nadan Kozhi Curry/Chicken Curry with Coconut

This is a very rustic (nadan) chicken curry, with no frills, no lengthy preparation and no elaborate ingredients. Most Malabar feast recipes are heavy and intricate while their everyday cooking is minimalistic and simple. The daily meals are typical of the rest of kerala cuisine, with dosa, puttu, neriya pathiri etc for breakfast, fish- rice based lunches,pathiri and a meat curry for dinner.In fact, my mother laughs when I ask her for this recipe. She calls it the neetiya curry. The origin of this curry is more Malapurram, my father’s naadu, than Calicut. She tells me the story of olden days, when there were unforeseen guests, and the chicken was less, the cooking was underway, so this curry gets stretched (neetiyathu) and becomes more and more watery to create more gravy. But in its simplicity, it is a perfect accompaniment to any rice based item such as pathiri, idiappam, puttu etc and even with porotta. It goes amazingly well with plain bread, somewhat like bread and stew.
I found that the Malaysian appetiser, Roti Canai’s chicken curry has almost the same taste, perhaps a legacy from Malayalees who migrated to Malayasia a long time ago.
According to my friend Ki in Kuala Lumpur, the roti -canai is our own kerala porota. There early Indian restuarants were set by Malabar muslims and they called themselves Malabarees. She says "Canai" in malay (bahasa meleyu) means flattening/smoothening/grinding. I wonder if they fish sauce to this curry too. I have friends who just go the Malaysian place Penang, to double order this as a main course.

Cooking time: 15 min
You will need:
Chicken-1 lb, (500gm) cleaned and cut into small pieces.
Potatoes- 2 medium size
Onions- 1 small one
Tomatoes-1 really small one
Green chilies paste– 3 tsp
Garlic –Garlic paste – 2 tbsp
Turmeric powder – 3/4 tsp
Red chili powder- 1 tsp (more or less as per taste)
Coriander powder-4 tbsp
Pepper- 1/2 tsp Powder
Coconut grated-1/2 cup or ½ cup coconut milk
Coriander, curry leaves each a small handful, chopped
Salt - to taste
No oil.
Preparation Method
1. Wash the chicken and lightly toss it with lemon juice and rinse again. Drain well onto a slotted drainer. Chop the tomatoes, onion into small pieces. Peel and dice each potato into 8 pieces.
2. In a pressure cooker or heavy bottomed sauce pan, add chicken, onions, spices and everything else except the green leaves and mix well. Pressure cook for 1 whistle. Alternately, cook covered for 10-15 minutes on low heat. If doing so, keep checking often.
Grind the coconut with ¼ cup water to a very fine paste. Alternatively, you can use coconut milk powder, dissolved in warm water.
3. After the pressure cooker cools down, open and check if the chicken is cooked. Add salt and the chopped leaves. Add the coconut paste and turn on the flame again. Let it simmer for at least 10 minutes on low flame.Mix well and check taste. If there is very little gravy, add ¼ to ½ water to make extra gravy and let it boil well. Turn off and serve.
,,

Pavakka Puliyinji/ Bittergourd Sweet and Sour Chutney

Everybody has their own version and name for Puliyinji. Known also as Pulinji or Inji Curry, it is essential to an onam sadya. The sweet and sour chutney made of tamarind and ginger is relished with any kind of rice.
After the farm visit, I had a bunch of bittergourds(Pavakka)that I had enthusiastically picked. Though I like biitergourd in almost every form, whether fried or made into a curry, the most unusual preparation I know is pavakka puliyinji. Puliyinji is familiar to most Indian bloggers, but have you tried it with bittergourd? It adds one more dimension to the puliyinji as its bitterness is tamed with the sweetness of the jaggery and the sourness of the tamarind.
The recipe below is an approximation only. This is one dish which should be customised to individual taste preferences by changing the quantity of chili powder, jaggery and tamarind. This recipe has its origins in my friend Mini's house.


You will need:
Bittergourd-1
Tamarind -1lemon size ball
Jaggery -1/4 cup concentrated
Ginger- 1 inch long piece
Green chilies-4
Red chili powder-1/4 tsp
Turmeric- 1/8 tsp
Curry leaves- 1 sprigs
Mustard seeds- 1/4 tsp
Red chili whole-2 Fenugreek seeds-1/2 tsp
Salt to taste
Canola Oil- 2 tbsp
Preparation:
1. Soak the tamarind ball in ½ cup water and warm it in the microwave for a minute. Blend the tamarind and extract the liquid without seeds and keep aside.
2. Dissolve 4-5 jaggery pieces in ½ cup hot water and strain the liquid. The liquid should not be too watery. How much jaggery depends on how sweet the available one is. Wash, cut and remove the seeds from the bitter gourd. Dice into very small pieces. Chop the ginger and green chilies into small pieces. Tear the dried red chili into pieces.
3. Heat the oil in a wok or cast iron pan. When it is slightly hot, add the mustard seeds and cover. When the seeds stop spluttering, add the red chili pieces and curry leaves. Then add the chopped bitter gourd, ginger and green chilies. Sauté for 4-5 minutes and add the red chili powder, turmeric, salt, tamarind extract and let it cook on medium heat for 10 minutes. Add the jaggery and let it simmer fro another 10 minutes or till the whole mixture thickens. Turn off the flame. The chutney should be thick.
Add more of chili powder or tamarind if needed.
4. Meanwhile, in a cast iron skillet, dry roast the fenugreek seeds, stirring all the while, till the aroma comes out. Transfer to a grinder and dry grind finely.
5. Add the fenugreek powder to the puliyinji and mix thoroughly. This stays in the fridge for at least 2 weeks.
, , ,

August 23, 2006

Pick Your Own.. Farm Visit

Chinese Bittergourd
Hot peppers
Red Blackberries
Blackberries.. They are red and turn black as they ripen
Rasberries.
As if the produce from my farm wasn't enough, last weekend, we went to a farm to pick our own vegetables and berries. There was zuccini, hot peppers, sweet peppers, bittergourd, eggplant,tomatoes, rasberies, blacberries etc.It is a nice experience if you enjoy seeing the berries in their natural habitat and love the fresh taste. And when we started picking the berries, we realised how much work goes into filling one of the small containers we see in the supermarket. The taste though is incomparable.

August 18, 2006

Ulli Surka/Pickled Onions


Red Onion- 1 sliced very finely
Green chilies- 3-4 slit vertically
Plain Vinegar- 2 tbsp
Water- 3 tbsp
Sea salt- 1/2 tsp or to taste.
Mix everything together by hand, crushing the chilies as you do so. Keep aside for 20 mins for the color to seep through.

August 17, 2006

Biryani Chammandi/ Chutney/ Coconut Pesto


Whats a biryani without the chammandi, right? For those who are used to eating the rice without this chutney, try it. The fresh herbs and the green chilies add a palate cleansing taste to the richness of the biryani. This is our nadan version of a pesto,coconut flavored with herbs and garlic, so I called it coconut pesto.

You will need:
Coconut grated- 1 cup
Green chilies- 6-7 or more
Ginger- 1 inch piece( no paste to be used)
Garlic- 1 big clove
Shallots (Red pearl onions)-2 peeled
Mint, coriander and curry leaves- a handful all together,
Lemon juice- 1 tsp (optional 1/2 tsp malt vinegar)
Salt (preferable sea salt)-1/2 tsp
Wash all the ingredients well. Grind everything except the coconut with very little water till the leaves are blended. Add the coconut grated and grind coarsely, pulsing the mixture.Do not add water. Scrap everything into a bowl and add the lemon juice or vinegar. Add more salt if needed.

August 15, 2006

Dum Mutton Biryani

Finally, I am posting the dum biryani.. tired just chronicling the whole process, as if I just made it again. The chembu is the copper colored vessel you see in the pictures. The rice is partially cooked, and then layered over the raw marinated meat masala, without adding any water. The sealed vessel creates enough steam under pressure to cook the meat and the rice. Since the rice has to be dry as a pulav/pilaf/fried rice, it is very important to eliminate any excess water. Make sure the mutton is drained well before marinating,use thick curd, and squeeze the watery juice from the tomatoes.
If trying out with chicken, it has to be drained well, sauted with masala for 8-10 minutes, and the baking time has to be reduced to 10 mins in the oven. Chicken gets cooked instantly so be observant of the water quantity.
Prepare all the ingredients as noted earlier for biryani. Boil the rice without frying in lots of water for 6-7 mins with the whole spices and salt added to the water. It should just turn opaque and not more than half cooked. Drain it and allow it to dry. Make some dough as for rotis or use leftover dough.

The ingredients are the same as for the regular mutton biryani.See here for details.
Follow steps 1 to 5 as for regular biryani. Marinate the meat for an hour or more.

Saute the onions in the Chembu itself till translucent and then add all the other ingredients.

Add the leaves,salt and cook on high flame for 8-10 mins for the extra water to evaporate.

Turn off the flame. Spread a clean wet muslin cloth over the masala and layer the half cooked rice on top garnished with the fried onions and nuts. Alternatively, you could line the masala with aluminum foil, pierced with holes, with edges overlapping on all sides. Sprinkle a little biryani masala and lemon juice on top. The lemon juice prevents the rice from sticking together. Now the Biryani is ready to be sealed. Make a long 1 inch thick roll of the dough and circle it on the lid in one unbroken piece.

Close the lid, pressing firmly along the dough to adhere the lid with the dough to the base. Make sure it is sealed without any holes. Once it starts cooking, the holes are difficult to be sealed again. Put any weight( any heavy vessel will do) on it for the initial 10 minutes to press down. Place on the stove top on high heat for 10 mins. Preheat the oven to broiler setting only if you have a top mount broiler. Else preheat it to 400 degrees. When you see and hear the hissing sound of steam trying to escape from under the lid, it means the steam has risen to the top and is ready to go into the oven. Now ideally this part of the cooking is done with smoldering coconut husks, shells and embers on top, but we can replicate that in the oven. Place the vessel carefully in the middle of the oven with the heat coming from the top for 5- 6mins.
Reduce the heat to 250 degrees(Bake)and allow it to cook for a further 20 minutes.
Then turn off the oven and let it cool for 15 minutes. The dough will have a golden color to it. Open carefully by breaking the dough with a blunt edge. The steam is scalding so it is a good idea to forgo curiosity for some more time if needed.

Spoon out the rice onto a serving plate till you reach the cloth lining and gently pull it out. The meat gravy should have thickened with the oil risen to the top. If there is still too much gravy, just simmer it on high heat for 5-7 minutes more. Mix the rice with the meat as required with more masala on the side or serve it layered but not thoroughtly mixed. Add salt if needed.
The whole process looks complicated but is just a matter of timing. The first time may not come out exactly perfect, but it only gets better with experience. Modify the time at each stage as per your masala's consistency and the quality of meat. Try it with any vessel that you can put in the oven.

The biryani without the masala mixed in.
Related Links:
Mutton Biryani

Calicut Mutton Biryani

Happy Independence Day. Though a bit late, I wanted to celebrate the special day with biryani as any occasion is celebrated back home. A festivity is not festive without a biryani and Malabar the region is synonymous with Biryani. Has anyone visited that area without at least once venturing out to eat biryani? Biryani is essentially a blend of rice and meat or fish with the rice cooked in the meat's juices to infuse the flavors in every bite.
The traditional method of making the biryani is in a "chembu", a copper cooking vessel, specially shaped to have a wider bottom for the meat to cook well and a narrow top for the rice. The steam emanating from the gravy cooks the rice above, the lid sealed with dough to prevent the steam escaping. It is called the dum biryani elsewhere especially in Hyderabad. It’s a healthy and a very delicious way of making biryani. The aroma when the dough is broken and the seal lifted is the ultimate.
Sunday at my grandmother's house was always biryani, and we used to wait impatiently for it, breaking and eating the dough crusts as it baked into a pretzel consistency.
She would start the cooking at morning, getting everything ready...cut, hand ground, chopped until there was a colorful array of ingredients laid out and the lingering fragrance of fresh herbs.
Over time, as convenience became our mantra, the meat and the rice started getting cooked separately, layered in baking pan and then baked together to get the flavors blended. I still make the biryani the separate way, but once in a while, the craving for the traditional takes over. On my last visit to Kerala, I gave up some clothes to make space in my suitcase for a small "biryani chembu". Even the time taken for the biryani seems less than the usual way.
Don't worry if you don't have the chembu.. before that came , I was cooking it the steam (dum) way in any heavy bottom vessel such as the crock pot, or a hard anodized aluminum large sauce pan.
So here is the recipe for the regular biryani.For those who want to try the dum version, the ingredients are the same and I shall soon post the detailed dum method.


You will need:

Mutton - 1kg or 2.5 lbs
Onion – 500 gm or 4 medium ones
Tomato - 200 gm or 2 medium sized ones
Green chilies – 100 gm or about 15 in number (Use 20-25 for 2 kg mutton..depending on the hotness of the chili.)
Ginger - 50 gm or a 4” piece
Garlic pods – 50 gm or 8 cloves (big)
Pepper powder – 1 1/2 tsp
Turmeric powder - 1 tsp
Plain Yogurt- 3/4 cup (thick)
Fennel(Perinjeerakam/Saunf) - 1 tsp
Poppy seeds (Khus khus) - 1 tsp
Mint leaves (Pudhina) - 1/2 bunch
Coriander leaves (Malli ela/Dhania) - 1/2 bunch
Curry leaves- a handful
Lemon juice- 1 1/2 tsp or juice of 1 lemon.
Clarified butter (Ghee) - 1/2cup or 1/4 cup mixed with ¼ cup oil
Cashew nuts – 20 gm or a handful
Raisins- 20 gm or a handful

For the rice:
Basmati rice - 1 kg/ 4 cups
Cinnamon (Karuvapatta) - 4 sticks
Cloves (Carambu) - 4
Cardamom (Elakkai) - 4
One bay leaf, salt.
Lemon juice- 1 1/2 tsp or juice of 1 lemon
Salt to taste
Biryani Masala:
Cinnamon 2 inch piece
Cardamom 8
Cloves 8-10
Nutmeg 1
bay leaves- 1
Mace 5-6
Caraway seeds 1 tbsp
Star Anise-1
Dry roast all together and grind to a fine powder.

Preparation:
1. Clean the mutton and cut into medium sized pieces. Wash and drain.
2. Soak the fennel seeds and poppy seeds in a bowl with water for an hour at least and grind with very little water to a very fine paste. If it still feels grainy, add a tablespoon of grated coconut to grind it well. Keep aside.
3. Grind together the ginger, garlic and green chilies into a coarse paste. Chop the tomatoes into cubes and slice the onions. One onion should be sliced extra fine. This one is for the fried onion garnish.
4. Marinate the mutton with the ginger garlic chili, and all the other spices and ingredients except the onions, biryani masala and herb leaves. Add salt too and keep covered for an hour at least. Clean and soak rice for 10 minutes. Keep aside.
5. Heat three fourth of the ghee/oil in a heavy bottom pan. Add the garnish portion of the sliced onions and fry, till golden brown and crisp. Sprinkle some sugar over the onions to speed up the crisping. This should take about 10 minutes. Remove the onions and fry the cashew nuts on medium heat till it turns brown on all sides. Drain and remove. Add the raisins now and stir till they plump up. Remove onto paper towels. This ghee/oil is used for flavoring the rice so save it.
6. Heat up the remaining oil and add the rest of the sliced onions and sauté it till it becomes translucent. Add the marinated mutton, the poppy seed mixture, the biryani masala and the coriander, mint and curry leaves and mix thoroughly. Keep it covered and cook on medium heat for an hour, checking frequently till the oil starts to separate and the meat gets almost cooked but still has a bite left. If the mutton normally requires a long cooking time, you can pressure cook it for just one whistle and then simmer on slow heat to concentrate the gravy. Do not add water at all. Check taste and add more salt or yogurt, pepper etc if needed.
7. Preheat the oven to 200 degrees.
8. Heat 3 tbsp of the remaining onion ghee/oil and add the whole spices- cinnamon, cardamom, cloves and bay leaves. Sauté for a second and add the drained rice. Stir the rice till it turns opaque and add 6 cups water (three fourth of the quantity required for ghee rice). Cover and cook on slow heat the rice along with all spices and salt, till all the water is absorbed. This would take about 5-8 minutes.
9. In an oven proof dish, spread half of the mutton masala and place half of rice over it. Sprinkle some lemon juice to prevent the rice from sticking. Spread the remaining masala and top it with rice followed by lemon juice. Pour 2 tbsp of ghee/oil on top of it and sprinkle some roasted onion, nuts and raisins. Close it with a layer of aluminum foil and then lid and put it in the oven for 25 - 35 minutes. Remove and let rest for another 5-10 minutes before opening.
10. Serve with coconut chutney (biryani chammandi), Pickled onions (Ulli surka), Yogurt and Papadam.
P.S. The biryani masala freezes extremely well, so if you have extra masala, separate it after cooking and freeze it immediately. Defrost and make ghee rice to go with it and you have instant biryani.
Some more biryani recipes:

Mutton biryani, RP ishtyle
Revathi's instant biryani which is a must try when you want biryani,but have no time.
Shynee's Chicken biryani

August 14, 2006

Malabar Kozhi Porichathu/ Fried Chicken


The weekend was spent lazing at the beach, getting our fill of the salty air and baking in the sun, munching goodies. Here we go to the beach, driving anywhere between half hour to one hour, while the beach air prevades the atmosphere in Kozhikode. As the trains approach the calicut station, you can notice the change. The smell of the salty wet air mixed with the slight stink of rotten fish and algae.. hmmm.. brings back memories.
Everybody lands up at the beach on the weekend evenings, with family/wife/friends in tow, socialising or walking or just gazing at the sunset. When i was a kid, my grandfather used to take us further north on the beach road, to an isolated "Koyal" beach, which was our name for the giant unused sewer pipes that lay embedded in the beach. We used to play all kinds of pretend games there. We used to top off the evening with ice cream, cutlets, salted mangoes.... Recently when I visited, even that part of the beach is now densified.

And so, my craving for the nadan chicken fry started. Simple as the recipe is, it is rarely made at our house, as the chicken is deep fried after marinating in just chili powder, turmeric and salt. Sometimes a tablespoon of rice flour is also added to the marinade. The healthier version of this is listed below.

You will need:
Chicken- 1 lb (or 5 pieces of leg)
Turmeric powder - 1 tsp
Red chilli powder -3 tsp or less
Lemon juice -1/2 tsp
Any oil for frying (coconut oil tastes the best)
Salt to taste
Preparation:
1. Clean and make gashes on the side of the legs.
2. Mix the spice powders and salt first, taste it, and then add the chicken and keep aside for at least 1-2 hrs. Do not add water to the marinade.
3. Heat 1/2 cup oil in a wok or sauce pan for 5 mins and reduce heat. Add the raw chicken pieces gently. Do not crowd the chicken in the wok. Do it in batches if the pan or wok is small.
4. Fry on medium heat for about 10-15 mins, turning once or twice to allow all sides to be cooked equally. If the chicken pieces are small, they won't take as much time, so fry it till the color changes to a golden brown. For checking, insert a sharp knife edge into the meatiest portion and if no juices run out, the chicken is done.
5. Drain with a slooted spoon onto a paper towel to remove the excess grease.

Related recipes:Chicken Shallow fry
,,

August 12, 2006

Summer is going....going..


3 more weekends left..till summer is declared over in the north-east (US).. so head to the beach, barbeque, park,rafting... whatever strikes a chord with your mood. Get out, get some sun before it become a distant memory when the cold air pushes its way in. How do we enjoy the warm weather that we took for granted in our tropical mainland? In Jersey, it's heading to the shore time.
And somehow, food is a predominant aspect of the fun.. what do we eat, what do we take, what do we grill???? This is the base for next year's memories. So, everybody,regale the blog world with all the wonderful ways each of you celebrate summer.
And foodies from Florida,California,India and other warm places, please ignore our summer fetish while you laugh with glee. You have to have winter to appreciate the heat.So, I am off.

August 10, 2006

Kadukka Varuthathu/Mussel Fry


Mussels, known commonly as Kadukka or Kallumakai(literally "the berry on the rock")is a shell fish harvested from the rocks near the coast or now cultivated in freshwater fields. For the uniniated, if you like clam, you will like mussels.Fresh mussel meat has about the same amount of protein as beef steak, must less fat, 25% less calories and many more mineral nutrients.
I have tried the ones available in the local supermarkets, Chinese grocery stores and found that the frozen mussels in half shells from New Zealand have the freshest taste. Ironical, but true.If you buy from the supermarket, they are perishable and will keep for only 24 hours in the refrigerator before starting to open. If you wish to eat them later, it's best to freeze them whole or shell them and freeze the meat in its own liquid in an airtight container.


More about them later. For now, you just have to remove the meat from the half shell and cut off the top corner part which looks blackish. If you buy whole mussels, try this link for cleaning instructions.

Mussels(Kadukka)- 1/2 lb
Red chili powder- 2 tsp
Turmeric- 3/4 tsp
Salt- to taste
1. Wash the mussels well and allow them to drain.
2. Mix all the spices together and marinate the mussels in this for 15 mins at least. If more than that, marinate in the fridge.
3. Heat 1/2 cup oil in a deep wok/pan and when it gets a little hot, add the mussels. Fry on medium heat for 5-7 mins on either side. Fry for a longer time if you want it crispier. How crispy it should get varies with individual taste.
Serve hot.

Perunjeerakam- Fennel seed or Aniseed?


Perunjeerakam is a essential item in my pantry. If you follow the malabar mappila recipes, almost every item gets its distinct lingering taste from the perunjeerakam. Omit it and the flavor changes dramatically.
So when somebody commented that the english word for the spice is fennel and not aniseed, I had to look it up. Was I misleading in my recipes? Not to be confused with star anise, a star shaped dried spice which also has a lovely minty flavor and tastes great in Ghee Rice. It is dominant in Chinese All spice powder and recipes.
Furthermore, the local Indian grocery store had both spices sold seperately. They looked similar, aniseed being a darker olive green than the leaf green of fennel(saunf) but they smelled the same.
So what was the difference? The Wikepedia and Cooks Thesaurus say they belong to the same family but that aniseed has a stronger licorice flavor. Aniseed is mostly used in Middle eastern recipes and flat breads. Maybe, it would taste great on our naans. The aniseed oil is used in a lot of drinks and as flavoring in candy. The fennel bulbs and leaves are also used in salads and soups. So, I concluded that I use the lighter green fennel at home, but this meant that I could replace that with aniseed if I wanted to deepen the minty flavor.
The Indian recipe sites list both as saunf/Perunjeerakam but they probably mean fennel seeds.My mallu cookbooks always referred to it as aniseed too.
Any comments on this from all our foodies?

August 09, 2006

FMG-2 Guess The Plant


Its not too difficult if you have been reading my previous posts... What do you think this plant is?

August 08, 2006

FMG1-Okra Part 2

The flower from a couple of days ago has grown into an okra.I love the way the okra plant grows up in spurts.It grows linearly without a spread, flowering at each level at the joint of stem and trunk, and becoming an okra the same day. Very unique.Even its star shaped leaves are a beauty.

August 06, 2006

Kaya Chemmeen Kootan/ Green Banana Curry with Shrimps.

With the lentil (parippu) prices going up here, suddenly I had to do some lateral thinking to come up with non lentil curries. That’s when I came across this recipe hurriedly scribbled in my recipe book, from my in-laws last visit.
Umma had made this curry in the spur of the moment, seemingly without any effort, just tossing in a handful of shrimps into a pan of simmering raw bananas. It reminded me of the old story of the soldier and the stone soup. It is amazing how our mothers can pull off variations spontaneously. Such a simple recipe and the end result was a scrumptiously rich curry thickened by the banana’s starch. I added a very small dash of coconut milk to seal the Malabar flavor and hold the banana and shrimp together.
To entice you to try it, let me tell you that the closest approximation of the taste is of Tapioca (kappa) with fish curry. So the combination works very well. It goes well with rice and accordingly to my spouse , goes well with parathas too.

You will need:
Shrimp- 1 cup peeled (about 20)
Green banana (plantain or regular)-2 medium sized ones.
Green chilies- 2 vertically slit
Red chili powder-1 1/2 tsp
Turmeric- 3/4 tsp
Fennel Seed/Saunfperunjeerakam)-1/4tsp
Salt to taste
Coconut Milk Powder- 1 tbsp(Optional)
For seasoning:
Mustard seeds- 1/2 tsp
Shallots or small onions- 2
Curry leaves- 1 sprig
Coconut oil-1 ½ tbsp

Preparation:
1.Chop the shallots finely and keep aside with the curry leaves.
2.Peel the green banana and quarter them into ½” inch long cubes. Soak them in water with a pinch of turmeric and salt for 10 minutes. Marinate the washed shrimps in ½ tsp chili powder, salt and ¼ tsp turmeric. Cut the shrimps into 2-3 pieces if they are very big.
3. Rinse the bananas and put them in the sauce pan with1 ½ cup water on a medium flame. Add the green chilies, salt, aniseed and the rest of the chili powder and turmeric.
4. Add ½ cup more water as the bananas start getting cooked. Add the shrimps to the bananas after 10 minutes. It will take about 10- 15 minutes for the bananas to be cooked to a point where it starts breaking down. The bananas have to turn starchy and the water should look clouded.
5. Check the salt and liquidity of the curry and add more salt and water if needed. Stir in 1 tbsp coconut milk powder (blended with 2 tbsp water) and let it come to a full boil and take it off the flame.
6. Seasoning: Heat the oil in a small wok/pan and as it heats up, add mustard seeds and cover till it tops sputtering. Add the curry leaves and shallots and fry till the edges of the shallots turn brown. Pour the flavored oil over the curry.

August 04, 2006

FMG 1-From my garden-Okra


Guess which vegetables's flower? There is a clue if you just look closely.
Yes,it is a Okra flower (vendaka).I caught the guessing bug from LG and now my vegetable knowledge seems to be increasing.
Last year, my mom had got seeds and we had a couple of wonderful okra plants. Good taste too.This year,had to resign myself to the plants from the nursery. It gives me an okra every alternate day, but the taste is a little dry. Anyway, so every weekend I am left with 3-4 okras. Just the right amount for a Okra Relish.(Vendaka Thottu Kootan.)I don't know how else to name it in english. So let me a get a snap of it and the recipe will be presented.

August 01, 2006

Green Blog 1-Spicy Cucumber Salad/Curry


Summer is special for me. As the temperatures soar, my annual amateur vegetable garden shows an energetic growth spurt and starts bearing fruit. The vines would start scrambling to climb everywhere, the tomatoes look for a support while the beans lean onto the fence,and the backyard is a mass of different leaves and flowers.
Every year one vegetable gets a better foothold (since I am an amateur)and I end having more than I can use. Last year was the Snake gourd(Padavalanga)and the Bitter gourd (Kaipaka).
The highlights this year are the cucumbers. When I let it grow, it grows to be almost a foot long but I prefer the flavor at six to seven inches for a salad . The longer ones are good to cook with as asummer squash.
Very easy to plant and maintain and it doesn't expect a lot from you. A happy surprise, they are producing more than I expected. Each morning, there would at least one hiding under the rambling vines, the dark green skin peeking through the palm shaped lighter leaves.
Oye cucumber, I counted in how many ways I can eat you? Salad, Soup,Raita, Tsatziki, Juice, Pachadi, or just plain chopped up and sprinkled with salt and pepper.
So when I came across this spiced up salad recipe from the Culinary travel book, Mangoes and Curry leaves, I had to promptly make it. And then took it one step forward by making a no-cook curry out of it. With hot white rice and a spicy fish/beef fry, this cold curry is perfect for the heat wave. This is my entry for LG's Green Blog project.
You will need:
Cucumbers- 1/2 lb
Sesame seeds- 1tbsp
Cumin seeds-1/2 tsp
Yogurt-2 tbsp
Fenugreek seeds- 1/8 tsp
Nigella seeds- 1/8 tsp
Green chilies- 2
Red chili powder-1/4 tsp
Turmeric- 1/8 tsp
Coriander leaves- 2-3 tbsp minced
Lemon Juice-1tbsp
Salt to taste (use sea salt preferably)
Oil- 1 tbsp

Preparation:

1. Cut the cucumbers lengthwise in quarters. Slice off the seeds if they are very big cucumbers. Cut lengthwise again if the pieces are thick. Place in a colander; sprinkle 2 tbsp salt and set over a plate to drain of excess water.
2. In a heavy skillet, dry roast the sesame seeds until golden. Transfer to a plate and then dry roast the cumin seeds till fragrant. Dry grind the sesame and cumin, place in a small bowl and add the yogurt to make a paste.
3. Rinse the cucumber with water and squeeze excess water. Add the cumin paste and coat the cucumber well.
4. Heat the oil in a pan over medium heat and add the fenugreek, nigella and chili and stir till the spices release their flavor. Take the pan off the heat and add the cayenne and turmeric.
5. Stir and pour the flavored oil over the cucumbers. Add the lemon juice and let it sit for 10 minutes. Add the coriander leaves and salt if needed.

My cucumber curry:
Double the quantities of the ingredients of the spices( double cucumbers too is if you like a lot of vegetables)and follow all the steps. In the end, after taking it off the flame, add 2 cups plain yogurt blended smoothly with one cup water. Adjust the salt.