November 30, 2006

WBB7-Kalthappam/ Rice Cake with Jaggery


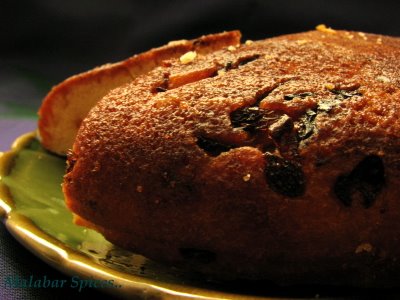
Kalthappam is a not so well known bread/cake/appam from the Malabar households. The texture is somewhere in between that of bread and cake so I don’t really know where to classify it. It is a baked/steamed mixture of ground rice, sweetened with jaggery(unrefined sugar) and has crunchy bits of chopped coconut to add texture.

Maybe it originated as baked version of Neiyyappam, that yummy fried fritters made of a similar mixture. Unniappams are also similar,but kalthappams are not so moist.
At my house, mom makes it as a snack for those in between times, when you are walking around, raiding the refrigerator, looking for something to satisfy the munchies. I make it once in a while and eat it as a snack as well as breakfast.It is healthy as it doesn't have any eggs or butter or too much sugar.

The taste is unique due to the shallots, coconut oil and coconut pieces. Shallots (I may have mentioned earlier too) balance the sweetness and is essential to the taste. Though the idea is foreign to one who hasn’t tasted it, using shallots in sweet dishes is similar to using spices in cakes.
Kalthappam
You will need:
Basmati/Biryani Rice -2 cups soaked for 6 hours.
Cooked rice (same rice as above) -1 cup
Jaggery – 1 ½ to 2 cup
Baking powder -1 teaspoon
Salt -a pinch
Coconut oil -2 or 3 tablespoons
Chopped Coconut Pieces -1/4 cup finely chopped
Shallots/ Red pearl onions -1/4 cup finely chopped

Preparation:
1. Melt the jaggery in 1/2 cup of water and allow it to cool. The quantity of jaggery to be used usually depends on the sweetness of the jaggery. If there is more water inadvertently, let it thicken over low heat. Strain it and use this liquid while grinding the rice. The thicker the jaggery water, the easier it would be to grind the rice without additonal water.
2. Drain the soaked rice and mix it with the cooked rice. Grind the rice and the cooked rice together to a fine consistency with the jaggery water. Do not add water unless absolutely neccessary and even add little at a time. The final consistency should be thicker than a pancake or dosa batter.
3. Then add salt, baking powder, and few chopped coconut pieces and mix well. In a pressure cooker (or a heavy bottom pan/cast iron deep skillet) heat the coconut oil and add the remaining chopped coconut and shallots. Saute for about a minute on medium heat till the shallots turn golden brown.
4. Pour the lukewarm rice mixture into the cooker. Close cooker and remove the weight. Cook for 2 minutes on a high flame. Next lower the flame and cook for 15-20 minutes on an extremely low flame. Remove from fire and open the lid after 5minutes. 5. When it is a bit cool, run a blunt knife along the edges to loosen the appam and remove from the cooker. The bottom would be dark brown with the onions and coconuts while the top is a honey brown. The final texture should be of deep crevices and tunnels vertically. Store in the refrigerator for upto 3-4 days.

P.S. It is recommended to get the whole ground rice mixture a little warm before you pour it into the cooker to distribute the heat evenly top to bottom. Whenever I tried warming the mixture on the flame, I ended up cooking it so either I do without it (grinding it in the processor makes it warm) or I heat the whole mixture in the microwave for about 15-20 seconds.

A Disclaimer: The kind of rice you use to make this decides the texture of this appam. I think basmati (I used Pari this time) would be fine, but again there are lots of basmati out there. I have had disasters with this earlier, with it being sticky, not rising, getting over burnt and so on.
Also, it cooks better on stove top. I tried baking it and didn’t like the texture. The pressure cooker is the best but if you are using a pan, it has to be at least 2 inches deep and have a thick bottom to prevent burning. So have patience and try it. I still can’t make it as well as back home but I will keep updating this post with inputs whenever I make it.
If anybody has more experience making it, please leave your suggestions and comments.

This is my Entry for - WBB #7/Baking for Breakfast hosted by Nandita of Saffron Trail.
RP just reminded me of the JFI event which had slipped my mind, so this is my entry for the JFI-Jaggery Hosted by the lovely Kay of "Towards a Better Tomorrow" as well.

November 29, 2006

The Daily Tiffin

Recently I started paying more attention to my son's lunch box, not entirely out of passion, but out of neccessity. What began as a "OMG,what shall I give him today?" is slowly capturing his and my imagination and becoming simpler and more streamlined.

One of my biggest challenges is a strange one. My little one who eats all my spicy, rustic, traditional and non traditional food at home is shy when he comes to school. I have been gathering all the excuses he gives for bringing back an untouched tiffin. It was gooey, sticky, it didn't taste right, the others made fun of the smell (Indian spices),it was not spicy enough, it was too spicy, it was cold (he likes it hot) and so on.
Now I keep asking my mom what she used to pack for us. That’s when I came across Meeta’s The Daily Tiffin, a lovely blog chronicling the tiffins she packs for her son. She takes beautiful snapshots of the lunches and makes me yearn to be a kid again, instead of a mommy. (Just kidding.)

So when Meeta started looking for contributors to broaden the topics, I was naturally interested to see where it would take me. Now as co-contributor along with Meeta, Lily and Nandita, I would be adding my notes on every thursday, on lunches, books, on anything kiddie related. A detailed introduction to each of us has already been posted at the site.

If any of you has any suggestions or ideas on what we should cover, they are more than welcome. Additionally, anybody who wants to contribute and post can do so, directly to Meeta or any of us. So come on over at The Daily Tiffin today. Maybe it would trigger a memory or it would help you create one.

November 27, 2006

List of Food BLogs


November 26, 2006

A Travel Recovery Lunch


It was a wonderful holiday week spent visiting family and friends in San Francisco, doing what families do best when they get together-talking all together and eating! We drove around the country side, taking in the vineyards, redwood forests, Coit Towers and hot footed through the San Francisco city of ups and downs, strolling through China town and waterfronts. The sights and smells of the water front may be yucky to some, but to me, it brought a whiff of good old Kerala. More on those photos later.

It feels a little empty to be just us again after being amidst so much conversation and laughter. My son is walking around a little lost, not ready to get back into the daily routine, and we both are still yawning, caught between time zones. The house felt silent and cold yesterday, but today after the cutting and cooking started up, I felt much more comfortably enconsed in my space.

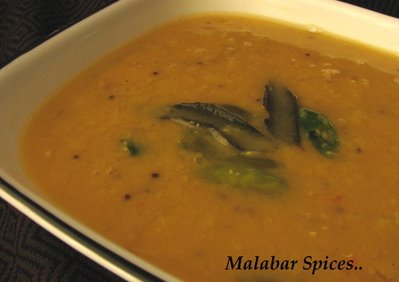
We were craving some really light food and had not much to work with as the refirgertor has not been restocked as yet. No tomatoes or vegetables, just a couple of plantains I picked up from the Indian store along with milk. And hmm…the freezer had shrimps. So the menu consisted of plain steamed rice, lentil curry (Parippu/ Dal), plantain stir fry(Kaya Meyukkuperatti),Carrot thoran and spicy shrimps(Chemmeen Varatiyathu) to balance the blandness.

There is something therapeutic about a basic rice meal without any coconut, coconut milk, cream or any other rich ingredient. It soothes the travel weary stomach and sleep deprived mind. Comfort food at its best.


The Dal Recipe:
Tuvar Gram(Thuvaraparippu) - 1 ½ cup
Onion – 1/2 sliced finely
Turmeric Powder- 1/2 tsp
Red chili powder- 1/2 tsp
Green chillies - 4 nos (slit lengthwise)
Garlic-1 clove chopped
Mustard seeds - 1 tsp
Cumin seeds (Jeerakam)- 1/4 tsp
Asafoetida- A pinch
Curry leaves- One sprig
Salt - 1/2 tsp or to taste
Oil - 1 tbsp

Cook the lentils with the green chilies, turmeric, 2 cups water and salt till the lentils are cooked. You could pressure cook it for one whistle or slow cook it in a saute pan. Heat oil in a pan and lower the heat while adding the mustard seeds and cover. When they splutter, add the cumin seeds,curry leaves and then asafoetida, garlic and sliced onions and fry for a couple of minutes.
Add the red chili powder and stir once and then add the lentils and enough water for gravy. Let it simmer for at least 5-8 minutes to get rid of the boiled lentil taste. Adjust the seasoning as required. Add a dash of lemon juice and fresh cut cilantro leaves.

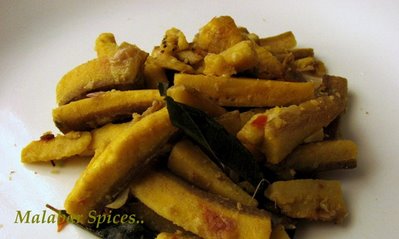
Kaya Meyukkuperatti

Kaya

You will need:
Raw Green Plantains – 1
Shallots /Pearl Onions – 5
Whole red chilies-2
Garlic-1 clove
Turmeric powder- 1/2 tsp
Red chili powder- 1/4 tsp
Curry leaves- One sprig
Salt – to taste
Oil - 2 tbsp

Preparation:
1.Peel the green plantains with a peeler, removing only one layer. Cut into 4 chunk pieces and then further cut each piece into 8-10 thin long segments. Soak the pieces in a bowl of water with ¼ tsp turmeric for about 5 minutes and then rinse it well and drain. Cook the plantains in 1 ½ cup water (or enough to submerge it) with the rest of the turmeric, red chili powder and salt. This should take about 7-10 minutes.
2. When the plantains are almost cooked (it should not get fully cooked), drain the excess liquid and keep aside. Ideally, the plantains should be cooked in just enough water, but I use a little more to avoid it getting mushy. This nutrient rich liquid can be added to the lentils or any vegetable curry if you do not want to throw it.
3. Meanwhile, peel the shallots and tear the red chilies. Crush the shallots, red chilies, and garlic in a mortar-pestle till it is combined. Heat oil in a pan and lower the heat. Add the curry leaves, the shallot mixture and sauté for a couple of minutes.
4. Add the cooked plantains and stir fry on medium heat for about 8-10 minutes or till the pieces start looking slightly crisp. If you are using a non stick pan, you may not need any more oil, but add a little bit more oil if they start sticking. Adjust the seasoning as required.

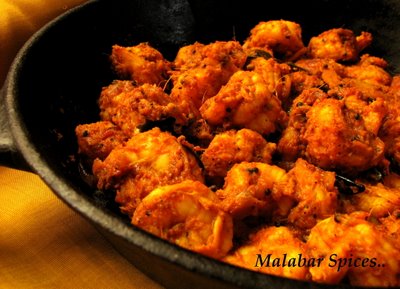
Chemeen Vartiyathu/ Skillet Shrimps

Shrimp Fry

The shrimps are based on Kerala Kitchen’s Shrimp recipe, and if you are making it, just follow her recipe ad verbatim as it is perfect. This time though, I did not fry it as much to lighten it and left it semi wet with the masala sticking to it. I also switched from the onions to shallots. Fry it with a bit more oil till slightly dry and it is too good. I have linked her recipe for those who want to try it and also posted my recipe here with the variations in it.
You will need:
Shrimp - 1/2 lb
Marinade:
Chili powder - 1 tsp
Turmeric powder - 1/2 tsp
Coriander powder - 1/2 tsp
Fenugreek powder - 1/8 tsp
Lemon juice - from 1/2 lemon
Fresh ground black pepper - 1 tsp
Salt to taste

For Dry Gravy:

Ginger garlic paste - 2 tsp
Fennel seeds - 1 tsp
Red Chili powder-2 tsp
Dried red chillies - 4
Shallots-7-8
Coconut Cuts-2 tbsp
Oil - 2 tbs
Mustard seeds - 1 tsp
Curry leaves

1. Defrost the shrimp, wash and drain. Marinate it with the ingredients for at least 1/2 hour.
2. Finely chop the shallots and coconut pieces . Heat oil in a pan, splutter mustard and add the chopped shallots, coconut and curry leaves. Add the ginger & garlic paste and fry untill the raw smell goes.
3. Now add the marinated shrimp and cook on medium heat for about 10-12 minutes or till the shrimp has changed color and the masala is sticking to the shrimp all around. Since we are not frying the red chili powder, you may need to add a couple of tablespoons of water to let the powders cook. Alternately, add one more tablespoon of oil and let it fry. Now add freshly crushed fennel seeds and fry the shrimp until done. Add the fennel seeds and more chopped curry leaves after turning off the flame.

, , , ,

November 15, 2006

Giving Thanks/ Roast Chicken and Neriya Pathiri

Giving Thanks is not easy. So when Meeta of What's For lunch, Honey asked to participate in Giving Thanks, the theme for her Monthly Mingle, I was forced to sit down and think. It is said a combination of nature and nurture makes an individual. Assimilating and absorbing a bit of something from every person and every place we come in contact with is so natural that we hardly pause to think back at what we were and where we are. Some of the culture of each place we set our roots in gets imbibed into our system.

Things, relations and knowledge I take for granted now was hard won some time back and these occassions only make it piquant. I have a lot to be thankful for but have not realy taken time out to thank anyone. A recent TV liquor commercial had the tag line "Toast Life", something we should do every healthy day of our life. (Every day I see a cop car pass by while my speedometer is nudging me, I thank God fervently.)

Now I feel like I just won an award and am asked to say a few words.. Bhaiyyon aaur Bahanon....
I would just like to say thanks to my family who support me through all my whims and quirks. They encompass my siblings, parents and my in-laws and my husband's siblings and all their families too. They got me started on this blog trip and are still my biggest critics and supporters. Once I get something in my head, my mom and mom in law get the brunt of it as I keep calling them to clarify a recipe and check all aspects. So they certainly deserve a special thanks.

Thanks to my better half guinea pig and my little one who eats all the stuff you see posted here (almost)and all the stuff I decided not to post.(hi hi:))My better half gives me the strongest encouragement(a clean plate is the best encouragement)and criticism even though he has no time to cook.:)My little one goes, "It has no flavor" making a funny face if the taste is not right.:)So u see, I have a tough crowd at home itself.

Thanks would be due to all my blogger friends who everyday are an affirmation that I am not the only foodie and food snob around. I learnt so many new recipes, got over so many food hurdles and made new friends whose posts I eagerly await. It has made me more familiar with other cuisines while sharpening my knowledge of my own cuisine. To name one would be take sides but I appreciate all of u especially the ones who take the time out to leave a comment which ensures that I am not talking to empty air. Go on leave your name and a comment, good or bad.

The recipe I chose for the Thanksgiving meal is a Roast Chicken, Malabar Style. I had posted it once but I think it is still appropriate to the occassion. So instead of writing again, I have linked it up to the previous Post which has a step by step set of photos.


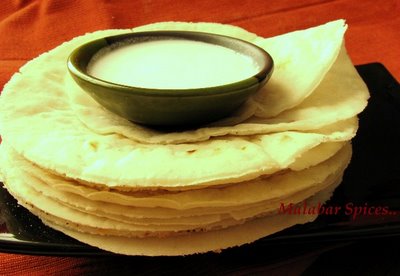
The second item is Neriya Pathiri, a delicate rice roti or tortilla so thin that making it for a mom level cook still makes me nervous. It is all in the hands.
It is a dish which reflects the delicacy of all relationships and moments. You spent a good amount of time creating it and unless you savor it, its gone in a puff. The detailed recipe I will post by evening as I have to get this to Meeta before she hits the deadline.
So keep eyes peeled as I post the step by step for this Pathiri. It's not difficult but it's not easy.
HAPPY THANKSGIVING!!HUG UR FAMILY!!

Pathiri/ Thin Rice Roti/ Breads


These fluffy pathiris are a speciality of Malabar cooking, with only the thickness varying across the Northern Kerala. Though I am from Calicut, I would say the Malappuram people make the thinnest softest, melt-in-your-mouth pathiris. They would probably scoff at my pathiris considering the thickness to be too much. I love these with Drumstick leaf curry.

You do have to eat a lot of these before satiation and that is precisely why these are never the main course. They are traditionaly used as tantalising appetisers or as a delicacy, nestled among the lavish spread of a banquet table.

I love being in Calicut when it is made at home. When there is a feast involved, my aunts and my mom get together and make it in a flurry of conversation and laughter. One person would be rolling and another one would be handling the griddle all at the same time, culminating in huge piles of pathiri.
Its the time to catch up on gossip and tidbits as they slowly fill the pathiris with their sounds. Making it here, with only music to keep me company somehow is just not right. But I still do, without a pathiri press,(only because I don't have one) just to recreate the moment.
The rice flour I use is Double Horse Pathiri Podi or any other rice flour from Kerala. I have also tried with the regular rice flour from the Indian stores, but they turn out to be hard. I am not sure what rice is powdered to make the flour and whether that is the difference in the powders.

You'll need: for about 16
Rice Flour- 2cups
Water- 2 cups
Salt-to taste
Thick Coconut Milk-1/4 cup

1. Boil the water with salt. When it is churning and roiling nicely, pour in the flour, make a hole in the center with the handle of a long handled spoon, cover with a lid, lower the heat and let it cook for a minute. Uncover and stir well with the handle or stick till it is well mixed. Remove from fire and keep covered for another 10 minutes. Open and when it is cool enough to touch, empty the flour mix on to a wide plate or kneading surface.

2. Knead well for about 5 minutes without adding any more water till the dough comes together with a uniform super smooth surface and is no longer sticky. If it is pebbly, it needs more kneading or it was not mixed well with the water initially. You could wet hands and knead again if it needs only a tiny bit of water. If it is sticky, the proportions were not followed correctly. Any water or any flour added at this point will change the texture of the pathiri so the first step has to be done with care.

3.Make a log of the dough and cut of equal sized balls of about the size of a small lemon.
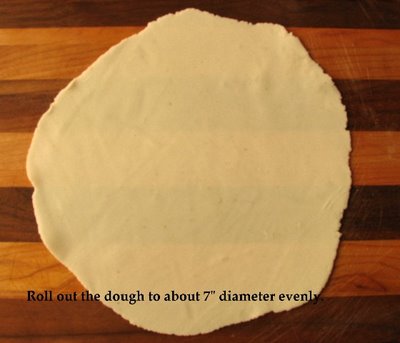
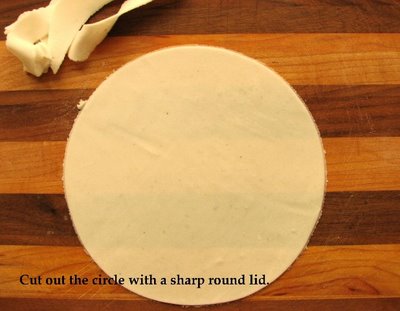
Roll it out evenly into very thin pathiris or tortillas. Sprinkle rice flour while rolling to prevent sticking taking care not to use too much. (Too much makes the pathiri hard.) Cut with a round cutter or a lid with sharp edges to make perfect rounds.

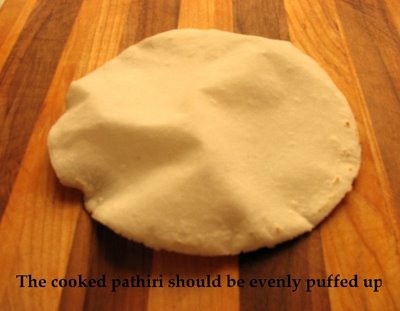
4. Heat up a tava/griddle, preferable a cast iron one, and when it is medium hot, place a pathiri on it. After a few seconds, turn it over. Repeat this once more. When you see the pathiri turning opaque, use the back of a spoon to spread the heat, without pressing down too hard. When it puffs up, remove it from the griddle.


5. Smear a tablespoon of coconut milk on each pathiri and keep covered. Alternately, each pathiri is dipped in coconut milk just before serving.

P.S.: The heat should be consistently medium hot to allow the layers to separate. If the heat is too low, it will either turn hard and if it is too high, it will brown without cooking the inner layers. Once the layers puff up, take it off the flame immediately.
Drain and serve hot.

November 14, 2006

Jeera Rice/Cumin Flavored Rice

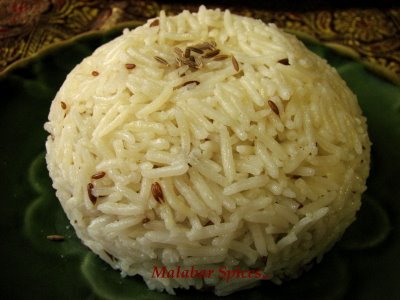
Jeera Rice
What do u make when you want an instant pulao or pilaf without the effort? Jeera rice! A weekday or weekend quickie pulao which goes so well with both meat curries and hot spicy curries made with Chole (Chickpeas), Rajma(Kidney beans)or the perennial favorite Ma ki Dal (Black Lentil Curry). My first meal here was jeera rice, rajma, green beans and chicken fry made by my sister in law. Whether it was the gratefulness of reaching home after a million hours on the plane or the familiar aroma of jeera rice, but after that I always look upon jeera rice with fond memories and still think of it as a wonderful combination.

I used to make it with ghee but realised over time that it is the cumin flavor that dominates and it tastes just as great when made with olive oil, so I switched. I add a few pieces of whole pepper which irks some in the family but gets me positive points with my pepper loving better half, so omit it if you don't like peppers exploding in your mouth.

I used the name Kali Jeera rice casually as I have it in my pantry and set off a trail of confusion. The cumin used is still regular whole cumin or jeera seeds. Kali jeera rice is a small grain aromatic rice from the NE India which looks like a smaller version of basmati. I just got tired of the super long basmati and this seemed closer in texture to the Calicut style Ghee(Neichoru) rice which I believe is called the Kaima rice.

It is tiny (almost half the size of basmati)and when boiled as regular rice, is very soft and easy to gobble up. I came across this rice at Subji Mandi recently and just decided to try it out. My imported stock of Kaima rice is over so I am looking for a substitute. The above photo is of jeera rice with basmati though.

You will need:
Basmati or Kali Jeera Rice - 2 cups or 500 gm
Cloves(Karambu) -3
Cumin(Jeera)-2 1/2 tsp
Bay leaf-1
Whole Pepper(optional)- 5-6
Ghee/Olive oil – 2 tbsp
Water- double the quantity of rice.;4 cups.
Salt to taste

Preparation:
1. Clean, wash and drain the rice. Let it soak for about 10 minutes.
2. Heat the ghee/oil in a heavy sauté pan and add the cumin seeds and whole spices.
3. When the cumin seeds sizzle, add the wet rice without water and fry till the rice turns opaque, stirring all the time.
4. Bring water to a boil simultaneously and add it to the rice. Add salt as needed. Let the whole mixture come to a boil .Then cover and lower the heat to a simmer.
5. Cook for about 10 minutes on low heat and check if all the water is absorbed from the surface. When you see no water on the surface and there is still water inside, turn off the heat and keep the pan covered for another 5-10 minutes. The rice will continue cooking and will separate each grain out.
6. Fluff the rice gently and serve with any curry.

November 10, 2006

WHB-Karakka Achaar/ Carrot-Date Pickle

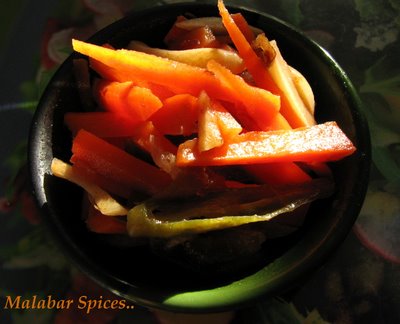
Carrot Pickle

Before I started accepting dates as a fruit, I used to eat it with gusto in pickle form. My mom always kept a bottle of home made dates (Karakka) pickle. Karakka achaar is a staple in the Malabar households. No Biryani or Neichoru is complete without it. Either they make it at home or get it from the Bombay Hotel near the beach in Calicut. The Bombay hotel sells their delicious pickle which is more sweet than spicy which goes so well with their awesome Biryani. Now I am homesick!

The other pickle I was very fond of was made by my friend Ki while we were at college. A simple carrot pickle with garlic and green chilies and ginger all cut up into slivers. I wonder if that would count as our vegetable intake while surviving on the hostel food (cafeteria). She made it and got it after every trip back from home and it used to last for a week with all of us preying on it. Unlike all our mom based food memories while at college, this was my Ki-based memory. At that time, I was amazed that she could make a pickle while I didn't even know how to make a tea.

I tried a lot of times to recreate it but it didn’t have the same zing. And over time, my taste for the date pickle and carrot pickle got muddled up. So now when I got the recipe from her, it was amusing to see that she has also started adding dates also to it. Yippee! Thanks Ki! So here is her recipe for the carrot pickle to which I have added dates. You could make with the dates or without. If making without the dates, add one more carrot to offset the spice powders.

You will need:
Whole Carrots -2 or 3
Ginger -1" piece
Garlic - 6 or 7
Green chilies- 5 or6
Fresh Dates- about 7-10 (increase or decrease as per sweetness)

Red Chili Powder- 2 tbsp
Turmeric Powder- 1tsp
Salt- 2 tbsp (Add after tasting)
Vinegar- 1 cup

Preparation:
Peel the skin from the carrot .Cut the carrots and ginger into even thin (about 1” long) pieces. Add some salt and turmeric to it and keep aside for 1/2 hour or so. Then gently squeeze out the excess moisture from the carrots by hand. Alternately, dry the cut vegetables in the sun for a couple of hours. This will get rid of the excess moisture which makes the pickle spoil fast.

Wash all the ingredients and dry very well. Remove the seeds from the dates and cut each date into 6-8 pieces lengthwise .Slice garlic and chilies also into thin long slivers. Mix them in a non reactive glass bowl and add vinegar and red chili powder. Add the carrots and check seasoning. Add more salt if needed. Keep refrigerated. The pickle is edible after 3-4 days but the dates start breaking down and sweetening it only after a week or so. The pickle gets better with age. You could add dried cranberries or raisins to it also.

This is a good spicy sweet relish to be enjoyed with any rice main course, naans and maybe even in other combinations. So I am sending some of this to my friend Meeta Of What's For Lunch,Honey? who is guest hosting this week's Weekend Herb Blogging. Weekend Herb Blogging was started by Kalyn of Kalyn's Kitchen to showcase recipes involving fruits or vegetables or herbs from different regions and now is hosted by enterprising bloggers each week.

,, ,

November 07, 2006

Meen Porichathu/ Fish Fry

Fish Fry

Fish fry is an essential item on the menu anywhere in Kerala. The fish varies, the marinade varies, but a noon meal (oonu) is not a meal without it. The hotels stick to the economical big fish but there is a variety of small fish freshly caught and sold every day which makes every fish fry a different one. Now when I am standing in an Asian grocery store looking at the big, bigger and biggest fish spread out on ice, a pang of envy crosses my mind. But instead of dwelling on it, I decide to fry the familiar King fish and Pomfret(Neimeen and aakoli). The thick salmon, swordfish etc also takes well to the marinade but the thin fillets have to be fried with care.

Fresh fish fry may stink up your whole house but will definitely warm your heart and fill you up with marvellous memories of other fish fries, the tastes and tales back home. I grill fish often using the same marinade with a bit of oil added in but nothing can beat the crispness of a deep fried fish. It is considered to taste good with rice :)) but somehow, it tastes best by itself just as it is fried, before it cools down.

You will need:
Fish – 1lb or ½ kg ( Pomfret/King fish or any firm fish)cut into thin slices
This one is made with black pomfret/pompano( Aakoli)
Red Chilli Powder - 4 heaped tsp More or less as per spice level
Turmeric Powder -1 1/2 tsp
Garlic powder – 1 tsp
Lemon Juice-1 tsp, 2 tbsp for rinsing.
Ginger powder-1/2 tsp
Curry Leaves -4 (optional)
Salt,- 3/4 tsp or to taste
Canola Oil- about ½ cup as needed for frying.
Preparation:
Clean the fish properly. Toss with about 2 tbsp of the lemon juice, rinse and pat dry with paper towels or drain completely.
Make a fine paste of the spice powders and curry leaves, mixed with 1 tsp lemon juice and salt. Add few teaspoons of water if needed to make a thick paste. At this point, taste the marinade (relax, it is not yet fishy) and add more seasoning if needed.
Marinate the fish evenly with this paste. This is best done by hand, to allow the marinade to penetrate into the fish.
Keep aside for at least half an hour. Heat the oil in a shallow thick bottom sauté pan and slide in the fish pieces one by one. Don't drop the fish in from the top. Deep fry (in that case,add more oil) or shallow fry on medium heat as preferred. Flip the fish pieces only after 3-4 minutes to prevent it from cracking and splattering.
The total frying time should take anywhere between 5 to 15 minutes depending on how big the fish pieces are and how crisp (well done) you would like it to be. I like it pretty crisp whereas my sibling needs to get it just right, not too rare, not too crisp, still soft and moist. So each to his own cooking time. The oil would stop crackling when it is almost done. Serve it with lime and onion slices.
P.S. One way to get rid of the fishy smell is to boil undiluted vinegar. Then dip a small kitchen towel in it, wring out excess vinegar and walk around the house waving it.(Muttering or chanting "go away fish smell,come back another day"):)It absorbs the smell. Then just aerate the kitchen for some time. It does provide entertainment for my little one.
, , ,

November 04, 2006

Stuffed Baby Eggplant

Stuffed Eggplant
This is a easy yet luxurious dish my Egyptian friend introduced me to. She brings this or stuffed peppers for lunch and has got me hooked on it. The stuffed peppers has rice also in it, but this is traditionally made with only ground lamb. Unlike typical Arab recipes, the ones she brings is a little spicy (she can outeat any chili afficianado) and so my recipe also called for more spice.
I also found a similar recipe in the Tyler's Cookbook I was discussing earlier. Again, since I had already tasted the authentic version, I was able to compare the recipes. The only change I made is to add paprika and Allspice powder. His version was quite accurate. Allspice berries are small dark brown hard berries which taste like a mix of all the spices together.. it has a sweetness, a sharpness and a woodsy taste too. I think the flavors would be fine without it as there is garlic, tomatoes and onions all merging together, but it balances the taste of meat. Substitute with a pinch of garam masala to add an Indian flavor to this old Arab favorite. The filling can be made with meat or without meat. Further stuffing options are listed below.

Cooking time:20 mins, Baking time-25 minutes.
You will need:
Eggplant- 3
Ground Meat (lamb/beef/turkey/chicken)-1/4 lb
Onions -1 small one chopped
Shallots-3-4 chopped
Garlic -3 cloves minced
Ground Allspice- ½ tsp
Paprika-1/2 tsp
Pepper-1/4 tsp
Green chilies-2 chopped finely
Tomatoes -2 peeled, seeded, diced
Lemon juice -1 tsp
Fresh Parsley- 1 cup chopped
Fresh Mint-1 tbsp chopped
Lemon- 1 sliced paper thin.
Salt to taste
Olive oil-3 tbsp

Preparation:
1. Preheat oven to 350 degrees. Cut the eggplant into two vertical halves. Heat 1-2 tbsp oil in a non stick pan and fry the eggplant on all sides for a minute or two and remove onto paper towels. The skin has to just get seared, and the insides do not have to get cooked. After it slightly cools, scoop out the inner flesh from eggplants with a spoon, talking care not to go too much close to the skin. An even layer of the eggplant should be retained inside each shell. Cut the scooped flesh into chunks and reserve. The eggplant is still uncooked so will not scoop out easily. Do it carefully.
2. Sprinkle inside of eggplant shells evenly with salt. Place upside down on paper towels; let stand 15 minutes.
3. Meanwhile, heat the pan again with the remaining oil. Cook garlic and onion over medium-high heat until browned, about 5 minutes. Add the ground meat and stir till it gets broken up evenly, about 5 minutes. Then add the tomatoes, green chilies reserved eggplant flesh, paprika, pepper, and allspice. Cook over medium heat, stirring frequently, until eggplant is just tender, about another 5-10 minutes. Season the filling mix with salt and stir in parsley and lemon juice. Remove from heat and let it cool down.
4. Pat eggplant shells dry with paper towels. Spoon about 1 tbsp of the eggplant mixture loosely into shells. Spray a large shallow baking dish with cooking spray. Place the eggplant, cut side up, into the baking dish in one layer. Top each eggplant with the thinly sliced lemon. Drizzle a tiny amount of olive oil on each eggplant. Bake for about 25-35 minutes until eggplant is fully tender. Remove from oven, cool to room temperature, sprinkle parsley and serve.

Other Possible Stuffings:
a. Above filling mixed with cooked rice and toasted pine nuts.
b. Cottage cheese(paneer)sauted as above instead of meat.
c. Just the eggplant-tomato mix itself, omitting the meat.
d. Mushrooms cooked with tomatoes and topped with grated cheese.
, , , ,

November 03, 2006

Gobi Chole/ Curried Cauliflower with Chickpeas


When I see an Indian recipe in an American Cookbook, I am curious. How did they present it? What recipe is it? Is it authentic? Is it misrepresenting my mainland? So naturally, I was intrigued to find a recipe for an Indian curry powder and corresponding vegetable stir fry in Tyler Florence’s new cookbook, Eat This Book, Cooking with Global flavors. It was presented very simply, along with the other easy to make everyday recipes from global cuisines. It used ready ingredients, like canned chickpeas and a previously prepared curry powder. It had even streamlined our multi step process into a simple skillet meal, which even novices could make with flair.

As an experiment, I tried it at home with all the skepticism of a food snob but couldn’t stop myself from changing certain items. The final taste was quite accurate and the preparation was easy. The best part was that it managed to give some flavor to the cauliflower.
The curry powder is a concept used mostly outside of India, popularized by the English. It is a generic name for the broad based blend of spices used in Indian cooking. But the different regions of India have differing cuisines and consider their spice mixes unique and individualistic. To classify all the spice mixes together as a “curry” mix is akin to making a mash (kichdi)out of the various flavors!

So when I analyzed Tyler’s curry mix, it called for ground mustard seeds which I omitted as I don’t recall chickpeas (chole) having ground mustard seeds. I also replaced his ready mix with my own garam masala and chili powders. I had to increase the chili powder to bring up the level of spice to offset the sweetness of the tomatoes. So I didn't end up making it with a curry powder as he suggested but here is my version with the spices.

I added raw scallions as garnish to add a bite just as the dhabhas in Delhi top the chickpeas with raw cut onions, green chilies and tomatoes. Feel free to skip the scallions if you don’t like the taste of raw onions.

You will need: Serves 4-5 so half it the first time you try it.
Chickpeas- 1 small can washed and drained
Cauliflower- 1/2 small head cut into florets
Onion-1 small, finely chopped
Ginger -3/4 inch piece, julienned
Tomato-2 plum ripe ones
Tomato Paste-1 tbsp
Red chili powder-3/4 tsp
Coriander seeds-3/4 tsp( toasted and powdered)
Cumin seeds-1/2 tsp ( toasted and powdered)
Black Pepper-1/2 tsp
Turmeric-1/4 tsp
Garam Masala- 1 1/2 tsp
Coriander leaves-1/4 cup chopped
Scallions (green onions)-1 stalk chopped fine for garnish
Canola/vegetable Oil-3 tbsp
Salt-1/4 tsp (to taste)

Preparation:
Heat the oil in a deep skillet or cast iron wok over medium heat. Add the onions, ginger and sauté, stirring, for a few minutes to soften the onion. Then add the spice powders and sauté for a minute, and add the tomatoes. Cook till the tomatoes break down and soften, about 6 minutes. Stir in the tomato paste and 1 cup water to dissolve the paste. Gently fold in the cauliflower and chickpeas. Add the salt. Reduce the heat to medium low, cover and simmer until the cauliflower is cooked, about 15 minutes. Uncover and continue cooking until the sauce has thickened and coated the cauliflower and chickpeas.
Take it off the flame, add more salt if needed and add the coriander and scallion leaves.

P.S. I don't make and keep this ready as I believe its just as easy to use the different spices in the proportion described above.For those who have no reservations on curry powder, I have reproduced the curry powder below as he described it exactly.

Tyler’s Indian Curry powder mix (makes about ½ cup)
Red chili powder-1 tbsp
Coriander seeds-2 tbsp
Cumin seeds-1 tbsp
Fennel Seeds-1 tsp
Cloves-1/2 tsp
Mustard seeds-1/2 tsp
Cardamom seeds-1 tbsp
Black Peppercorns-1 tbsp
Turmeric-1 tsp
In a skillet, combine all the whole spices except the turmeric and toast over medium heat till the spices smell fragrant. Shake the pan often to prevent the spices from getting burnt. Let it cool and then powder in a clean coffee grinder and add turmeric. Store in a sealed jar for up to 2 months.
I am sending some of this to Kalyn's Kitchen for this week's Weekend Herb Blogging.
, , , ,