July 29, 2006

Meat Cutlet (Beef/Mutton)

Cutlet is such a common snack in India that almost anybody would know how to make it. But beef and mutton cutlets are familiar sight only in Kerala given the largely vegetarian population of other places in India.
Unlike the vegetable cutlets, the meat version I am used to have no chili powder, cumin, coriander powder etc and allows the flavor come through naturally. The garam masala adds a smoky flavor which appeals to some, while others find it overpowering.
I started making cutlets in the early days of experimental cooking after marriage, having had a lot of experience in shaping and frying them well. But getting the texture correct and not having them fall apart on me while frying took a lot of experience.

Most of the time, its the Potatoes that betray me.They would soak up so much water during boiling that the whole mix would become moist and break. The variety available here was also confusing.Red,Russet Idaho,White, Baking, Boiling...
Now, I stick to using Yukon gold, Russet Burbank or white round potatoes. They hold their shape while boiling and are hassle free if microwaved-baked.
This is my entry Revathi's FMR#7-Comfort Food..

You will need: (Makes 16 cutlets)
Lean Ground Beef or Mutton- 1/2 lb
White Potato-3 (Approx. 3 /4 lb)
Onions- 2 medium sized ones
Green chilies- 8
Turmeric- A pinch
Garlic- 2 cloves
Black pepper- 2 tsp
Biryani Masala/Garam masala- ½ tsp (optional)
Lemon juice- 2 tsp.
Salt to taste
Coriander leaves- 1 cup chopped finely
Canola Oil- ½ cup
Egg –1
Bread crumbs- 1 cup

Preparation:
1. Chop the onions, garlic and chilies finely and put in a shallow pan, without oil. Add the uncooked ground meat, turmeric, and mix .Let it cook for 10 to 15 minutes on high heat, uncovered. Stir to prevent any particles from sticking to the pan.
2. As the meat cooks, it lets out oil which in turns fries the onions. So there is no need to add oil. After 15mins, take the mixture off the flame and add the lemon juice, garam masala and pepper. Drain onto paper towels to remove excess oil.
3. Meanwhile, wash each of the potatoes, wipe them dry and cover with plastic wrap. Place them in the microwave and adjust the setting for the baked potatoes. All the potatoes can be cooked at the same time. Alternatively, the washed potatoes can be pressure cooked with ½ cup water for a single whistle.
4. Peel the potatoes and mash them with your hands/potato masher or the back of a spoon. There should be no lumps.
5. Add the meat mixture to the potato, and add the chopped coriander leaves and salt. Mix and taste and add more salt or lemon juice if needed.
6. Make lemon sized balls of the mixture and shape it into an oval or round shape.
Beat the egg (You can use just egg whites too) with a pinch of salt. Keep a plate with bread crumbs also ready.
7. Dip each oval ball into the egg and then into the bread crumbs. Give it a final shaping.
8. Heat oil in a pan and shallow fry the cutlets till brown on either side.

July 27, 2006

Cheera Thoran/ Spinach stir fry


A thoran is a stir fry but with much less oil, sometimes even steamed partially. Spinach is a regular side vegetable on our rice menu. Most of the time, I make the stir fry with the Spinach available locally. It is easy to make, yummy and highly nutritious too(ask Popeye). But the spinach has more water content than the Kerala spinach and the end result is a wet thoran, unlike the crispy cheera thoran.
When I started my vegetable garden, I was so thrilled to find a plant called the Malabar Spinach which I had to plant. As it grew, I realized, it is a climber variety which is supposed to mature in 55 days and is also called a slippery vegetable, not to be confused with cheera.
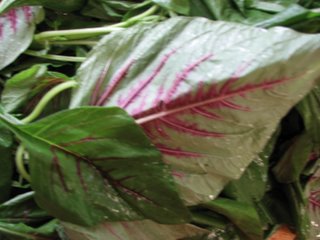
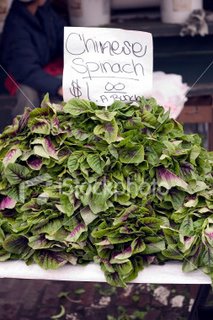
Once in a while, I find the red green spinach in Indian and Chinese grocery stores which is the closest approximation to the Kerala cheera in taste. It is called Chinese spinach/ edible amaranth ...thin green leaves with red veins and red color in the middle.


You will need:
I bunch of Chinese Spinach (cheera)
Shallots- 2 sliced
Green chilies- 4 or 5 chopped
Turmeric- ¼ tsp
Garlic- 2 cloves
Coconut- ½ cup.
Salt to taste (use sea salt preferably)
Oil- 1 tbsp


Preparation:
1. Soak the spinach in water for 5-10 minutes to get rid of the sand. Wash it well under running water. Let it drain thoroughly. Optional, mop up excess water with paper towels. Chop the spinach finely.
2. Pulse the coconut, chilies and garlic together without water in a dry grinder till it looks scrambled.
3. Heat the oil in a pan and add the shallots. Fry till it turns translucent and then add the spinach and turmeric. Keep the pan covered for a minute to wilt the spinach.
4. Make a well in the middle of the spinach and add the coconut mix and cover it with spinach. Let it cook uncovered on medium flame for 5-10 mins till all the water evaporates. Add salt and mix the coconut and spinach. Serve with rice.

July 25, 2006

Nadan Kozhi Curry/ Malabar Chicken Curry


This is the traditional chicken masala curry made on a regular basis in my mom’s house. She makes it when there are impromptu guests for breakfast with pathiris, or for dinner with neichoru or madikki pathiri.
For a long time, I had been adding variations to this recipe, but gradually gravitated away it, finally forgetting the original recipe. So it was a pleasure to get it back from my mom and start over again.
This chicken curry uses most of the whole spices locally available in Kerala, which in turn gives it its unique flavour, associated widely with Malabar curries. You could omit adding more water in the end to make it a Chicken Masala (Kozhi Varatiyathu).

Cooking time: 25 mins Preparation time is another 10 mins
You will need:
Chicken-2 lb, (750gm) cleaned and cut into small pieces.
Onions- 2.5 cups chopped (3 medium sized one)
Tomatoes-2 cup tomatoes (2 medium sized ones)
Green chilies - 6 chopped
Ginger–Garlic paste – 2 tbsp
Turmeric powder – 3/4 tsp
Red chili powder- 2 tsp (more or less as per taste..this will be spicy)
Coriander powder-3 tsp
Whole spices: 2”long Cinnamon stick, 4 cloves, 3 cardamom
Pepper- ¼ tsp (whole or crushed)
Leaves: Coriander, Mint, each a small handful, chopped
Salt - to taste
Oil-4 tbsp
Curry leaves – one sprig

Preparation Method
1. Wash the chicken and lightly toss it with lemon juice and rinse again. Drain well onto a slotted drainer.
2. Heat the oil in a large shallow pan, add the whole spices. Sauté till the fragrance fills the air and then add onions.
3. Fry onions till transparent and add chilies, ginger and garlic and stir well. Then add the tomatoes, all the spices and chicken and cook uncovered on low heat till water comes out. Do not add any water: it will prevent the spice powders from getting cooked. This will take between 10-15 minutes. Keep stirring to avoid the spices from getting stuck to the pan.
4. Add salt and the pepper. Check to see if the chicken is cooked. If there is no water, add ½ cup water and now cook it covered for five minutes to let the chicken cook well. Add ¾ water to make extra gravy and let it boil well. Add the leaves, leaving the coriander leaves for the last, after switching off the flame.

July 21, 2006

Sweet Kichdi

Ever since I saw the panorama of breakfast dishes in the Saffron Trail's roundup, I have been wondering what my favorite weekend breakfast is, besides toast omelet. Much as I like Idli –Dosa-Uthappam, I have been considering those as dinner items for a long time now. Nor can my sleepy stomach digest puttu/ pathiri with meat/fish curry - the traditional heavy breakfast of Calicut.
While on vacation, I do eat them but I just want to crawl back and sleep some more to get over the lethargy. Kichdi was the one recipe that leapt to mind, light and sweet, my comfort food from a long time ago.

Now, Kichdi or “Kichuri” is easily recognized as a rice and lentils cooked together to a mish mash. It is also used colloquially to mean a "mess". The more familiar kichdi is the salty/spicy version of it, either cooked bland enough for a baby or a convalescent to digest it easliy or spiced up to be defined as an Indian masala rice.
My friend once made a spicy version with whole green gram lentil and lots of green chilies and garlic. The taste of that kichdi still lingers on.
I am sure everyone has their favorite recipe of the kichdi and it would be interesting to learn about them. If you want to know more about them, try these interesting posts on "kichdi" and Masala kichdi

The Malabar version of the kichdi is a sweet one. It is still rice and lentils cooked together but flavored with coconut milk, ghee and sugar. We do add a tempering (tadka) of shallots but it is entirely optional. The small onions (don't try to replace it with large onions) adds a hint of spice to the kichdi, to balance the sweetness. The shallots is a trademark of the Malabar food, added to most desserts (payasams) and drinks.
This is my entry for the Saffron Trail's Breakfast Blogging.
Rice and Lentils cooked yet seperated...

Served hot with sugar...


You will need

Split Green gram lentil ( Moong Dal) -200gm
Raw Rice (Basmati or long grain) - 150 gm
Small onion (shallots)- 1chopped finely.
Ghee-1 tsp
Salt -a pinch.
Grated Coconut - Approx.1 cup (frozen)

1. Grind coconut with 3/4 cup water and extract 1 cup thick coconut milk. Or 1/2 cup milk from coconut milk powder added to 1/2 cup plain milk will do. Using just the coconut powder milk has a cloying aftertaste not associated with fresh extracted milk.
2. Wash rice and lentils together and add salt and double quantity of water. Cook it together in a pressure cooker for just one whistle and switch it off. Alternately you could cook it in a rice cooker or on open flame with sufficient water.
3. Open cooker and on low flame, add the coconut milk and stir well. let it blend together for a minute and take it off the flame. The kichdi should be moist and not too thick.
4. Heat the ghee and fry the chopped shallots till brown. Add it to the kichdi.
5. Serve hot in a bowl, topped with 1/2 tsp ghee/butter and lots of sugar to taste.

July 16, 2006

Simple Meals

My sis-in law and her young family recently moved to Australia after a comfortable hiatus in India. Now, minus the nanny, the cook and the whole bandwagon, she has to join the ranks of us juggling multiple roles.
Though she used to cook earlier, she is out of touch with the logistics of preparing simple meals. So she asked me to compile a list of simple beginner recipes keeping in mind the lack of easy availability of Indian products and produce. I intended to spend time sifting thru the blogs to compile a list, but thought it would be more authentic if each of you contributes what you would consider to be your simplest recipe.
It doesn't have to everyday per se, just simple enough not daunt the new cook.
Do I call this a meme? If so, I am tagging you all for the theme.You could contribute a new recipe or a combination of your exisitng posts. Carry it on.
Sailu, Nabeela, Annita, LG, My Workshop ,Sumitha ,Spicyana, Aparna of Bhakshanam,Immigrant recipes,Indianadoc

July 15, 2006

Spicy Grilled FIsh/ Chutta meen


My first contribution to the simple series is a grilled fish. Marinated in a spicy blend of green chilies, parley, garlic, lemon juice and salt.

You will need:
Fish – 1 lb or 4 pieces. Any fish fillet or steak pieces (Tilapia/ Tuna/ Catfish/ Swordfish)
Garlic - 5 cloves.
Green chilies – 14 small ones (use less for less heat)
Lime juice- 4 tbsp
Olive oil – 5 tbsp
Sea salt – to taste
Parsley/ Coriander leaves – 1 bunch (enough to make 1 cup after grinding)

Preparation:
1. Wash the fish and keep aside. You don’t need to wash it if it is fillets.
2. Grind all the ingredients together with oil and lime juice. Don’t add water unless it is too dry. It should be smooth with a chutney-like consistency. Taste and add more salt /lemon juice as suited to your palate.
3. Marinate the fish pieces in this blend for an hour or more in the refrigerator.
4. Preheat grill to 350 F. Or use the broiler in the cooking range.
5. Use foil or a nonstick tray on the grill. Spray/ brush a layer of oil on it and lay the fish fillets gently.
6. Grill on each side for 5 minutes or so. Turn over and sear the other side. The cooking time varies with the fish. The tuna steaks took about 8 minutes on either side.
7. Serve with a wedge of lemon and some mint chutney on the side.

July 13, 2006

Mumbai Moving...

Mumbaikers have been going through a rough patch with the floods first and now the attacks.Lets hope they find the strength to deal with this.For those who want to help or get information, go to..Mumbai help

July 09, 2006

Kozhi Nirachathu/ Stuffed chicken

Those who have visited Calicut or are from there know that the town is known for its delicious food. So what do the Calicut wallahs make if they want to make something special?
They make stuffed goat, stuffed chicken, stuffed mussels, stuffed plantains, stuffed pies (Chattipathiri)and so on. The more elaborate the better. If it can be stuffed then why not? There is something primitive about a stuffed bird on the dining table with a crowd of people oohing and aahing around it. It turns conversation around to itself.

Over there, this is a must for any "salkaram" or parties felicitating the newly married couple. The newlyweds may not be able to eat (stuffed as they are with the attention), but the rest of us enjoy.
The modern evidence of this is visible everyday in Supermarkets and Price clubs where the rotisserie chicken rotates beckoningly. What about the thanksgiving turkey? How many of you have switched to roasting chicken from turkey and looked for a recipe which suits the spicy palate?
You could recreate the whole recipe or just bake or fry the chicken with the stuffing, depending on your taste. My sister-in-law was my creative consultant on this recipe with the gravy version. Thanks to her for the inputs.

You will need:
Chicken-1 small one (1 1/2 lb)
For the initial marinade:
Red chili powder- 2-3 teaspoon, or as per spice level
Turmeric- 1 teaspoon., Salt to taste

For the stuffing:
Egg -1 or 2
Onions - 1 medium sized ones,Green chilies- 4
Curry leaves- 1 sprig.
Coriander leaves- a handful, chopped
Ginger-garlic- Together 1 tsp
Coriander powder- 1 teaspoon
Turmeric- 1/4 tsp
Red chili powder- 1/4 tsp
Poppy seeds (Khus Khus) - 1/4 tsp
Cashew nuts- 6 chopped, Raisins- 10
Salt -1/4 tsp

For the gravy:
Onions - 2 medium sized ones, Green chilies- 5
Tomatoes- 2 medium ones. (Or 1/2 can tomato puree)
Curry leaves- 1 sprig.
Garlic paste- 11/2 tsp.
Ginger paste- 1 1/2 tsp
Lime juice- 1 tsp
Coriander leaves-a handful chopped
Curry leaves- a handful
Salt
Spices:
Coriander powder- 1 tsp
Turmeric- 1/4 tsp
Red chili powder- 2 tsp
Aniseed (saunf) - 1tsp
Garam masala (biryani masala) - 1/2 tsp
Salt -to taste, Oil - for frying

Preparation Method:

1. Clean the whole chicken both inside and outside. Rinse with a dash of lemon juice to remove unpleasant smells. Mix the chili powder, turmeric and salt and apply all over the chicken. Cover and set aside in the fridge for as much time as you have.
2. Prepare the stuffing. Boil the egg(s) till fully firm and peel. The number of eggs depends on how big the chicken is. Heat 2 tbsp oil and fry the curry leaves, onions, green chilies, ginger garlic till the onions start turning brown. Add more oil if needed to prevent the onions from sticking to the pan. Add all the remaining spices (for the stuffing only) and saute well till the spices start leaving off an aroma.The raisins, cashew nuts and poppy seeds are optional.It adds a sweetness to the stuffing. Mix the boiled egg into this mix and keep aside.

3. Stuff the above mix into the chicken.....First the egg, then the onions into the chicken's cavity, taking care not to over stuff. There should be no stuffing coming out. Now tie the chicken's legs and hands together with kitchen twine.

4. Heat 1/3 cup oil in a saute pan large enough to contain the whole chicken and gently put the chicken in it and stir. Fry on medium heat till the chicken is browned on all sides. Not fully fried, just lightly browned.
5. Now drain the chicken and prepare the gravy. If you are not a fan of caramelized onion gravy, you could skip the gravy altogether and continue cooking the chicken in the saute pan or wok. Keep it covered for 10 mins or more on each side till the chicken is fully cooked on the inside. Alternatively, after the initial frying, you could cover it well in an oven proof dish and bake it for 20 mins at 350 degrees.

6. Gravy/sauce:
Slice onions and chilies finely. Grind aniseed to a fine powder and mix with all the other spices. Heat oil, fry the onions and chilies and coriander leaves and curry leaves. When the onions start browning in 10 minutes or less, add the ginger garlic paste and stir well. Add the tomatoes as well and cook it on slow heat. When the tomatoes start breaking down, add the spices and fry gently till the whole mixture moves as one mass.
Add the salt and check taste. Pour the gravy into a baking bowl and add the chicken to this mix .Ensure that the chicken gets covered with the sauce. Cover and bake for 30 minutes. The onions should have caramelized into a sauce of dark uniform consistency. Wait till the chicken cools down. Remove the tie backs and carve.
,,

July 07, 2006

Maddikki Pathiri/ Kannuvecha Pathiri/ Malabar Roti

Madikki Pathiri or Kannuvecha pathiri is the mappila version of the chapathi or roti. The name comes from the multiple maddukku (folds) that gives it its distinct layers.The other rotis are called unnaka chappathi (meaning dry rotis), by my grandmother. She makes one the night before and has this for breakfast with leftover fish or beef curry.It actually tastes better the next day.

A word of warning: This recipe tastes authentic only when the pathiri is fried well. Don't try to make it without oil or ghee.
Sometimes you can add a bit more of whole wheat flour to the mix to vary the flavour. This goes well with almost any curry but I like it best with sugar.


You'll need:for 4 rotis
All purpose flour-2 cups,
Whole wheat flour- 1/2 cup (you could make it fully out of whole wheat flour too)
Salt-to taste

1. Add salt and water to the flour to make a dough. The dough should be hard like that for puris, else it would be difficult to roll it out.
2.Keep aside for 15 mins. Divide into even sized balls...about the size of a medium lemon.
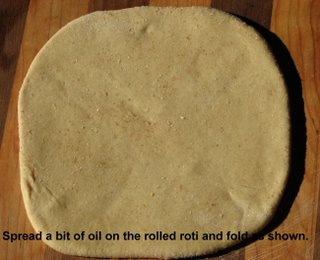
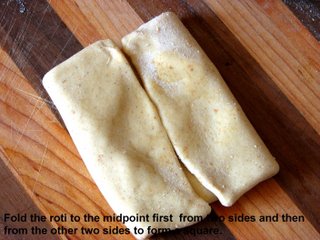
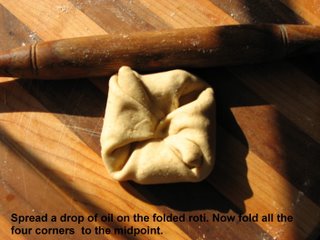
3. Roll it out thick and smear ghee or oil over it. Fold as shown in the pictures. Roll out into a 5" square.
4. Heat a griddle or saute pan and cook each side for a minute.As the raw color leaves the pathiri,add about 2tbsp oil or more to let each side fry well.
5. Turn over and fry the other side till golden flecks appear.
Drain and serve hot.