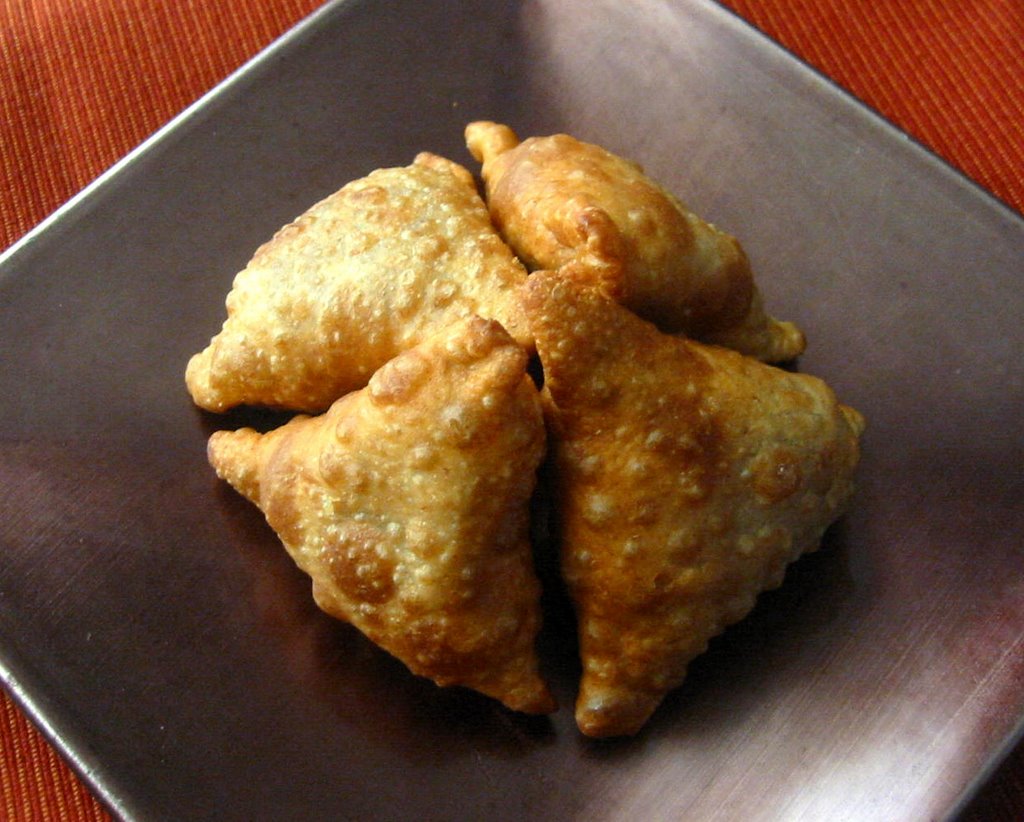
Malabaris do not usually make vegetable samosas. They make it only when they run out of meat.:) But seriously, there is a vegetable version which I like to call Ulli/Onion samosa since it mostly has onion content in it but it tastes so good. The origin of this samosas are probably the large scale caterers in Calicut. When you order samosas from a caterer, they add onions to reduce cost and increase the filling quantity. Over time, the onion proportion went up so much, that it became a type in itself.
Somehow potatoes were never added in the mix. (I do love the Punjabi potato samosas so much). These are much smaller than the giant potato samosas and the shell is more a crisp puri than layered pastry. I do not think it needs chutney with it but any chutney may complement it. You can eat quite a few at a sitting along with a good cup of tea. Try it,it is unusual but you may end up liking it.
For Vegetable Filling:For about 12 samosas
Onions – 4 large ones
Carrots- 2 long ones.
Peas- a handful (optional)
Ginger -1/2 inch long piece
Garlic -5 cloves
Green chilies- 6
Turmeric powder – 1/4 tsp
Roasted Coriander powder – 1 tbsp
Red chilli powder -1 tsp
Fennel powder -1/2 tsp
Salt to taste
Small green chilies -6
Curry leaves- A handful
Oil- 2-3 tbsp
Slice the onions and curry leaves very finely into long pieces. Chop the green chilies,ginger,garlic and carrots into small pieces. Saute everything together till the onions just get wilted. When it cools use for stuffing. Make the samosas and frt them as shown in the latter part of the Meat Samosa post.
Related Links:
Potato Samosas by Manpasand
Potato samosas by Coconut Chutney
September 30, 2006
September 29, 2006
Malabar Meat Samosas/ Meat Stuffed Savoury Pastries
Ramazan, our month of fasting started last weekend and that of course brought back memories of home. So this month, I am going recreate as many of the delicacies as I can in an effort to make my family and my extended blogosphere family enjoy the little known traditional food.
This is one of the Ramazan specialities, samosas filled with meat. It is made completely by hand but feel free to replace with ready wrappers or ground meat or even chicken. Ground meat changes the texture but tastes similar. Though if making with chicken, no need to pressure cook, just cook the boneless pieces in the spices and chop it up.
Back home, there is a vegetarian version of this samosa which I will post later today. It is made with just onion, carrots and green chilies, but tastes great. Also, the quantity of onions to meat is a personal preference. Increase or decrease as you like.
Forgive the quality of the photos, my camera is acting funny today. But I had to post so did it anyway.
For meat filling (makes about 24 samosas)
Boneless Beef/Mutton -1 lbs
Ginger -1 inch long piece
Garlic -5 cloves
Green chilies- 6
Turmeric powder – 1/4 tsp
Roasted Coriander powder – 1 1/2 tbsp
Red chilli powder -1 tsp
Black pepper powder – 1/2 tsp
Fenugreek seeds -1/2 tsp
Fennel powder -1/2 tsp
Mint, curry leaves, coriander leaves - A handful of each, washed and chopped
Salt to taste
For Sautéing:
Onions – 1 1/2 lb (5 medium ones)
Small green chilies -8
Curry leaves- A handful
Oil- 2-3 tbsp
Preparation:
1. Clean and cut the meat into small pieces. Grind ginger, green chilies and garlic into a paste. Mix everything with the meat, including the spice powders and leaves.
2. In a thick bottom sauté pan or pressure cooker, add the marinated meat and let it cook uncovered for 5 minutes. No need to add any oil at this stage. When the meat starts releasing its excess water, place the lid and let it cook for 3-4 minutes after the first whistling sound. Take it off the flame and open after the steam is fully released. If there is excess gravy, simmer uncovered for 5-10 minutes to evaporate it.
Slow cook the meat covered on low heat for almost 1hr if you do not have a pressure cooker.
3. Meanwhile, chop the onions, green chilies and curry leaves into very fine pieces.
When the meat cools down, chop that also. You could use a chopper for this.
4. Heat the oil, and sauté the cut onions, chilies and meat on medium high heat till it looks dry and slightly separated. Keep stirring to avoid the mix from sticking to the base. When the mix cools down, the filling is ready.
P.S.If onions were cut by the chopper, it becomes a bit moister so the frying time increases.
The wrapper for the Malabar Samosas are traditionally handmade and are not as crisp as those of the north indian potato samosas. Still, the same filling can be used with store bought samosa wrappers too. The traditional style is explained below.
For the wrapper dough:
1 1/2 cup wheat flour
3/4 cup all purpose flour
½ tsp salt and 2 tsp oil.
5. Make the dough the same way as for Triangular paratha. The dough should be hard but pliable else it would be difficult to roll it out. Cover with plastic wrap and keep aside for at least 15 minutes. Divide into even sized balls...about the size of a medium lemon.
6. Roll it out evenly till about 7-8 inch in diameter (Ah yes; now we need a measuring tape while cooking). Cut it into four quarters as shown.
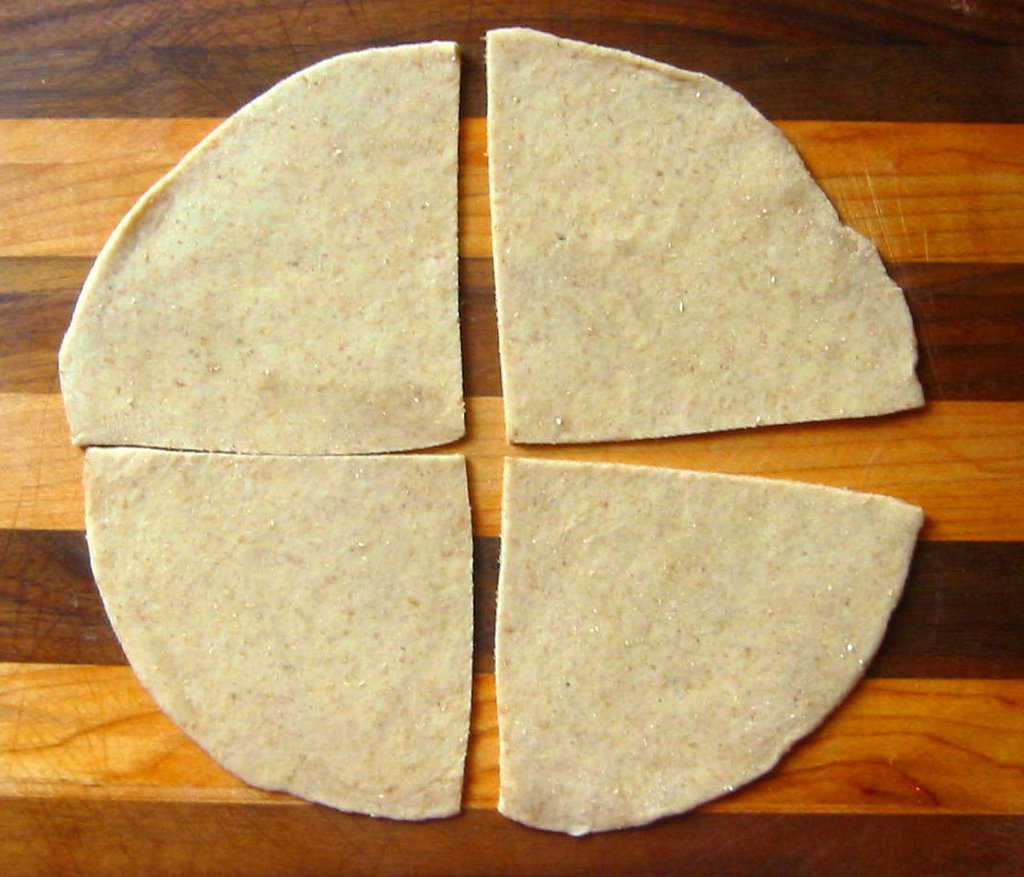
Disclaimer: The following steps are for the truly uninitiated and are prone to misinterpretation. Still I will try and explain as well as I can. If you already know how to do it, just go ahead and make the samosas.
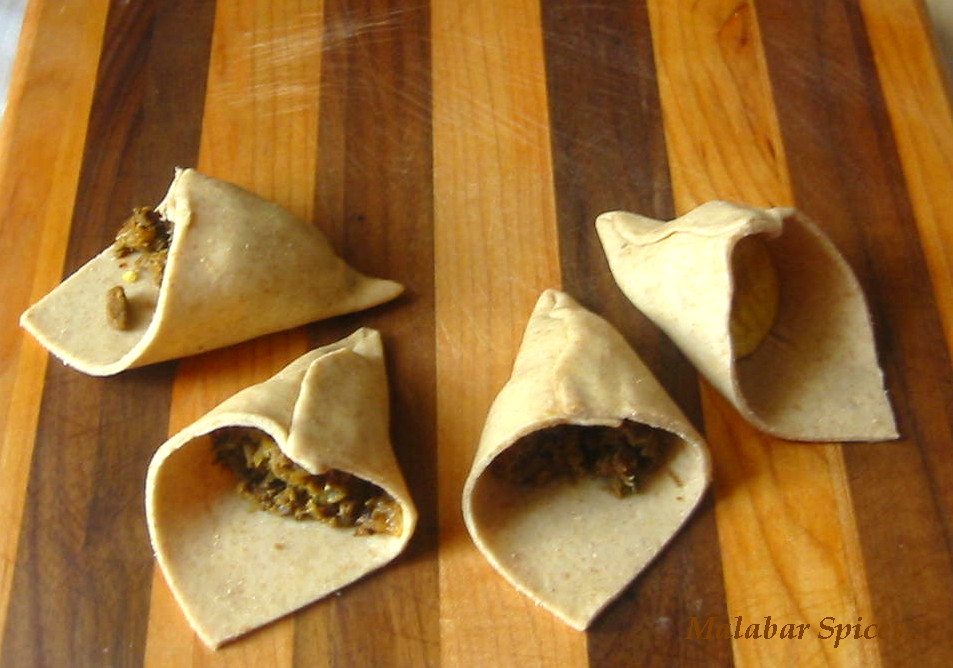
7. Take one quarter and revolve it along the curved edge till the two ends meet. Spread a drop of water along the edge and seal it to make a cone as shown. Now fill with 2 tsp of filling (or less). Wet the remaining flap and turn it over and seal over the cone. Now repeat and make more till you get tired. The filling can be kept in the refrigerator for 3-4 days.

8. Heat about 1 ½ cups of oil in a wok or deep frying pan. When it is quite hot, reduce the heat to medium. Slide 4-5 samosas one by one, taking care to plop it in. Fry it like a puri. Turn over once immediately, and fry for 2-3 minutes or less. Turn over and fry the other side till golden flecks appear. Drain and serve hot.

Meat Samosas, Malabar Recipes
September 27, 2006
Three Pepper Turkey Chili

Fall is slowly creeping in here, lurking in the cooler temperatures in the mornings, sending the sun skittering back home earlier every day. My garden is looking forlorn, with some plants yellowing and giving in to the frost, while some are holding on, but with fatigue in their branches. The last storm was the turning point. They got so damaged; I could taste it in my bland new crop of vegetables. Not long before I will have to pull them all out.
And I have started on my “hot food” fetish. Hot as in spicy and hot as in hot. I was craving chili, a taste acquired from my colleagues and now made at home too.
Chili/Chilli is essentially a spicy soupy stew of beans(sometimes), chilies and meat cooked together. An easy recipe for the meat lovers, it is full of protein and vitamins, and it varies in taste from region to region in southern US. There is even a vegetarian version of this with tofu substituting for meat.
My first brush with chili was with a lot of trepidation, thinking it is some overly spicy concoction. It was not spicy and I was surprised when I tasted Kidney Beans ( good old rajma). “Arre, this is our rajma curry with meat in it.” But it was not just Rajma. When Kidney beans are mixed with bell peppers and celery and tomatoes, they take on a different set of flavors.
As time went by, I tasted chilis of different types and mixes and realized that the ones served in the North East are not spicy but if you travel south, closer to its Mexican roots, it starts getting hotter and has less beans. The names they go by are as interesting as their recipes-2 Alarm Chili, Texas Two Finger Chili, and Four Dead in O-hi-O Chili, Male Chauvinist Chili, Heaven and Hell Chili.
My turkey chili is a take off from different chili recipes, tried and customized to include more veggies and flavor. This time I substituted turkey for the beef, in an effort to cut down on red meat intake. We could hardly make out the difference in taste. It has three peppers in it hence the name. :) Bell Peppers, Green Chilies Peppers and Dried Black Peppers.
You will need:
Ground Turkey/ Beef/Chicken-3/4 lb
Red Kidney beans-1 ½ cup cooked
Onion-1 ½ cup chopped finely
Carrots-1 cup chopped finely
Celery-1/2 cup chopped
Any Bell Pepper(Red/green/yellow/orange)- 1 cup chopped.
Green Chilies/Any hot chili-6-8 crushed
Garlic-6-8 crushed
Tomato-about 1lb(4 medium tomatoes)or 1 1/2 can stewed tomatoes.
Coriander/Cilantro leaves-1/2 cup chopped
Milk - 1/4 cup( optional)
Salt-1/2 tsp (to taste)
Seasoning:
1 tbsp. chili powder
1 tbsp paprika
1 tsp. ground cumin
1/2 tsp. ground oregano
1/2 tsp garlic salt
1/2 tsp black pepper
1/4 tsp thyme
1 dried chili pepper, crushed, seeds removed
Dry grind them all together.
Preparation:
If using dry kidney beans, soak overnight and cook in the pressure cooker for 5-10 minutes. Else, you can use canned kidney beans after rinsing it once. Add more or less kidney beans than specified depending on how meaty you like the chili to be. This is a good recipe for the crockpot for those who have it. Mix everything together, leave it cooking in the crockpot, go out and come back to a delicious chili.
Cook ground turkey or beef in a large pot, add onion, celery and stir until onions are transparent. No need for oil. The oil from the meat cooks and flavors the onions. Then add the rest of the ingredients except the milk and leaves, bring to a boil. Reduce heat to low, cover, and simmer 30 minutes. Open and add milk, coriander leaves and check seasoning. Top with some cheese and chopped cilantro/Coriander.
Serve with corn bread or rice or rotis/tortillas.
Spicy Chili Recipes, Turkey Chili, South Beach Recipes
September 25, 2006
GB-3/ Thakkali Mulakittathu/ Tomato Curry.
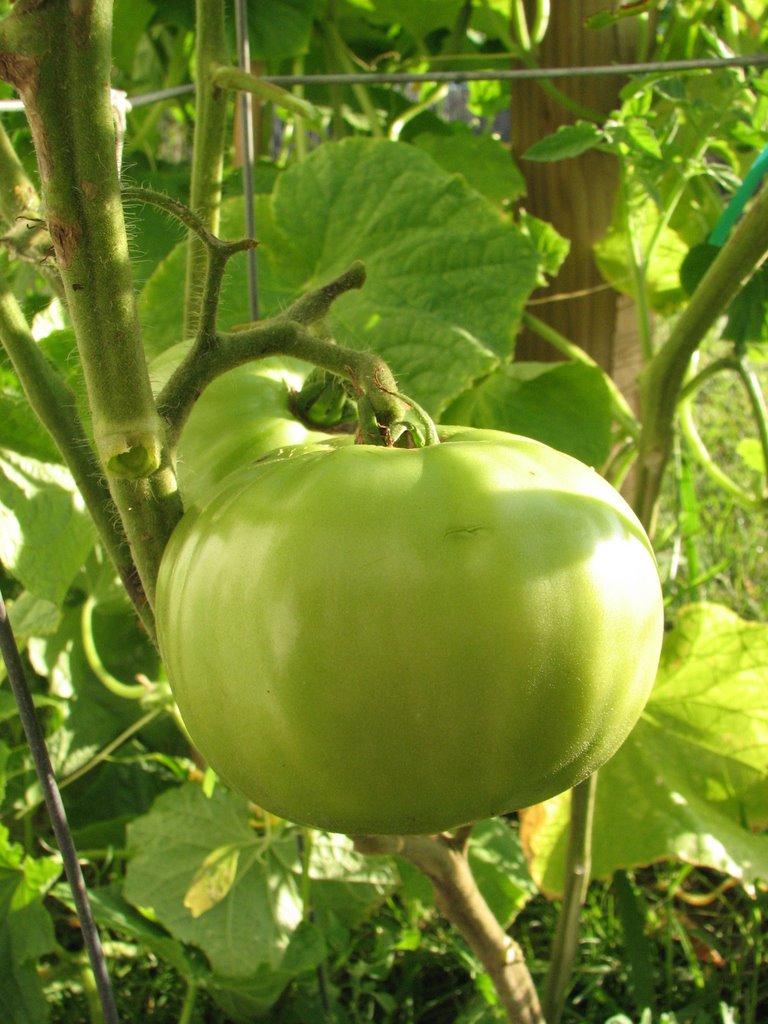
Last year, I had planted plum tomatoes and cherry tomatoes, and got so much, had to give them away. So this year, for a change I went for the biggest tomatoes I could find, literally called the Big Red or Beefsteak tomatoes. Each of this tomato is equal in quantity to 3-4 of the plum tomatoes. It is a deep red inside, criss cross in its cross section and very sweet and tomatoey in flavor. I watched impatiently as it took about a month for the tomatoes to ripen from the time they fruited, but it was well worth the wait. This summer I did not have to buy tomatoes.:)
This is my third entry for Ginger and Mango's growing collection of the Green Blog Project.

It tasted amazing when just sprinkled with sugar and eaten. One of my friends chops up a bunch of red tomatoes, adds a couple spoonfuls of sugar and lets them sit in the refrigerator for some time. Its tastes perfect on a hot summer day when the flavors merge. These tomatoes were used up initially in my mozzarella and basil (from my garden!)salads, but as it ripened, it demanded to be cooked. And when I cut one, it is so much, that I prefer to use it at one go.

I have used two recipes here. One is an easy everyday kind of tomato curry and the other is a garlicky chutney that can be stored for a long time in the refrigerator. Very similar to each other but the curry is a Malabar favorite whereas the chutney has other influences. My mother used to make this chutney and store it for weeks. We ate it with toast and cheese, with adai and dosa and with idlis. The garlic-tomato chutney recipe is explained below.
A version of this tomato curry (without the mustard seeds) is common as tomato fry served along with rotis/chappathis in some small restaurants.
For the Tomato Curry:
You will need:
Tomato- 5 cups (chopped).
Green Chilies/Any hot chili-4-5
Onion- 2 medium one, sliced(optional)
Ginger -1/2 inch piece
Garlic-4-5
Red chili powder-1 tsp
Turmeric-1/4 tsp
Coriander powder-1/2 to 1 tsp as per taste
Tamarind Extract- 1tbsp (If made from fresh tamarind)
Sugar-1tsp
Canola/vegetable Oil-3tbsp
Salt-1/2 tsp(to taste)
Fenugreek Seeds-1/2 tsp
Mustard Seeds- ½ tsp
Curry leaves-one sprig
Preparation:
1. Cut the tomatoes into small cubes and measure 3 cups and keep aside. Cut the green chilies, onion, ginger and garlic into tiny pieces. If using fresh tamarind, soak a small ball in warm water and extract the juice. If using the store bought tamarind, use very little as it is in concentrated form. How much tamarind to use depends on the sourness of the tomato.
2. Tempering: Heat the oil in a heavy bottom pan. After a minute, lower the heat and add the mustard seeds and cover till it finishes spluttering. Keep a safe distance if uncovered. Now add the fenugreek seeds and curry leaves. Make sure it does not burn as it will add a bitter taste if burnt. Then add the onions and saute till they turn transparent and start to brown at the edges. Add the green chilies, ginger garlic paste,saute and then add the turmeric, coriander and chili powder. Fry for a minute or two on medium heat and then add the tomatoes. Fry till they soften and then add 1 cup water. Cover and cook on low heat for about 5-10 minutes, till the tomatoes turn pulpy. Open and add the tamarind extract, sugar and further cook, stirring all the while. The whole mass should come together. Check the taste and add more sugar or spice if needed. Take it off the flame, and serve with roti or rice.
P.S. This tomato fry if allowed to cook longer on low heat, releases all its oil and becomes a thick chutney like consistency.
Tomato Curry,Malabar Recipes
Thakkali Chutney/Tomato-Garlic Chutney
My recipe calls for tomatoes and tamarind, but as my friend suggested, the tamarind can be replaced with vinegar. This may also reduce the quantity of oil for all those who worry about it. Try either way.
You will need:
Tomato- 2 lbs
Garlic-2 pods (14 big cloves)
Red chili powder-2 tsp
Tamarind Extract- 5tbsp (If made from fresh tamarind)
Sugar-1tsp
Canola/vegetable Oil-4tbsp
Salt-1/2 tsp(to taste)
Fenugreek Seeds-1/2 tsp
Mustard Seeds- ½ tsp
Curry leaves-one sprig
Preparation:
1. Cut the tomatoes into small cubes and measure 6 cups and keep aside. Cut the garlic into halves along its length. If using fresh tamarind, soak a small ball in warm water and extract the juice. If using the store bought tamarind, use very little as it is in concentrated form. How much tamarind to use depends on the sourness of the tomato. Dry roast the fenugreek seeds in a pan on low heat for a couple of minutes till its aroma rises and then powder the seeds and keep aside.
2. Heat all the oil in a heavy bottom pan. After a minute, lower the heat and add the mustard seeds and cover till it finishes spluttering. Now add the curry leaves. Then add the garlic, fry a bit and add tomatoes, tamarind extract and chili powder.
3. Cover and cook on low heat for about 5-10 minutes, till the tomatoes turn pulpy. Open and add sugar, salt and further cook, stirring all the while. The whole mass should come together and release all its oil.
4. Check the taste and add more sugar or spice if needed. If it looks dry,add more oil and let it fry on low heat. This oil acts as a preservative. If it is for immediate consumption, you don't need to add a lot of oil. Take it off the flame,add the fenugreek powder and let it cool. Only after it cools, store it in a bottle in refrigerator.
September 21, 2006
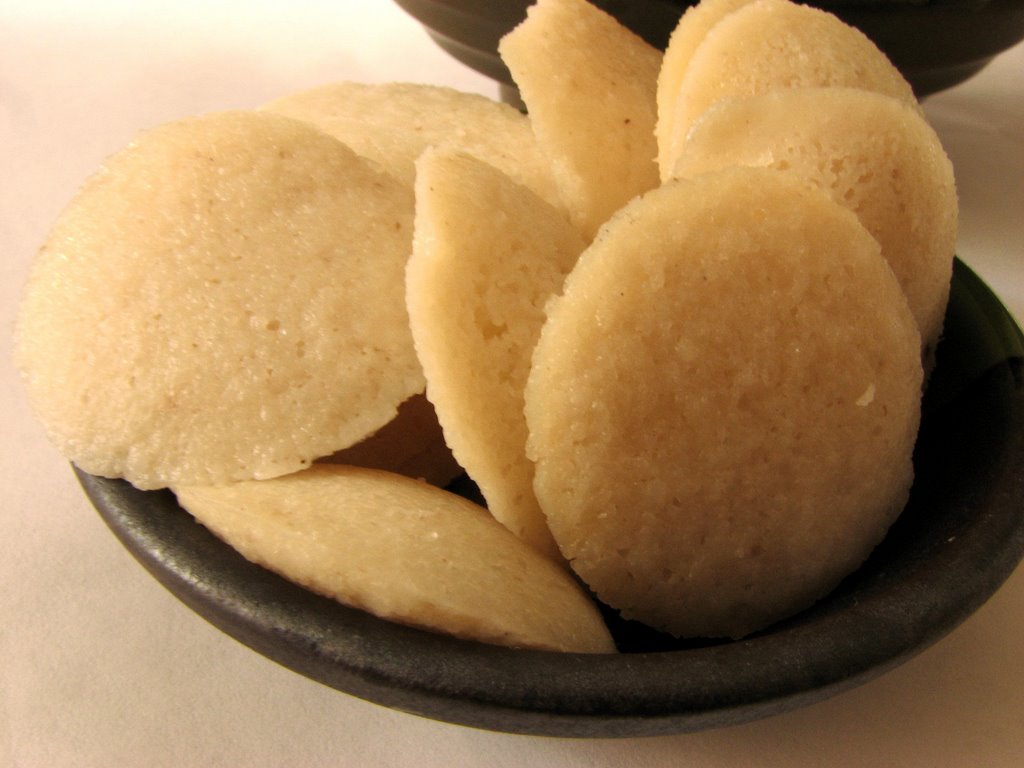
Micro Idli Vada/ Steamed Rice Dumplings in Yogurt
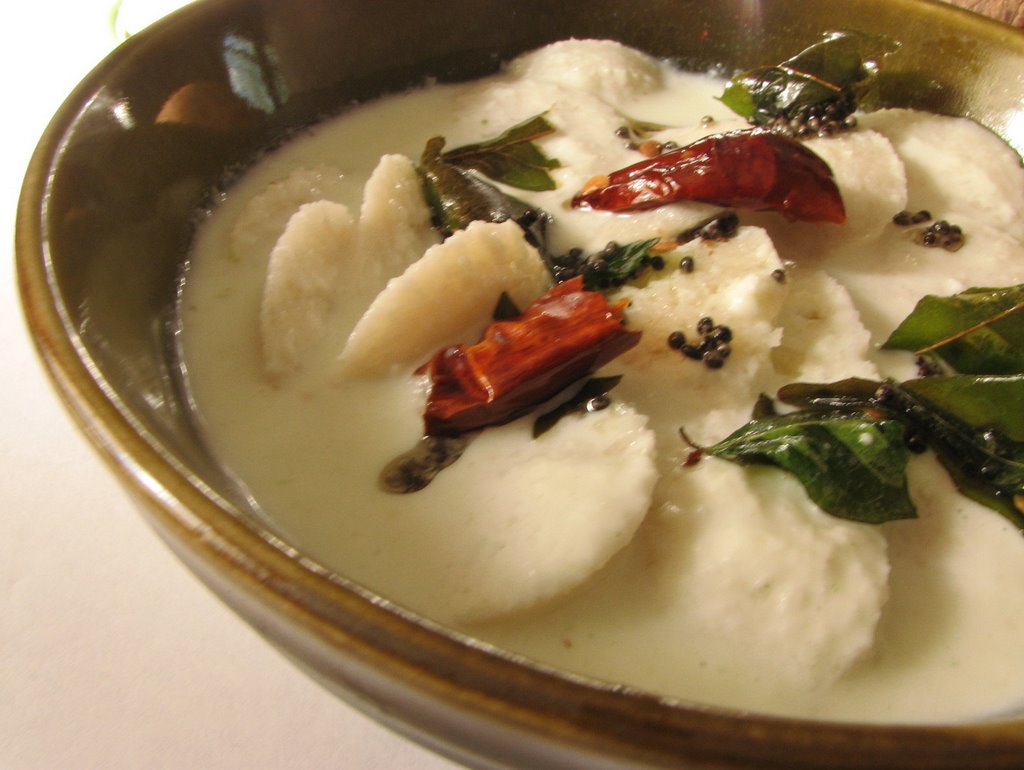
What do you call idlis that are just about the size of a coin? Is there a formal name for it? I was introduced to it by my mom-in-law during her last visit here. She made this as a light dinner. It ended up with me liking them so much I got the corresponding idli stand. I call it the micro idli. If anybody has a better name,lets have it.
The micro idli stand makes about 15 idlis per level. Barely a teaspoon of batter is poured into each idli so 10 of these idlis is equal to one ordinary idli.
This is a very delicious alternative to idli sambar and dahi/thair vada. No frying involved. Micro idlis or baby idlis are soaked in a coconut flavored yogurt and tempered with spices. You can eat quite a bit before you realise it. I make it as a light dinner, as an appetiser or as a snack. The ground green chilies and dry red chilies adds some heat to balance the mildness of the yogurt. Add chilies as per individual spice tolerance.
Ok, so now I got feedback that these are originally called Mini Idlis and Sambar Idlis and cocktail idlis. In Bangalore and probably Madras, they are served dipped in sambar. I wonder how they would taste with rasam. So should I change the name of my post? And thanks to all those who responded to my query. It was interesting to read all the stories associated with it.
These are not Rava Idlis. These are regular idlis but made in the small mould. So if anyone cannot find the Idli Rava in their Asian stores, use normal method to make idlis. One good Basic recipe is RP's Workshop's Idli recipe.
You will need:
For Idlis
Idli Rava(A kind of rice flour)- 1cup
Urad Dal- ½ cup
Salt-1 tsp
For the Yogurt Base:
Plain Cold Yoghurt- 2 cups
Water- 1cup
Coconut-1 cup
Green Chilies-5
Curry leaves-3
Ginger-1/4 inch piece
Salt-1/4 tsp(to taste)
For the seasoning:
Oil-1 tbsp
Mustard seeds-1/2 tsp
Curry leaves-one sprig
Red Whole chilies-2
Salt-1/4 tsp(to taste)
Preparation:
1. Idli: Wash and soak the urad dal for 4-5 hrs and grind well with water. Add the idli rava and enough water to blend it. Grind for some more time to make a smooth batter. Scrape into a large vessel and cover with aluminum foil. Pierce some holes in it with a fork to let the air escape. Keep in a warm place overnight to ferment. When it is well fermented, add salt and enough water to make it slightly pour able.
2. Grease the micro idli moulds and pour about ½ tsp of idli batter in each mould. It will rise when cooked so do not fill to the brim. Steam in a pressure cooker (without the weight) for 7-10 minutes. Remove and unfold into a large serving bowl.
3. Now the yogurt base: Grind the coconut, the green chilies, ginger and curry leaves with little water to a fine paste. Add the yogurt, water and blend well. Add salt as needed. Pour the yogurt sauce all over the micro idlis. Let it soak the sauce in. Add more yogurt mixed with water as needed.
4. Tempering: heat the oil in a heavy bottom pan. After a minute, lower the heat and add the mustard seeds and cover till it finishes spluttering. Keep a safe distance if uncovered. Now add the curry leaves, and red chilies. Pour over the idlis. Serve cold or at room temperature.
This tastes best when the idlis are freshly made. If planning to use the next day, keep the idlis and the sauce separately and mix heated idlis only when ready to eat. The idlis tend to get hard in the refrigerator.

Food, Mini Idli Vada, Idli, Snacks, Low Cal,South Indian
September 19, 2006
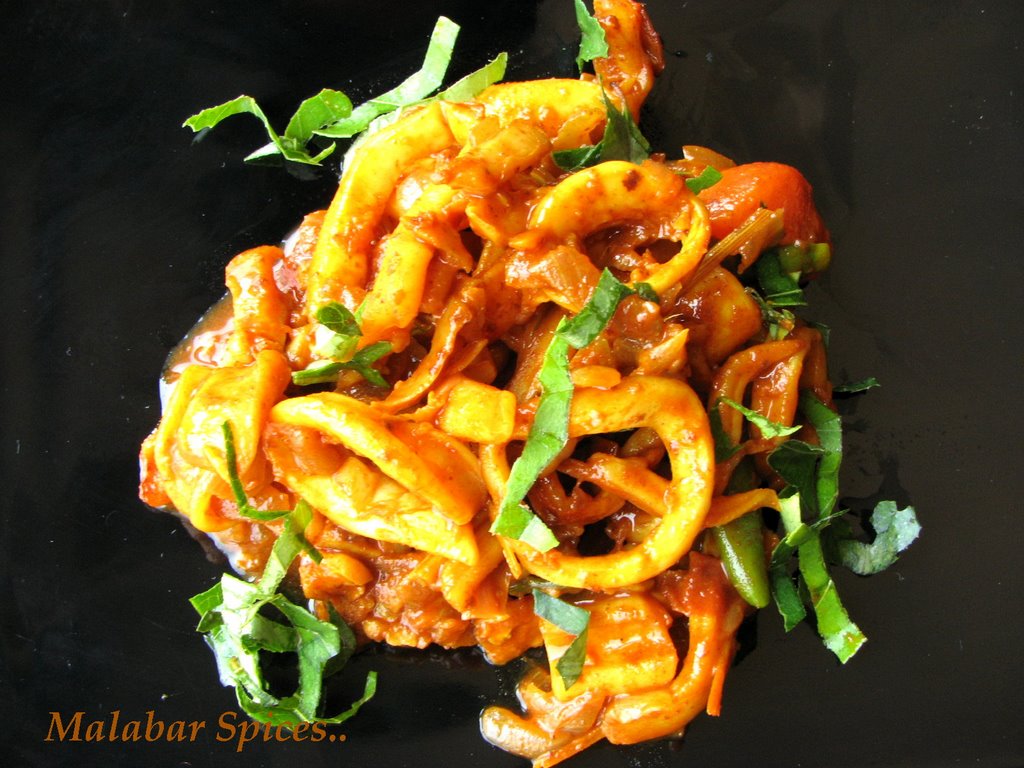
Calamari/Squid Stir fry
The first time my brother went home to Calicut on vacation, he raved about this Calamari fish to my parents. It didn’t sound like any fish we were used to eating. It sounded exotic, subtle and non fishy tasting. Since he could not find the native Malayalam name for it, he went to the fish market with my cousin in search of Calamari. When he brought home this ugly looking fish, it turned out to be a squid, an average fish lost in the endless variety of big and small fish available.
A squid is a mollusk related to the cuttlefish and octopus. It has ten tentacles, and like its cousin, the octopus, it also has a protective mechanism which releases a dark ink into the water when in danger.
There in Calicut, a coastal town, you get to buy it whole, ink and all and you have to clean it well to get rid of the inky flavor. Hence, not preferred as much as the cleaned Pomfret, Mackerel or King Fish. Here it is available fresh, cleaned and ready to cook. So I find it an easy alternative to making fish. The meat is firm and white with a mild, slightly sweet/bland taste and it takes on whatever flavors are added to it. Squid is also known as calamari, its Italian name.
The squid ranges from one inch in size up to eighty feet, but the most common size for eating is less than twelve inches. Although the tentacles are edible, the body is the prime section of meat which can be stuffed whole, cut into flat pieces, or sliced crosswise into perfect rings. Squid lends itself to just about every cooking method imaginable and is often eaten raw in sushi dishes. For those who only get to buy it whole, try this link on how to clean the squid.
Also, found our that it is called Kanava in malayalam.
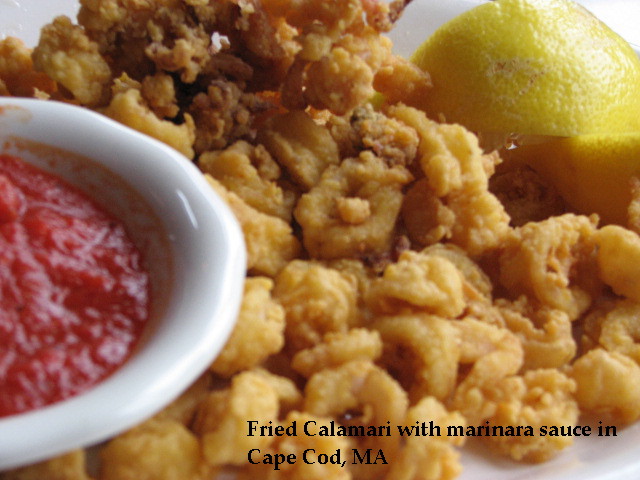 The most common way to eat Calamari is the breaded and fried way, with a spicy or tangy sauce which can be tomato based or cream based. We had our fill of the freshest Calamari in breaded form in Cape Cod, MA. But at home, we mostly make the spicy curry version to go with rotis. This is the way it is mostly made at home, but I added two ingredients. Lemon grass, gives the curry an added flavor and balances the spicy taste. Secondly, a bit of milk or cream is added to blend all the pieces into a sauce.
 You will need:
Calamari- 2 (about 6 inch long).
Onion-1
Shallots-5-6
Green Chilies/Any hot chili-4-5
Ginger -1/2 inch piece
Garlic-4-5
Tomato- half of a small tomato.
Red chili powder-3/4 tsp (depends on spice level)
Turmeric-1/4 tsp
Lemon grass- 2 inch piece
Coriander leaves-1/2 cup chopped
Curry leaves-one sprig chopped
Milk/ Cream- 1/4 cup
Canola/vegetable Oil-3tbsp
Salt-1/4 tsp(to taste)
Preparation:
1. Crush the lemon grass to release its juices. Substitute grated lemon rind or ½ tsp lemon juice. Grind the ginger, garlic and green chilies coarsely. Chop the onions and shallots finely.
2. Wash the calamari and cut it across its length into thin circles. Marinate with ½ the turmeric, chili powder and salt.
3. Heat the oil in a sauté pan and fry the shallots and onions. When it start turning a little brown, add the ginger garlic paste, lemon grass and the stir for a minute. Add the rest of the spices and one tablespoon of water to prevent it from burning. Fry for about 2-3 minutes on very low heat. Add more red chili powder if you like it spicy but make sure it is cooked before proceeding.
4. Add the calamari and stir fry for about two to four minutes. Add the chopped tomato and continue to stir. When the calamari and the spices come together as a mass, add the cream or milk (regular milk is fine) and let it simmer just once.
5. The calamari cooks really fast so do not cook for a long time after adding the calamari. If overcooked, the calamari will turn hard.
6. Take it off the flame, add more salt if needed and add the coriander and curry leaves.
Calamari,Squid, Low Cal,Stir Fry,South Indian,
September 17, 2006
Banana Nut Muffin

Almost everybody loves bananas, right? I like the variety of the tropical bananas in Kerala. The fat Poovan Pazham, the sweet and tiny Njavalipoovan, the mild tasting Mysore Pazham, the Robusta, the Plantains, the red ones from Trivandrum.
And here we get the Chiquita, the Dole, but all are primarily one category known as the Robusta. I do like bananas but only at a certain stage of ripeness.i.e. when they are still greenish yellow outside but have turned sweet inside.
So what do I do when the bananas turn ripe? Banana nut muffins are made at my house to use up the last 2 bananas which are very ripe inside but have started showing the spots outside. The muffins flavored with the bananas and the nuts, spiced up by the nutmeg and cinnamon is one of my favourite combinations. Omit the nuts if you want to. The muffins are good for a snack for my son, as a breakfast on the go, and perfect with the evening tea or coffee.
You will need: For 16 muffins
All Purpose Flour- 1 ½ cup
Sugar- ¾ cup powdered (Can be reduced as per sweet level)
Maple Syrup/Honey-4 tbsp
Milk- ¾ cup
Butter-2tbsp at room temperature.
Canola/vegetable Oil-3tbsp
Baking powder-1 tbsp
Cinnamon-1tsp
Salt-1/4 tsp
Nutmeg-1/4 tsp
Egg-1
Bananas -1-2 ripe ones mashed.
Walnuts/Almonds- ¾ cup crushed coarsely or chopped
Preparation:
1. Preheat oven to 350 F. Fit 12 muffin cups with paper liner. Coat each with cooking spray. Sift the flour with the baking powder, cinnamon, salt and nutmeg.
2. Combine melted butter, oil and powdered sugar in a blender till extremely smooth. It should not be grainy at all. If doing by hand, blend well. Break the whole egg in the blender too and pulse till mixed. Scrape the contents into a mixing bowl and add the flour gently, folding it in a little at a time. When it is all mixed, add the maple syrup, bananas and nuts. Fold until just blended.
3. With an ice cream scoop, portion the batter into the muffin cups, dividing evenly. Sprinkle raisins/cranberries and a couple of nuts on each mound of batter.
4. Bake for 20-25 minutes or until a wooden toothpick inserted into the muffin comes out clean and dry. The last five minutes of cooking are crucial to prevent over browning, so keep an eye on it. Cool for a minute and then remove from the muffin pan. The muffins can be kept with the paper cups attached.
This is my entry for 'Weekend Breakfast Blogging' hosted by Saffron Trail.
September 14, 2006
Black Rice Payasam/Kheer

I first came across the black sticky rice dessert at a Thai/Malaysian restaurant and was intrigued by the lilac color. The desset was a rice pudding/kheer/payasam flavored with coconut milk. When raw, Black rice appears black and rounded, medium grain. Upon cooking, its colour changes to a deep purple and it is a non-glutinous rice.
It has a relatively high mineral content (including iron)and, like most rice, supplies several important amino acids. Black or purple rice is unmilled, leaving a dark husk in place, which colors the grains when it cooks.The husk leaves a chewy bite to the dessert. As it is unhulled, black and purple varieties of rice are classified as brown rice too. So payasam can be healthy too, I guess. Yum.
I bought the rice at an Asian Supermarket and used it instead of our regular rice for rice pudding(payasam). Cooked it with water first and then with milk and condensed milk and it came out a beautiful lilac color, with a nutty chewy taste. The only drawback is that it has a longer cooking time so cooking it on gas is a long process. It has been suggested to soak it overnight to spped up the cooking. It has not yet been tried as a rice dish but since we like the wild rice, my guess is that it would taste similar.
You will need:
Black Rice- 1/4 cup
Milk - 4 cups
Condensed Milk- 1/2 tin (more or less depending on your sweet tooth)
Preparation:
1. Soak rice overnight. Boil rice in plenty of water till half done. Better still, add 1 cup water and pressure cook till one whistle comes, and then cook for 5 mins on very low heat. Drain excess water and keep aside.
2. Heat milk, bring to a boil, add the rice and let it cook on low heat till the rice is fully smashed. This may take anywhere between 10-20 minutes. After it is cooked, add condensed milk and let it simmer for 10 minutes.
The more the rice is cooked before adding the milk, the better. I pressure cook the rice even after adding the milk but it gets messy.
Serve hot or cold.
I am sending this to Anthony's Kitchen increasingly popular Curry Mela.
Black Rice Desserts,Payasam,
September 11, 2006
An Egocentric Meme..
I was: tagged By Annita.. Thanks
I am from: Of course, Malabar-Calicut.
I am thinking about: where to go in the winter.
I said: suck in your tummy.
I want to: go to Venice
I wish: Calicut was in US
I regret: losing my temper.
I hear: the phone ringing.
I am: so i am.
I dance: with my son.
I sing: when i hear a song.
I cry: when i am angry.
I am not: good at sports.
I write: foodie posts,emails,poems,lists......
I confuse: faces and names.
I need: more hours in a day.
I tag: Shilpa,Priya, Manpasand
September 10, 2006
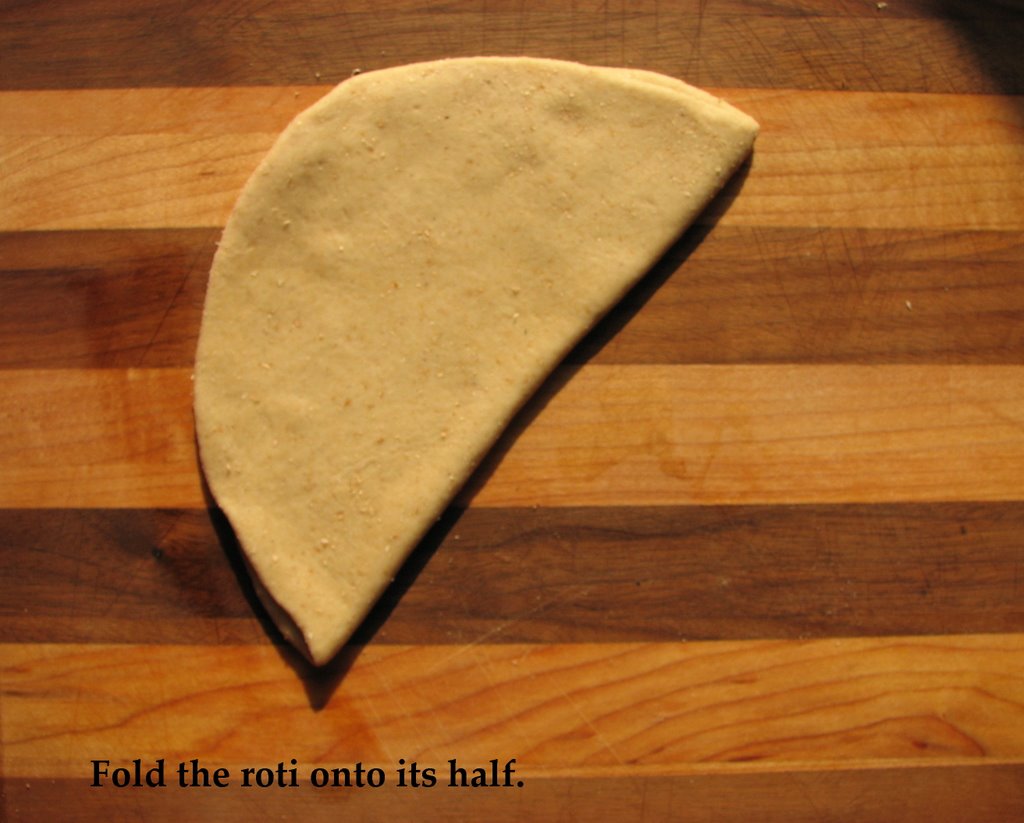
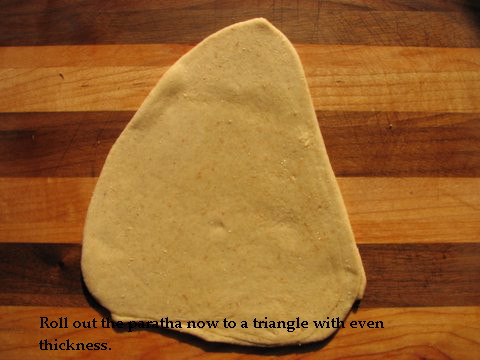
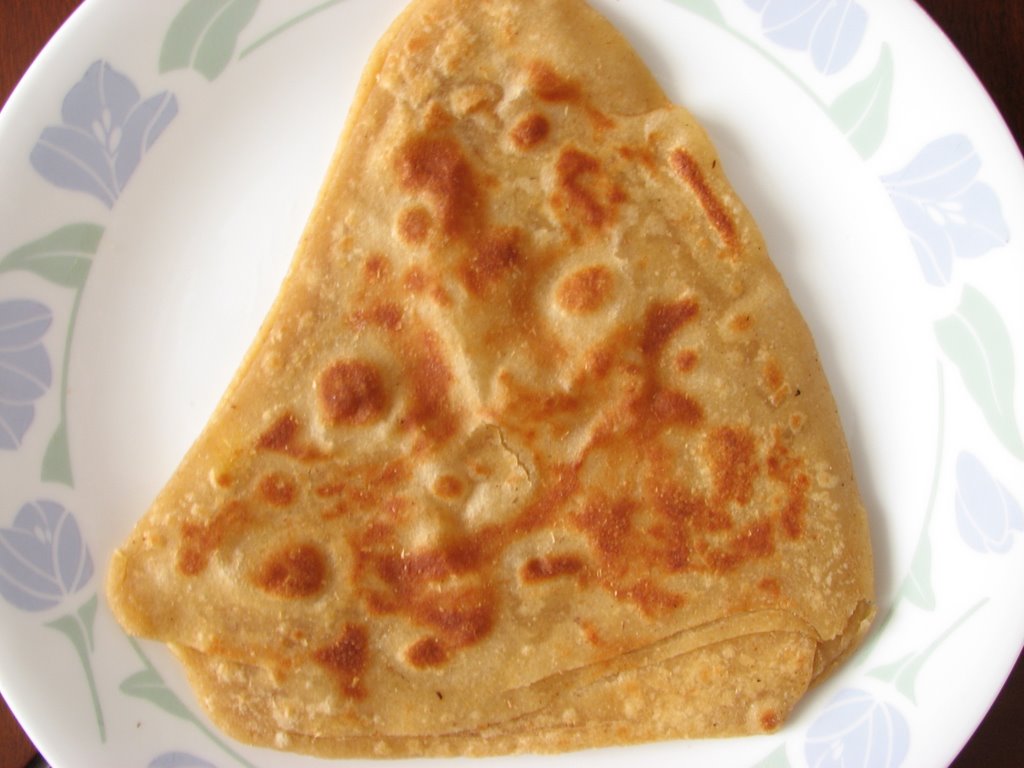
Triangular Paratha-A Photorial


You'll need:for 6 parathas
Whole wheat flour- 300 gm
Oil or Ghee- as needed
Salt-to taste
1. Add salt and water to the flour to make a dough. The dough should be medium hard in texture. Not as soft as roti and not as hard as puri. Knead it well to make a smooth roll. Cover with a plastic wrap.
2.Keep aside for 15 mins. Divide into even sized balls...about the size of a medium lemon.
3. Roll it out thick and smear ghee or oil over it. Fold as shown in the pictures. Spread about a drop of oil at each fold. Roll out into a triangle. Do not make it too wide and thin. It should be about 4-6 inches and a little thick. Too thin and they turn out like papadams.
4. Heat a griddle and cook each side on medium heat for a minute or two. When one side starts to rise, turn over and cook the other side. Increase the heat if it is taking too long, and then reduce it again. Try gently pressing down with a spatula to spread the heat evenly.( Do not keep it pressed.) When you see the paratha turning pale brown, the layers will start to rise and seperate. The oil should be applied only after the paratha looks almost cooked and rises up in the middle. Add about 1/2 -1 tsp oil/ghee and smear it all over the surface with the back of the spoon.
5. Turn over and cook the other side till golden flecks appear on both sides. Add a bit more oil if you see any raw spots.
P.S.:The heat should be consistent in the initial phase of cooking to allow the layers to seperate. If the heat is too low, it will either turn hard and if it is too high, it will brown without cooking the inner layers. Once the layers puff up, the oil is only to fry the outer most layer. You can add as much as you want.
Drain and serve hot.
Related Posts: Madikki Pathiri
Food,Triangular Paratha,Malabar Recipes,Roti
September 09, 2006
WHB 1-Spicy Chicken Kebabs
The chilies from my garden are finally maturing after being green for over 40 days. I had almost given hope, initially not knowing that they need the hot summer sun to let their fiery capsaicin loose.The Scotch bonnet and Habanero Chilies are different pod types of the same species. They come in different colors, ranging from chocolate to yellow. My scotch bonnet chilies are an inch long, pale orange in color and oval in shape with a pointy tip. They are slightly sweet yet intensely hot. My previous post on the chili itself desribes its characteristic and has some rustic garden photos.
Scotch Bonnets from my garden were plucked and waiting for its time in the limelight. A special chili like Scotch Bonnet chili needs a special recipe that highlights its spicyness centerstage. Something like a Kabob/Kebab with a simple blend of flavors exploding in each bite.
A Kebab is minced meat on a skewer or meat cubes marinated in an array of spices and grilled. Kebab is usually made of lamb and beef, although chicken and fish can be used for some styles. The word kebab means “to roast,” which is what grilling is, properly speaking. Kebabs originated in Turkey but spread through the Middleeast to Asia. There are many varieties of Kebabs, as listed partially in Wikepedia.
My kebabs are from an Arab recipe but I added the sweetness of a Red bell pepper to balance the heat of the chilies. The scotch bonnet can be substituted by 5-6 green chilies or 2 jalpeno peppers. The Kebabs go well with Pita bread and White Sauce.
I am also sending this to the entertaining and educating Weekend Herb Blogging hosted by Kalyn's Kitchen.

You will need: (makes about 10 kebabs)
Boneless Chicken Breast- 1 lb
Red bell Pepper- 3/4 of a whole pepper (1 cup chopped).
Onions-1/4 cup chopped finely
Scotch Bonnet Chili- 1/3 or more as per taste.(substitute any hot chili)
Black Pepper- 1 tbsp
Garlic -4 cloves
Parsley/Coriander leaves- 1 cup chopped
Lemon Juice- 3 tbsp
Spice Mix-1 1/2 tbsp
Olive oil-3 tbsp
Salt- 3/4 tsp
Metal skewers-Thick square ones.
Spice Mix:
Cinnamon-1 piece
Cardamom- 4-5
Cloves-7
Nutmeg- 1/2 tsp
Cumin seeds- 1 tsp
Dry roast and grind all together and keep aside.
Preparation:
1. Wash the chicken breast and pat dry with paper towel, until completely dry.
2. Cut into small pieces and mince in a chopper in batches. Without adding any water, pulse for 1-2 minutes for each batch. Remove the minced meat into a mixing bowl. If there is any moisture, the kebabs would not hold together. So it is important to ensure that the chicken pieces are dry before mincing.
3. In the same chopper, now finely chop the red bell pepper (without seeds and core), parsley/coriander, onions, and chilies and add to the chicken. Add all the other ingredients and mix with hand or fork till well blended. Keep aside for at least one hour. The more the marinated time, the better it will be. It can even be marinated overnight in the refrigerator.
4. Grease your hands with a bit of olive oil and gather lemon size ball of the minced meat and shape it into a small tube. The oil is to keep the meat from sticking to the hand. If your hands start getting sticky, wash them well, dry and apply a new layer of oil before rolling again. If you have the thick square skewers, the kebabs should be chorded onto it along its length. Else, just insert a regular skewer through the length and remove it. It is not easy to make it hold on to the regular metal skewers as it falls apart when it cooks.
5. Preheat the grill to 300 degrees. The kebabs can be put directly on an outdoor grill, but if doing in an oven, line a tray with aluminum foil and spray a film of oil.
6. Place the kebabs on the grill and cover it to cook for 5-10 minutes. Turn only once after 5 minutes and do not keep opening the grill. Maintain heat at 300 degrees.
7. Serve hot with Yogurt-Mint Dip(chutney) described below and Pickled onions.
Yogurt-Mint Chutney:
Coriander leaves-1 cup
Mint leaves(pudina)-1 1/2 cup
4 green chillies
Garlic-3 cloves
Lemon Juice-2 tbsp
Plain Yogurt-4 tbsp
Salt as per taste
Preparation:
Wash and chop the coriander. mint leaves coarsely. Put all ingredients except yogurt in a small blender. Blend till smooth. Add very little water if required. Remove with a rubber spatula. Add the yogurt and taste. Add more salt if needed. Stays fresh for 3-4 days with yogurt and for 2 weeks without yogurt.
Weekend Herb Blogging, Chicken Kebab, Recipes,
September 08, 2006
FMG-7 Scotch Bonnet Chili


Thats scotch bonnet chili, one of the hottest chilies known. It is described as a very small but very hot chilli, similar to the habanero. Scotch bonnets are frequently used in Caribbean cooking. They can be light green, yellow or red. After preparing chillies, it's important to avoid contact with the eyes or any sensitive skin - even washing the hands may not be enough to remove all the capsaicin, the volatile oil in the fruit that gives it its hot taste. I experienced this first hand when I accidently rubbed my eye with my hand hours after handling it.
Unlike the Jalapeno pepper which has a bell pepper like thick fleshy skin and flavor, the scotch bonnet is closer in taste to Indian and Thai chilies. I grew this in my garden and was disappointed to see just 5-6 fruits on a plant, my vision of a thriving chili plant shrivelling. But when I tasted it, realised that each chili is worth at least 10 of the regular Indian chilies. Yum.
It is also called "kannampotti" in Malayalam according to Injimanga,our seasoned gardener.
September 04, 2006
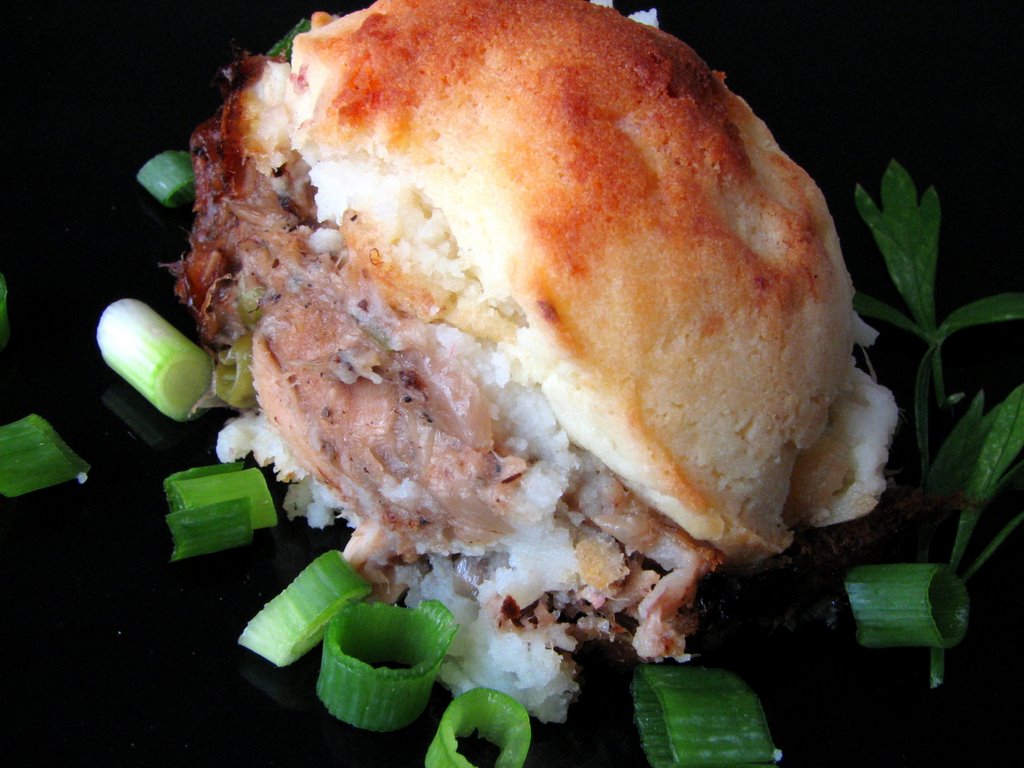
Weekend Cookbook Challenge- Fish Pie

An unusual blog that I stumbled upon while surfing is the The weekend cookbook challenge.It focusses on a theme every month and then rounds up entries from the varied respondents. When I decided to participate in Weekend cookbook challenge- foreign foods cohosted by Once upon a feast, the dilemma was what to cook. Being in America, the question of what food is foreign to me is not easy to answer. Back in India, anything foreign was broadly called continental and seemed exotic. Something distant we see in pictures like an unknown face. After tasting a variety of cuisines first hand at the multitude of ethnic restaurants here and then trying them out at home, now some of them seem like well known friends.
So I chose to make a traditional English Fish pie. It is the fish version of the shepherd’s pie which is ground lamb covered with mashed potatoes and baked. The first time I came across the recipe was on The Naked Chef's show on Food TV and then tried it at a friend's house. But now to link this common recipe to an actual cook book, a similar recipe is also there in Complete Fish & Game Cookbook by A.D.Livingston, a cookbook from the library. I added scallions and parsley to the recipe. In fact, next time, I would even add a teaspoon of a garam masala , our blend of whole spices, which would really add a richness to the fish filling. Almost any kind of fish can be used for the pie, fresh or canned. I choose Tuna/ Flounder/Tilapia fillets when using fresh fish, or canned tuna when in a hurry.
You will need: For 4 servings
Fish-12 ounce (340gm) or 2 can tuna packed in water
Peas- 1 cup
Onions-1 ½ cup chopped
Green chilies- 6
Scallions-1/4 cup chopped
Pepper- 1 tsp
Ginger -1/2 tsp chopped
Garlic -1/2 tsp chopped
Parsley- 2 tbsp chopped
Oil- 2 tbsp
Salt- to taste.
White sauce:
All purpose flour (Maida) - 1 1/2 tbsp
Butter- 1 tbsp
Olive Oil-1 tbsp
Milk- 1 1/2 cup
Nutmeg- ¼ tsp
Salt to taste
Mashed Potato:
Potato-3 medium size ( ½ lb)Russet
Butter-2 tbsp
Milk-1/4 cup milk or less.
Salt- to taste
Pepper- 1/2 tsp
Preparation:
1.White sauce: Melt the butter and oil together in a pan. Add the flour and mix. Cook the flour in low heat, till it turns light brown, stirring all the while. This could take upto 10 minutes and needs constant attention to prevent it from burning. When it turns light brown, add half the milk, whisking with the other hand to prevent lumps from forming. No spoon, use only an egg beater or whisk. When all the milk is absorbed, add the rest too, blending gently. Allow it to simmer for a minute and keep aside.
2.Mashed Potatoes: Scrub the potatoes well and cut them in quarters with the skin on. Boil the potatoes with skin, in just enough water to cover all the potatoes. Drain the spuds when it is cooked, and mash it a fork or potato masher. Don’t let it over cook. For a really smooth and lump-free mash, use a potato ricer and stir through the warm milk and butter. Season with salt and pepper and set aside. Add the milk slowly and use only enough to make it fluffy.
3.Fish: If using fresh fish fillets, clean and cook fish in a sprinkle of salt without adding oil. Add a tablespoon of water if it is sticking. Stir it in a non stick pan for a 2-3 minutes till it changes color. When cool, flake the fish and keep aside.
4.In a wide non stick pan, heat the oil and sauté the onions. If using tuna packed in oil, drain the oil completely and use no additional oil. Add the onions and fish together. Sauté all the ingredients together for 5-8 minutes or till the onions look transparent. Add the parsley in the end.
5.Layering: Mix the white sauce with the fish filling. Pour 2 beaten egg whites all over the mixture. Coat the baking pan with a thin layer of oil and spread the fish mix evenly. Spread the mashed potato on top evenly. Use an ice cream scoop to make even mounds of the potato.
6.Preheat the oven to 300 degrees and place the baking pan in the middle. Bake for 10-15 minutes. When the potato starts turning golden brown, it is ready. Remove from oven and allow it to cool before serving.
Subscribe to:
Posts (Atom)