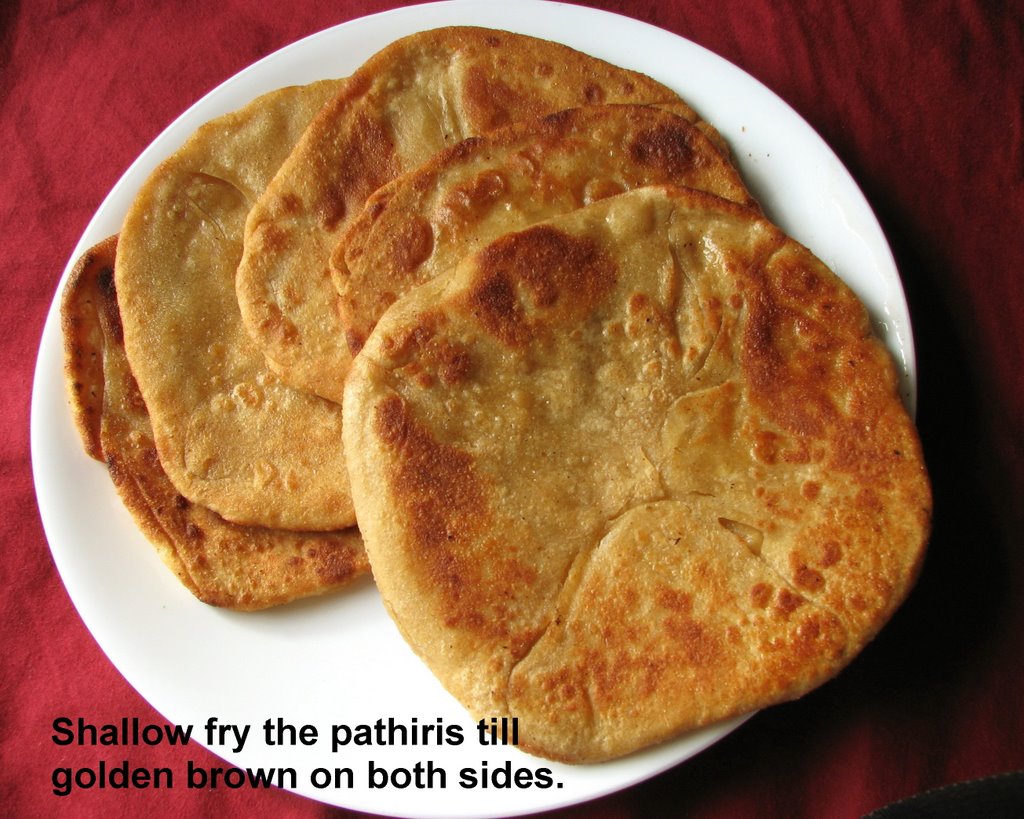
Showing posts with label Breads. Show all posts

February 25, 2009

The Great White Bread...


I always get enticed by stories where the main protagonists live right next to the best bakery in the neighborhood and take a daily walk... hear the birds chirping and see the early morning rays pierce thru the sleepy trees, smell the dew on the grass, feel the misty light swirling around.. to reach the bakery and exchange a few words with the baker while choosing the bread of the day.. It's the grown up equivalent of the old Enid Blyton charm of tea sandwiches and lemonade.

After coming here, I was bread heaven.. I would go to the supermarket and stand stupefied in the bread aisle..yes, there is an entire aisle dedicated to bread!!! trying to decide which bread to be carried back home..but finally over time, I realised they were all prepacked mass manufactured ones which I got bored soon of.

In between I tried my hand at the home baked bread too....There is something irresistible about the smell of baking bread..the slightly yeasty, toasty smell that envelops the whole house...they were good but not that good to write about. My folks visited us for the first time in US and my mom and I spent our time making all kinds of bread. Then for a while, my job and kid took over and I stopped experimenting.

By then, Paneras set up shop and that started the love affair with the Artisan breads, the whole wheat baguettes, sourdough bread, the cinnamon raisin bread, the roasted garlic, the olive bread, sun dried tomato bread...needless to say I spent a lot of time and money there for some time. That's how my family got hooked on paninis (a fancy grilled cheese sandwich with lots of stuffing) and french toast with leftover bread.

Then came the no-knead bread revolution, where you could artisan breads (the kind of bread with the crusty exterior and the spongy yummy interior), without getting your hands dirty nor using up too much effort. That bread demystified the whole bread shop and made the stuffy, snobbish sounding "artisan" bread to just a loaf of bread which gets a special treatment to generate the chewy crust. So that bread, along with the five minute bread, all of which I shall write about later, became staples...

BUT.. there was still something wrong.. as anyone with kids knows, unless the kids like it, there is no point in making something again and again...and the Artisan breads were too hard for my kids, so again I was searching..for a simple loaf this time.
Also, my mom is again visiting (though on the other coast of US)and she asked for a white bread recipe to use up the extra yeast. Now the Internet is filled with artisan and fancy breads of all kinds but I couldn't find a simple white bread.
Going back to my old copy of "Bread", a book that was neglected in all this hi-fi baking, I got a white bread recipe..and it was so easy!! Knead once, let it rise, punch down and shape into baking pan, let it rise and then bake.

Anyway, to stop my rambling, here is my first white bread.. It may not perfect and the shape is a little flat as I didn't have the correct loaf pan..(but as my DH says, this can be the reason to buy the loaf pan now.) Is it economical to make your bread? I don't know about that.. but it sure tastes good. I just need to figure out how to store it without the moisture coming in it. Any suggestions for that?
I am not an expert in this, but this recipe seems to be fool proof as I saw it in two different books. Also the temperature distribution in electric and gas ovens will be a little different so the first time may not be perfect. Will keep you updated with my adventures. Do try and if I can I will resolve issues with your results.

You Will Need:
This dough makes 2 loafs so either half the ingredients accordingly or freeze the dough and use it later for the second loaf.
Warm water-1/4 cup (2 fl oz)
Warm Whole Milk- 2cups(16 fl oz)
Active Dry Yeast-4 teaspoons
Sugar-2 tablespoons or honey plus one pinch of sugar.
Unsalted Butter-2 tablespoon, melted
Bread Flour- 6 to 6 1/4 cup plus extra as needed
Canola oil for greasing

Preparation:

In a bowl, combine the water and the 1/4 of the milk. Sprinkle the yeast and the pinch of sugar over the liquid and stir to dissolve. Let it stand till foamy, about 10 minutes.
...Most bread recipes call for two risings. Although a time frame is given, it cannot be precise and depends on the temperature of the room and other factors....


In a food processor or in a bowl, combine the remaining milk, sugar, salt and 1/3 of the flour. Whisk or beat till creamy and then add the yeast mix and slowly add the remaining flour one cup at a time so that it all mixes well without any lumps. Keep mixing till the dough pulls away form the bowl side in the food processor.

...To test if the dough has risen enough, press 2 fingers into it. If the indentations remain, the dough is ready to be shaped and left to rise a second time....


Mix with the back of a spoon and knead by hand if you are not using the food processor. The dough should be smooth and elastic. Just like you make a chapathi/puri or batura dough, except that this will be slightly softer. Transfer the dough to an oiled bowl and turn the dough to coat it lightly with the oil in the bowl.Cover loosely with plastic wrap or a lid and let it rise at room temperature for 1 1/2 hrs.

Lightly grease a 9X5 inch loaf pan. Turn the risen dough out onto a lightly floured board/mixing plate and divide in half. Pat it into a rectangle and fold it like an envelope. Roll up the dough tightly into a thick log and roll it back and forth with your hands till it is the same length as the loaf pan.

... To test its readiness after a second rising, press against it with a finger tip.If the imprint remains and the dough holds its shapes, its ready to be baked.....


Pinch the ends and the long seam to seal and place the loaf in the pan , with the seam side down..All this is done just to get a neat rectangular shape so do it any way you like it. Cover loosely again and let it rise for another hour, till the dough has risen one inch over the rim of the loaf pan.Preheat the oven to 375 F(190 C). Bake on the middle rack till the loaf is golden brown and pulls away from the sides, about 40 minutes. Turn out onto a wired rack and let it cook completely. Store in a cool, dark place.

August 23, 2007

Express Meals 2 :Pav Bhaji


Somewhere in between the avalanche of entries, I realised that all the express recipes I had planned to blog got sidelined and are still sitting on the shelf. Its great to have plans but not so easy to get around to executing it. So while I struggle with the round up for the Express Cooking Event, here is one of my express meals...Pav Bhaji..

Pav Bhaji is not at all familiar to a true Keralite and I attribute my fondness for it to my stay in amchi Mumbai some light years ago. Those were the worry free days of long commutes and fun weekends hitting the city for a dinner and a movie.

Pav Bhaji falls somewhere in between a dinner and a snack..a heavy snack in fact before the movie. The sight itself is very appealing....The vegetables simmering on a large wide cast iron skillet, with pavs getting toasted on the corners, with the vendor adding more and more butter and breaking down the clumps, making the tak tak sound each time.
There the overwhelming fragrance of butter permeated the pav and the mashed vegetables and as if that wasn't enough, they placed a blob of the rich stuff on the bhaji just before serving! Call it junk food or street food Indian ishtyle but its actually a very wholesome meal..Buttered Pav or bread and a whole lot of vegetables slow cooked with spices and smashed together, topped with fresh cilantro, raw onions and lime wedges. Without realising, everybody ends up eating all kinds of veggies!

I tried out a lot of pav bhaji recipes before settling for Nupur's version of it which I feel comes closest to the Bombaiyya taste I was searching for. Thanks Nupur!
So just follow the recipe as is: Nupur's Pav Bhaji
So how express is it?
No onions, so no peeling and cutting. Ideally should be slow cooked but coarsely chopped all the veggies and let it cook all together in a pressure cooker while sauteing the peppers and spices in a pan simultaneously. The tomatoes got blended for a second to break them down.
Sometimes I use canned crushed tomatoes instead. After the tomato puree has thickened, I added the cooked veggies to the pan and let it simmer for 15 minutes on medium heat. Serve with hot buttered Pav or as shown here, whole wheat burger buns. It really doesn't take more than 20-30 minutes.

On another note, Who doesn't like awards? The blogosphere is agog with awards nowadays and its good to see them to keep the morale up...all in good fun..
I gotto keep smiling as I got the Rocking Gal Award from not one but three fellow blogger friends!! Viji of Malabar Ruchi, Mandira of Ahaar and Sra of When my soup came alive think so..:)So I didn't really miss the Rock n Roll era, did I?
SO I would like to pass this onto:
Nabeela of Trial n Error
Nandita of Saffron Trail
Shn of Mishmash


Then Daily Musings went on to award me the schmooze award What is that, I wondererd...schmooze.. the word is so wrong...when I checked it up, it saidSlang... To converse casually, especially in order to gain an advantage or make a social connection!!!....(I thot it was a weird one, saying I buttered up pavs till I read what it was about..):)Knowing Indosungod, I had to find out the real meaning of this funny award... Now I am humbled and a bit pink too!!

The Power of Schmooze Award is for bloggers who “effortlessly weave their way in and out of the blogosphere, leaving friendly trails and smiles, happily making new friends along the way. They don’t limit their visits to only the rich and successful, but spend some time to say hello to new blogs as well. They are the ones who engage others in meaningful conversations, refusing to let it end at a mere hello - all the while fostering a sense of closeness and friendship.”

This award has probably been awarded to Asha, but I feel like conferring it again on her..
Asha of Foodie's Hope.
Jyo of Curry Bazaar
Chandrika of Akshayapatra

May 01, 2007

Chicken Curry In A Hurry..


Invoking the summer gods with the Okra has worked (:)) as it is warm and sunny here finally. What a difference in last week's rainy and gloomy days and this week's sunny days!!

But the days suddenly have become hectic and cooking has taken a back seat for a moment. After a long time, studies are back on the horizon (for a test) and all the yummy recipes seem so time consuming and labour intensive. Focusing on remembering what you read is not so easy with a rusty brain, and stressing it further with a complicated meal planning is just not right.

Nevertheless food has to be cooked unless you want to brave the greasy restaurant staples on a daily basis. Blogging too has thus been quite on the slow track. So today, I am stealing some time to rescue my readers from the corny hindi video.:)

Rummaging through my cookbook, I came across a handwritten malayalam recipe tucked in my recipe drawer, called Chicken Shahi Kurma. Though daunted by the name, the recipe looked easy and It turned out to be a creamy chicken curry which fools you into thinking that it is rich and took ages to cook. No cream, no coconut milk, just good ole ground cashews to thicken it. Prep time is minimal if you use a 2 skinless, boneless chicken breasts and the cooking time is 15 minutes. Curry in a hurry indeed!

You will need:
Chicken-1 ½ lb, (700gm) boneless, cleaned and cut into small pieces.
Onions- 1 1/2 medium sized ones
Green Hot Chilies-6-8
Garlic cloves-3
Ginger-1/2 inch piece
Carrot-1 large one
Turmeric powder – 1/2 tsp
Red Chili Powder- 1 tsp
Fennel Powder-1/4 tsp
Black Pepper Powder- 1/4 tsp
Cashew nuts-7
Whole spices: 3 cloves, 2 cardamom
Lemon juice-1tbsp
Plain Thick Curd (Yogurt)- ½ cup beaten
Curry leaves- 1 sprig
Cilantro(Coriander)- 2 tbsp
Salt - to taste
Oil-2 tbsp
Preparation:
1. Cut the chicken into 1-2 inch even sized pieces. Wash the chicken and lightly toss it with lemon juice and rinse again. Drain well onto a slotted drainer. Slice the onions finely and dice the carrots. Soak the cashew nuts in ½ cup warm water for 10 minutes. Cook it in the microwave for 1 minute to speed up the soaking. Then wet grind it with the cleaned ginger, garlic and green chilies to a very fine paste. Add water only as you need to grind.
3. Heat the oil on a medium flame in a large shallow pan, add the whole spices and the onions. Saute the onions till they are light brown. Keep stirring and add oil if the onions are sticking to the pan or browning too fast.
4. Add the ground paste, spice powders and saute well for at least a minute, or till the red chili powder gets cooked. Then add the chicken and carrots and stir well till all the excess moisture dries up. It would be good if the chicken gets sauted on all sides before getting cooked. Then lower the heat, add 1/2 cup water, salt and cook covered for about 10 minutes or till the chicken gets cooked. Keep checking and add a little bit water if it starts sticking to the pan.
5. Check to see if the chicken is cooked. Add the chopped leaves and then lower the flame to a minimum. Add the beaten yogurt and adjust salt seasoning. If the yogurt is not sour, add a tsp of lemon juice to balance the flavors.
Serve hot with pathiri, appam, bread, puttu or just paratha.

January 12, 2007

Alu Ka Parantha and The Three Things Meme./Stuffed Bread

I am not great with memes..I let it languish in my to-be-written folder till everybody in the blogging world has had their say and then I smile, thinking I escaped this one.
It is like playing passing the parcel and being the one who didn’t have to do anything. :) Writing about food is easy, writing about yourself is not. You have to be an extrovert to be able to let people in. Doesn’t come easy.
So this time, I put on some of my favorite hindi music, got my cuppa of Cardamom(Elakai) tea and sat down not to disappoint my taggers Coffee and Maheshwari.

T h e T h r e e T h i n g s M e m e:


Three things that make me laugh:
1. My son, my nephews and my nieces’ pranks and antics.
2. My better half!
3. A good movie.

Three things that make me cry:
Just three things? I cry for every thing, happy tears, frustrated tears, sad tears, angry tears…like someone() once said to me,” I can cry at least! These are my tears.”

Three things that scare me:
1. Driving in the rain at night.
2. Trafiic Police.. yeah, me too. I am more worried about my insurance premium going up than getting a ticket.
3. Things I can only worry about but can’t change.

Three things that I love:
1. My family-the one I was born into, the one I married into and everybody in it.
2. Cooking when I am not hungry.
3. Seeing a building seamlessly integrated with its environs.

Three things I don’t understand:
1. Why enough is never enough.
2. Why Priyadarshan is converting wonderful rustic mallu movies into non-contextual Hindi movies.
3. Why we take on more than we can physically do.

Three things on my desk:
1. My pens, erasers, scales, sketch pens, notebooks.
2. My latest cookbook.
3. My laptop and camera.

Three favorite foods
1. Soup, any kind.
2. Eggs in any form
3. Sweets, fruits, nuts.

Three beverages I drink regularly:
1. Black Tea w/ milk( maybe green tea if I am at work)
2. More tea.
3. Hot Jeeraka water..water boiled with cumin(jeera)

Three TV shows I watched/ books I read as a kid:
1.Amar Chitra Katha, Target and Marvel comics.
2. Books galore!
3. Fouji,Nukkad, Kachchi Dhoop, Mahabharatha!

Three fellow bloggers I would like to tag:
RP of My workshop
Anita of A Mad Tea Party
Nandita of Saffron Trail.

I did have fun writing this and I do hope now you three will carry on the baton from here and won't disappoint me.:)Now lets eat some Alu paranthas..I can almost smell the butter.

Alu Parantha


You will Need: For 6 Paranthas
2 cups Whole Wheat Flour or Durum Wheat Flour
3/4 cups Hot or warm water
1 tbsp Plain Yoghurt
2 Medium Potatoes
3/4 tsp Cumin Powder
1/2 tsp Dry Mango Powder(Amchoor) or 2 tsp lemon juice
1 tsp Chili Powder OR 2 tbsp finely chopped Green Serrano Chilies
1 1/2 tsp Salt
4 tbsp Chopped Cilantro
1/8 tsp Turmeric


Preparation

1. The potatoes should be boiled, peeled, mashed and cooled to room temperature. Take care not to have a drop of moisture left in the potatoes. That makes the parantha soggy. I usually bake it in the microwave in the baked potato setting. Then there is no additional moisture added to the potato.

2. Put flour, yoghurt and 1 tsp salt in a large bowl. Make a well in the middle and pour half the water in the center. Use a spoon or hand to mix the flour and water and knead it well, adding water little by little till the dough seems non sticky and soft. When the dough is well kneaded, it will feel elastic and silky smooth. To test the dough, press it lightly with a fingertip. If it springs back, it is ready. Spread a very thin film of oil (by hand) on the dough and cover it for at least 15 minutes in a warm place. This allows the dough to absorb the water and makes it pliable enough to spread with the stuffing. Cover with a wet towel so the dough does not dry out.
3. Mix the mashed potatoes with all the spices and taste it for spice, sourness and saltiness. Add more spice if needed. Make small balls of the mixture.

4. Divide the dough into 6 equal size balls. With your hand, flatten each ball to a 3-4 inch round with the edges thinner than the center. Place the potato ball on it and gather the edges around the stuffing to form a secure round again.

5. Flatten these balls slightly and roll into a 6 inch circle. While rolling, do not apply excessive pressure. Never roll to the outside. It will only squish out the stuffing. Try rolling from the edges to the center in an even pressure to avoid the stuffing from spilling out. The stuffing ball should be dry and 3/4 the size of the dough ball and it won't come out.

6. Pre-heat the griddle. Maintain medium high heat and place a parantha on it. After about a minute, flip it and allow it to cook on the other side. When the surface looks opaque and starts rising up, spread a little oil or butter and cook over low heat on both sides till golden brown.
Serve with chutney or yogurt, and Indian pickles

January 06, 2007

Easy Kerala Porotta-1/ Layered Flat Bread


The New Year has already started and I am still writing about it with capitals and struggling to get over the hurdle of what to post first in 2007. Remember "kya karoon kya na karoon...yeh kaisi mushkil hai.."
Everybody had time to set beautiful first posts while I was knee deep playing host, spending time with my son and partying! :(
Now you all must know what kind of student I was in school! And blogging with so many events feels like school sometimes! Submissions, Assignments, Research!!
Anyway so to start you all off on a wonderful year, let me introduce you to one of my favorite recipes, the Kerala Porotta.

The Kerala Porotta is a flaky pastry like multilayered flat bread, a speciality of Kerala. It is made from maida, (enriched wheat flour) by a long labor and time intensive process. The flour is mixed with water, oil and egg to make a soft dough, and allowed to rise for 5-6 hrs. It is stretched and flattened by hand in order to save the air pockets which arise from the stretching and then cooked on a griddle.

...It is stretched like pizza dough until it becomes wafer thin, then gathered and twisted into a circle...

While at home, my experience with the porotta was limited to the fun part of stretching and flipping, rolling it into the twisted circles.The first few times I tried making it were a disaster with the porotta stretching w..e..l..l… but then rebounding back like elastic. It looked soft, it left soft but on cooking, it was a hard unyielding mass, not at all like the flaky porotta from home.

I blamed it on the flour and we relegated ourselves to buying the frozen greasy Porottas from Wynad Foods. Till my good friend Gattina blogged about her Scallion Hot Cakes. So now I found an easy breezy way as per Gattina’s method; and figured out the problems with my traditional labor intensive way. More about that in my next post on the Kerala Porotta. This post is about the easy way.
...an easy version of the Kerala Porotta, a derivative of the Malaysianbread Roti Canai...

At the same time, a friend’s mom (who had previously lived in Malaysia) was visiting and she demostrated the easier way Malaysians make the same porotta. I have mentioned the similarities in Malay and Mallu cooking in one of my earlier posts.
The Malaysian Roti Canai is either stretched out and fried as it is or folded into squares, a process which is easy and retains all the pastry like layers intact.

The baking powder and the hot water help in overcoming the elasticity of the dough and make it pliable enough to work with. So I have Gattina and my friend’s mom to thank for this easy version of the Kerala Porotta. This is much healthier than the frozen Malaysian Porottas so do try it on a weekend with a a nice spicy dipping chicken or lentil curry.


You will need:
Unbleached all purpose flour-2 cups
Baking powder-1/4 tsp
Fine salt-1/4 tsp
Oil-2 tsp
Hot boiling water-1 cup
Preparation:
1.In a large bowl, combine flour, baking powder, 2 tsps of oil and fine salt.
2. Bring a cup of water to boil, immediately pour into the flour mixture, use a mixing spoon to stir, and after 5-10 minutes, knead it with your hand until it is a smooth blend. Do not add any more water.
3. Put the dough in a greased bowl, cover and let it rest for an hour.

4. Divide the dough into 12 pieces.Roll out the ball as big and as thin as you can get it to be, sprinkling a little flour as you go along. Gattina suggests that whenever you feel the dough refuse to spread, cover and let it rest,and continue working on others.


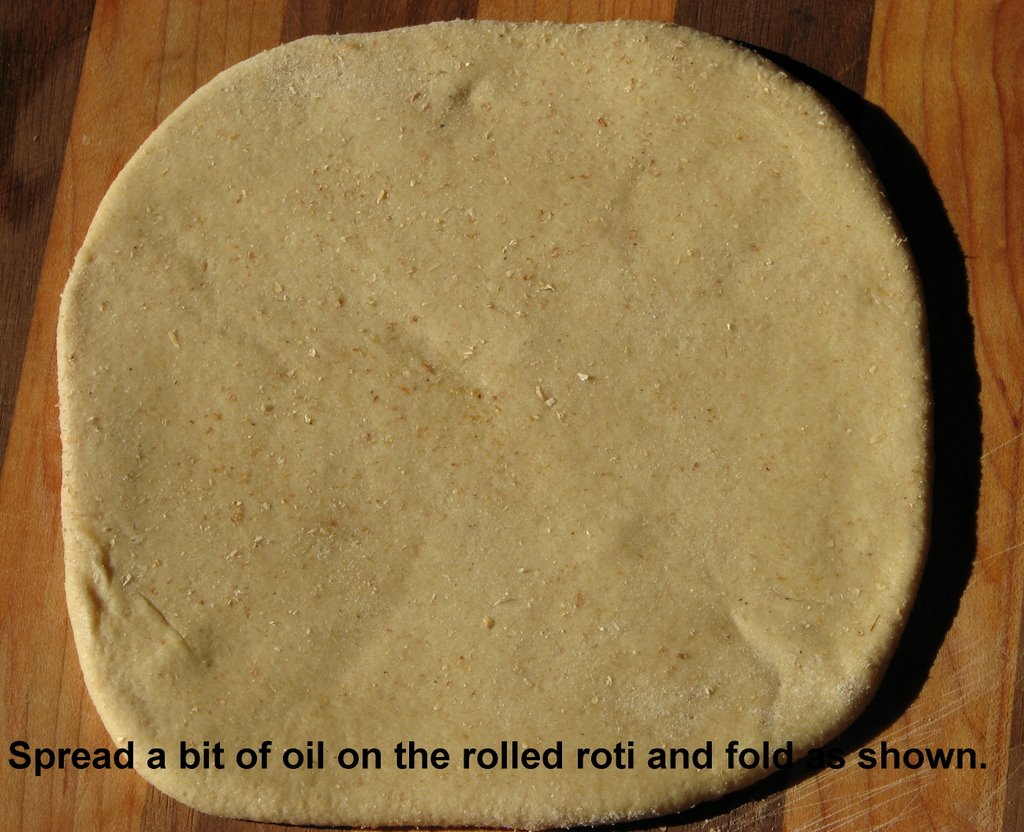
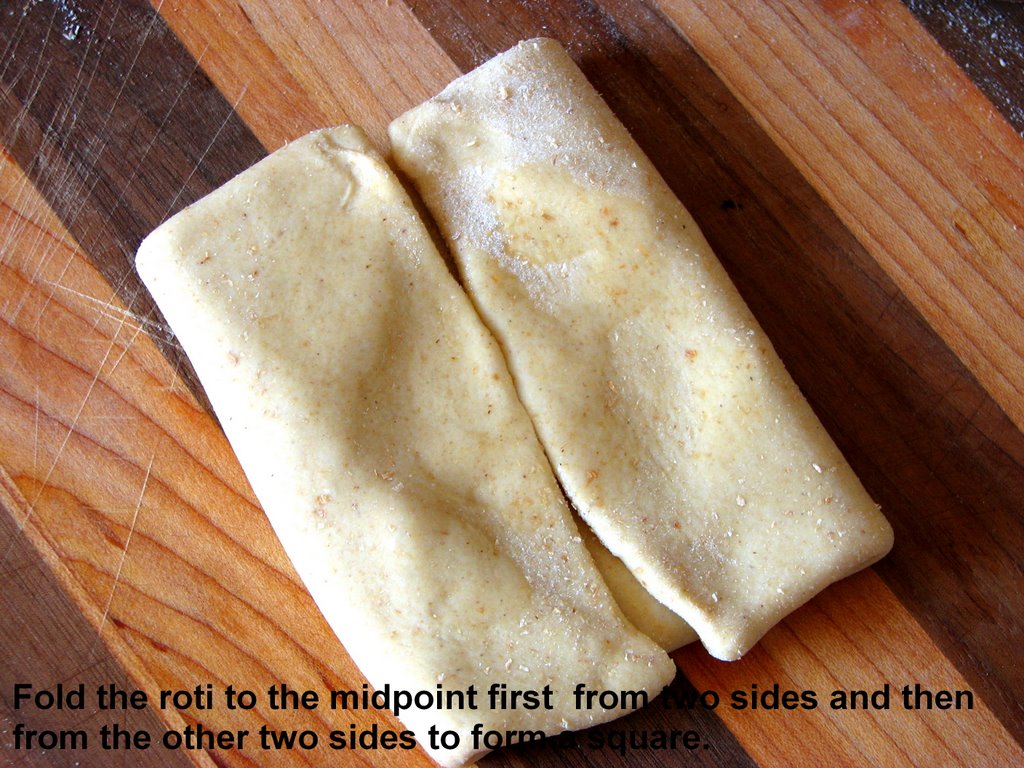
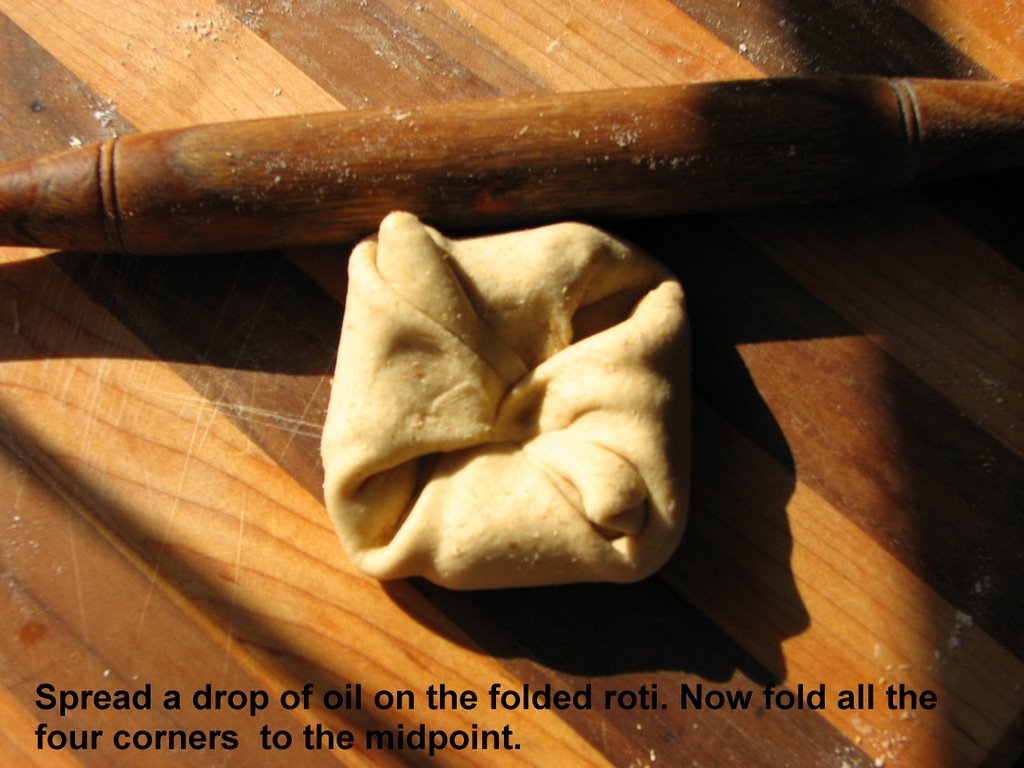
5. Brush a drop of oil on the whole surface and fold as shown in the pictures, brushing oil on each alternate layer. Take care not to put too much oil or it won't roll out. Once it is a square, roll it out to be about 6" wide on each side.


6. Pre-heat a griddle, and cook on medium high heat on each sides. Flip only after one side gets a little opaque. When the layers start puffing up, spread half a teaspoon of oil on each side to let it crisp. Each porotta takes about 2-3 minutes for cooking. Maintain medium heat throughout to evenly cook it with hardening it.
If the heat is too high or too low, the porotta will get hardened.
7. Remove the porotta and serve hot.

Thanks to all of you who voted for us. It made us the second place winner! Don't forget to check out my post over at the Daily Tiffin..Its on kids's cooking this time.

, , , , ,

November 15, 2006

Giving Thanks/ Roast Chicken and Neriya Pathiri

Giving Thanks is not easy. So when Meeta of What's For lunch, Honey asked to participate in Giving Thanks, the theme for her Monthly Mingle, I was forced to sit down and think. It is said a combination of nature and nurture makes an individual. Assimilating and absorbing a bit of something from every person and every place we come in contact with is so natural that we hardly pause to think back at what we were and where we are. Some of the culture of each place we set our roots in gets imbibed into our system.

Things, relations and knowledge I take for granted now was hard won some time back and these occassions only make it piquant. I have a lot to be thankful for but have not realy taken time out to thank anyone. A recent TV liquor commercial had the tag line "Toast Life", something we should do every healthy day of our life. (Every day I see a cop car pass by while my speedometer is nudging me, I thank God fervently.)

Now I feel like I just won an award and am asked to say a few words.. Bhaiyyon aaur Bahanon....
I would just like to say thanks to my family who support me through all my whims and quirks. They encompass my siblings, parents and my in-laws and my husband's siblings and all their families too. They got me started on this blog trip and are still my biggest critics and supporters. Once I get something in my head, my mom and mom in law get the brunt of it as I keep calling them to clarify a recipe and check all aspects. So they certainly deserve a special thanks.

Thanks to my better half guinea pig and my little one who eats all the stuff you see posted here (almost)and all the stuff I decided not to post.(hi hi:))My better half gives me the strongest encouragement(a clean plate is the best encouragement)and criticism even though he has no time to cook.:)My little one goes, "It has no flavor" making a funny face if the taste is not right.:)So u see, I have a tough crowd at home itself.

Thanks would be due to all my blogger friends who everyday are an affirmation that I am not the only foodie and food snob around. I learnt so many new recipes, got over so many food hurdles and made new friends whose posts I eagerly await. It has made me more familiar with other cuisines while sharpening my knowledge of my own cuisine. To name one would be take sides but I appreciate all of u especially the ones who take the time out to leave a comment which ensures that I am not talking to empty air. Go on leave your name and a comment, good or bad.

The recipe I chose for the Thanksgiving meal is a Roast Chicken, Malabar Style. I had posted it once but I think it is still appropriate to the occassion. So instead of writing again, I have linked it up to the previous Post which has a step by step set of photos.


The second item is Neriya Pathiri, a delicate rice roti or tortilla so thin that making it for a mom level cook still makes me nervous. It is all in the hands.
It is a dish which reflects the delicacy of all relationships and moments. You spent a good amount of time creating it and unless you savor it, its gone in a puff. The detailed recipe I will post by evening as I have to get this to Meeta before she hits the deadline.
So keep eyes peeled as I post the step by step for this Pathiri. It's not difficult but it's not easy.
HAPPY THANKSGIVING!!HUG UR FAMILY!!

Pathiri/ Thin Rice Roti/ Breads


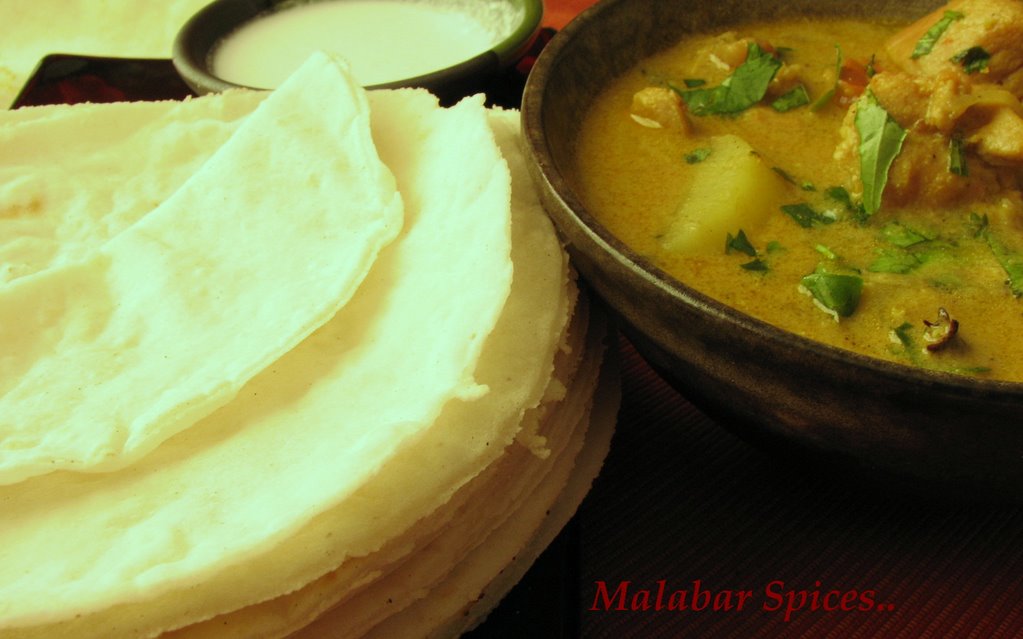
These fluffy pathiris are a speciality of Malabar cooking, with only the thickness varying across the Northern Kerala. Though I am from Calicut, I would say the Malappuram people make the thinnest softest, melt-in-your-mouth pathiris. They would probably scoff at my pathiris considering the thickness to be too much. I love these with Drumstick leaf curry.

You do have to eat a lot of these before satiation and that is precisely why these are never the main course. They are traditionaly used as tantalising appetisers or as a delicacy, nestled among the lavish spread of a banquet table.

I love being in Calicut when it is made at home. When there is a feast involved, my aunts and my mom get together and make it in a flurry of conversation and laughter. One person would be rolling and another one would be handling the griddle all at the same time, culminating in huge piles of pathiri.
Its the time to catch up on gossip and tidbits as they slowly fill the pathiris with their sounds. Making it here, with only music to keep me company somehow is just not right. But I still do, without a pathiri press,(only because I don't have one) just to recreate the moment.
The rice flour I use is Double Horse Pathiri Podi or any other rice flour from Kerala. I have also tried with the regular rice flour from the Indian stores, but they turn out to be hard. I am not sure what rice is powdered to make the flour and whether that is the difference in the powders.

You'll need: for about 16
Rice Flour- 2cups
Water- 2 cups
Salt-to taste
Thick Coconut Milk-1/4 cup

1. Boil the water with salt. When it is churning and roiling nicely, pour in the flour, make a hole in the center with the handle of a long handled spoon, cover with a lid, lower the heat and let it cook for a minute. Uncover and stir well with the handle or stick till it is well mixed. Remove from fire and keep covered for another 10 minutes. Open and when it is cool enough to touch, empty the flour mix on to a wide plate or kneading surface.

2. Knead well for about 5 minutes without adding any more water till the dough comes together with a uniform super smooth surface and is no longer sticky. If it is pebbly, it needs more kneading or it was not mixed well with the water initially. You could wet hands and knead again if it needs only a tiny bit of water. If it is sticky, the proportions were not followed correctly. Any water or any flour added at this point will change the texture of the pathiri so the first step has to be done with care.

3.Make a log of the dough and cut of equal sized balls of about the size of a small lemon.
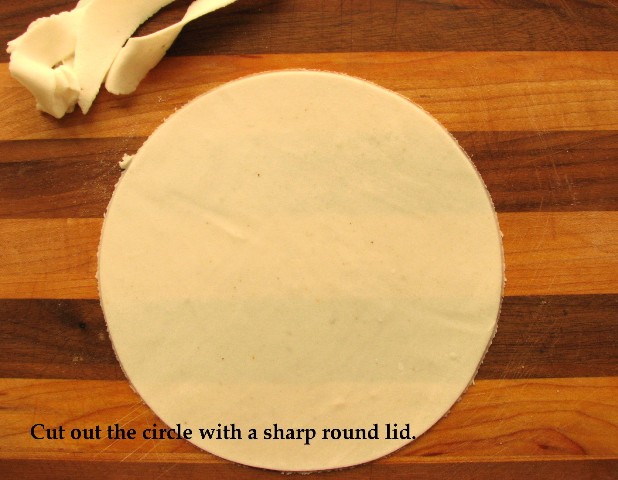
Roll it out evenly into very thin pathiris or tortillas. Sprinkle rice flour while rolling to prevent sticking taking care not to use too much. (Too much makes the pathiri hard.) Cut with a round cutter or a lid with sharp edges to make perfect rounds.

4. Heat up a tava/griddle, preferable a cast iron one, and when it is medium hot, place a pathiri on it. After a few seconds, turn it over. Repeat this once more. When you see the pathiri turning opaque, use the back of a spoon to spread the heat, without pressing down too hard. When it puffs up, remove it from the griddle.


5. Smear a tablespoon of coconut milk on each pathiri and keep covered. Alternately, each pathiri is dipped in coconut milk just before serving.

P.S.: The heat should be consistently medium hot to allow the layers to separate. If the heat is too low, it will either turn hard and if it is too high, it will brown without cooking the inner layers. Once the layers puff up, take it off the flame immediately.
Drain and serve hot.

October 14, 2006

Puri-Bhaji/ Fried Bread with Mashed Potatoes.


Our weekend breakfast, brunch or early lunch...Puri Bhaji is my easy, no frills yet feel good meal. I like to make this but prefer eating the puris with bananas mashed in sweetened milk. A remnant of my childhood habits. Hot fried puris, straight of the flame is definitely comfort food. Here, with me rolling and frying,(and photographing now),I tend to get them not as hot.(But I start eating one rolled up with sugar, while the others are being produced.)

I know a lot of people like to eat it with Aam Ras(mango pulp), but a simple gingery potato or banana milk is my favorite combination. The excessive ginger in this recipe is supposed to relieve the indigestion produced by potatoes. Optionally, add a couple of cherry tomatoes along with the potatoes.

You'll need: For about 10-12 puris
Whole wheat flour- 1 1/2 cups
Water- ¾ cup more or less.
Oil -1 tbsp
Salt-to taste
Oil for Frying-1-2 cups

Preparation:
1. Add salt and oil to the flour and make it crumbly. Add water a bit at a time to make dough. Knead well for about 5 minutes till everything comes together.The dough should be smooth but medium hard in texture. Knead it well to make a smooth roll. Cover with a plastic wrap and keep aside for 15 minutes. Divide into even sized balls...about the size of a very small lemon.

Roll it out to a small circle and fry it. Do not roll out more than 2-3 at a time as it hardens if it is not fried immediately. Heat oil in a wok/kadai/cheenachatti/ and when it is hot, slide one puri in from the side. Press down with the slotted spoon to allow it rise completely and then turn over and cook the other side till golden flecks appear on both sides. Remove and drain onto paper towels.

P.S: Do not roll it out too thin. Test the temperature by dropping a speck of dough in the oil and seeing how fast it comes up. The heat should be medium hot consistently.

Potato Bhaji
Potatoes-2 big ones diced into small pieces.
Onion-1 cup chopped coarsely
Green Chilies-6-7 chopped.
Ginger- 1 inch piece, chopped finely
Turmeric-1/2 tsp
Salt-3/4 tsp or to taste
Curry leaves- 1 sprig.
Mustard Seeds- ½ tsp
Oil-2 tbsp
Preparation:
Heat the oil in a heavy pan. After a minute, lower the heat and add the mustard seeds and cover till it finishes spluttering. Keep a safe distance if uncovered. Now add the curry leaves, and onions, green chilies and ginger.

Stir fry for a minute and then add the potato cubes, turmeric and salt. Add 1 cup water (enough to submerge the potatoes), and let it come to a boil. Now cover and cook on low heat for 10 minutes. Open and add more water if the potatoes are not cooked. When the potatoes are cooked, mash them with a potato masher or the back of a spoon. Check seasoning.
Serve hot with the puris.
,, ,, , , , ,

September 10, 2006

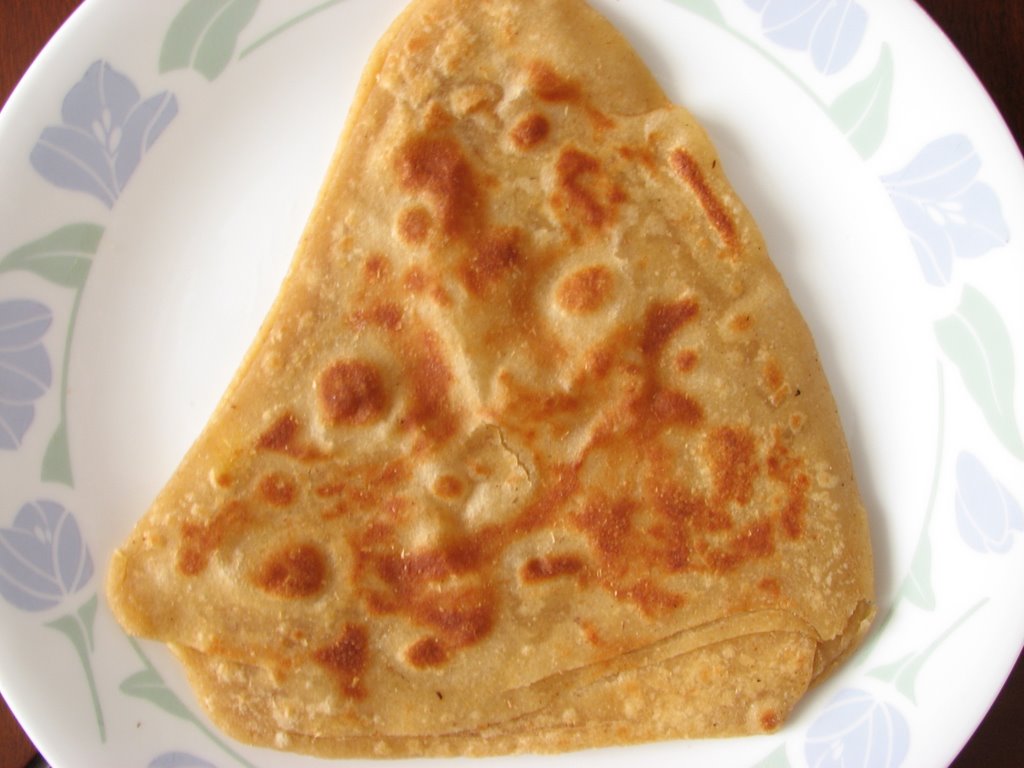
Triangular Paratha-A Photorial


You'll need:for 6 parathas
Whole wheat flour- 300 gm
Oil or Ghee- as needed
Salt-to taste

1. Add salt and water to the flour to make a dough. The dough should be medium hard in texture. Not as soft as roti and not as hard as puri. Knead it well to make a smooth roll. Cover with a plastic wrap.
2.Keep aside for 15 mins. Divide into even sized balls...about the size of a medium lemon.
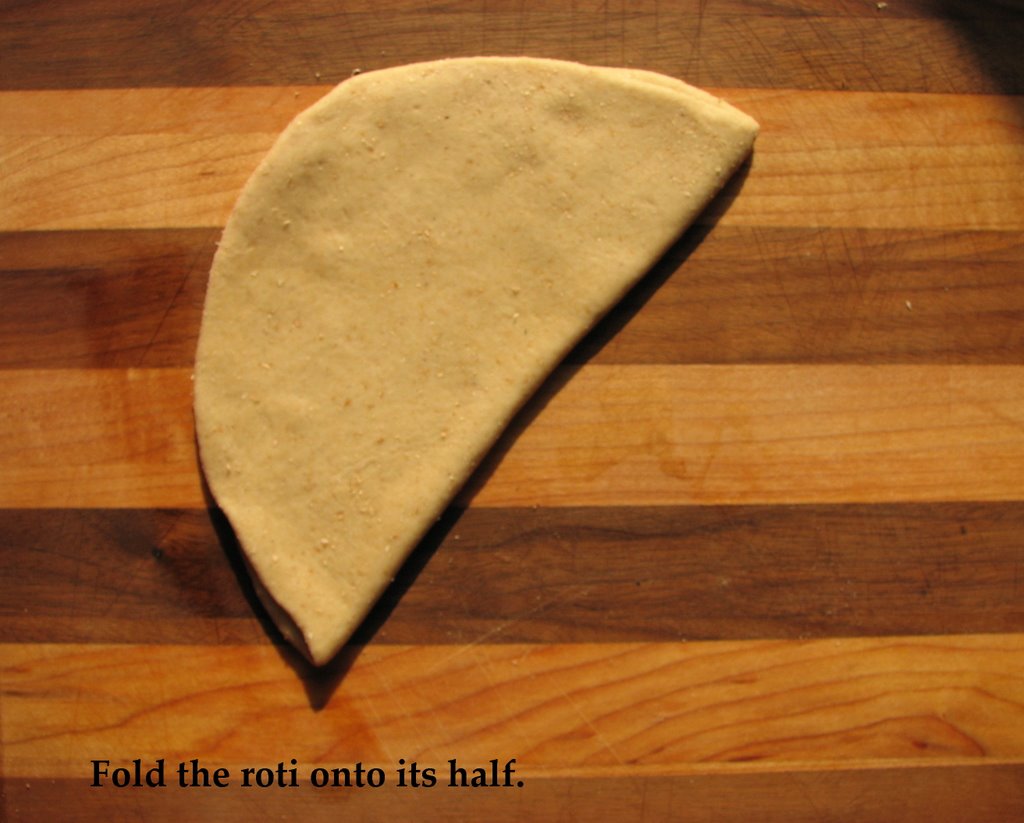
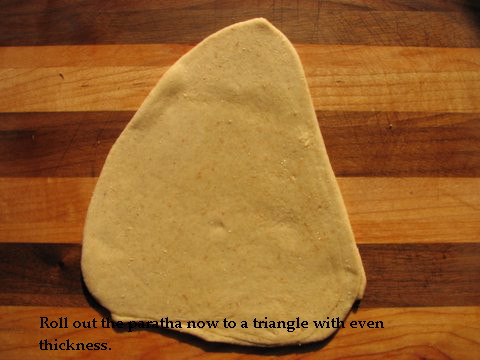
3. Roll it out thick and smear ghee or oil over it. Fold as shown in the pictures. Spread about a drop of oil at each fold. Roll out into a triangle. Do not make it too wide and thin. It should be about 4-6 inches and a little thick. Too thin and they turn out like papadams.
4. Heat a griddle and cook each side on medium heat for a minute or two. When one side starts to rise, turn over and cook the other side. Increase the heat if it is taking too long, and then reduce it again. Try gently pressing down with a spatula to spread the heat evenly.( Do not keep it pressed.) When you see the paratha turning pale brown, the layers will start to rise and seperate. The oil should be applied only after the paratha looks almost cooked and rises up in the middle. Add about 1/2 -1 tsp oil/ghee and smear it all over the surface with the back of the spoon.
5. Turn over and cook the other side till golden flecks appear on both sides. Add a bit more oil if you see any raw spots.
P.S.:The heat should be consistent in the initial phase of cooking to allow the layers to seperate. If the heat is too low, it will either turn hard and if it is too high, it will brown without cooking the inner layers. Once the layers puff up, the oil is only to fry the outer most layer. You can add as much as you want.
Drain and serve hot.
Related Posts: Madikki Pathiri
,,,

August 29, 2006

GB-2/ Garlic-Parsley toast with Spinach Omelet


My Malabar Spinach is growing wild and I am using them in everything now, a little bit in my lentils, salads, thorans and even in my eggs. What better way to get some fiber in? Toast omelet is my family's weekend breakfast and so this time, I made some modifications to the standard egg. Spinach omelet is still very eggy with just a hint of the spinach flavor coming through. Good for a weekend breakfast. And since it is a weekend, why stop at plain toast? So I went ahead and used my fresh parsley for a herb butter toast. Most of my basil and parsley get used up in the garlic butter at parties, but if you just make the butter, it stays well in the fridge and you can use a little bit as needed. Makes a welcome change from the ordinary spreads.
This is my second entry for the Green Blog Project. I feel this is also an apt entry for Nandita's weekend breakfast blogging hosted this time by Cook's Hideout.

Spinach omlette
You will need:
Spinach- a handful chopped
Parsley-2 tsp chopped
Onion-1
Green chilies/any hot chili -2-3
Eggs-2
Milk-1 tbsp
salt to taste,
oil-1tbsp
Heat the oil and saute the onions and then add the chopped spinach and green chilies. Stir fry till wilted. Beat the eggs with a pinch of salt and pepper and 1 tbsp of milk. Add the spinach, chopped parsley and mix well. Grease the small cast iron skillet/pan with a spray or brush of oil and pour the egg in. Cover the pan and lower the heat to the minimum and cook for 5-7 minutes. Serve with toast.
Parsley-Garlic butter:
5 tbsp melted butter, 1/2 tsp garlic minced or garlic powder, 1/2 tsp pepper and 4 tbsp parsley chopped. Blend all with a fork and refrigate it to set the butter. Spread the butter on a waxed paper and roll it tight before refrigeration if you want it as a log. Spread as needed on toast.
For a lot of garlic toast, preheat the toaster oven. Slice a loaf of bread into 1/2 inch thick slices, spread the butter on one side and toast in the oven for 2 minutes on each side under the broiler.
For a garlic butter loaf, increase the quantity of butter to 6 tbsp. Slice an italian or semolina loaf in half vertically and spread the herb butter on both sides. Now cut the bread into 2 inch wide pieces from the top, taking care not to cut it completely. Cover the bread completely in aluminum foil and bake in the oven at 300 degrees for 5-19 minutes . You could keep this wrapped bread on a grate over coals or gas grill during an outdoor barbeque. Unwrap and serve the wedges.
The garlic butter can be made with any herb.. oregano, basil, our own coriander or thyme mixed with garlic and butter. Add salt only if the butter is not too salty. You could even make this with margarine instead of butter.

July 07, 2006

Maddikki Pathiri/ Kannuvecha Pathiri/ Malabar Roti

Madikki Pathiri or Kannuvecha pathiri is the mappila version of the chapathi or roti. The name comes from the multiple maddukku (folds) that gives it its distinct layers.The other rotis are called unnaka chappathi (meaning dry rotis), by my grandmother. She makes one the night before and has this for breakfast with leftover fish or beef curry.It actually tastes better the next day.

A word of warning: This recipe tastes authentic only when the pathiri is fried well. Don't try to make it without oil or ghee.
Sometimes you can add a bit more of whole wheat flour to the mix to vary the flavour. This goes well with almost any curry but I like it best with sugar.


You'll need:for 4 rotis
All purpose flour-2 cups,
Whole wheat flour- 1/2 cup (you could make it fully out of whole wheat flour too)
Salt-to taste

1. Add salt and water to the flour to make a dough. The dough should be hard like that for puris, else it would be difficult to roll it out.
2.Keep aside for 15 mins. Divide into even sized balls...about the size of a medium lemon.
3. Roll it out thick and smear ghee or oil over it. Fold as shown in the pictures. Roll out into a 5" square.
4. Heat a griddle or saute pan and cook each side for a minute.As the raw color leaves the pathiri,add about 2tbsp oil or more to let each side fry well.
5. Turn over and fry the other side till golden flecks appear.
Drain and serve hot.