January 15, 2010
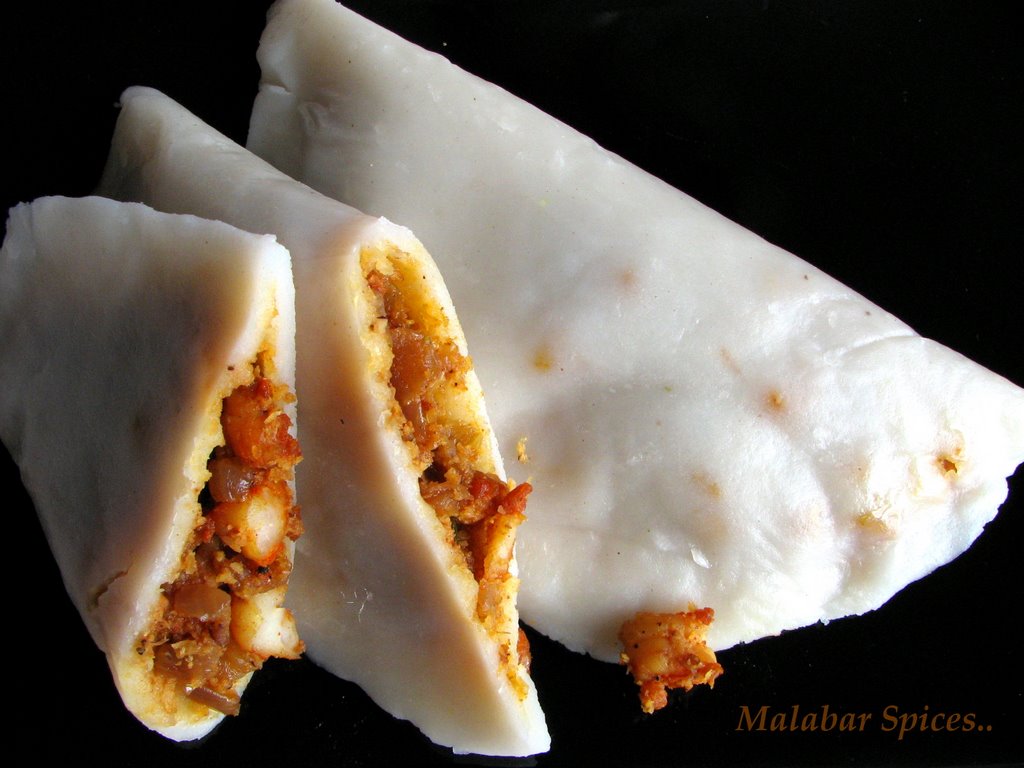
Meen Pathiri/ Steamed Fish Pancakes
This is another of those traditional Malabar recipes that is getting endangered and should be on a protected list..They were (and maybe still) are so commonplace in our houses but you might be more familiar with it through the travel cookery shows in Kerala where they are deemed exotic and laborious.
Pathiri is a term used loosely in Malabar region of Kerala to mean roti/chappathi/ or flatbread. The prefix of the word" pathiri" decides what kind it is..godumbu pathiri is made of godambu,i.e.wheat, ari pathiri is made of rice flour, erachi pathiri, has erachi /meat stuffed in it, meen pathiri has meen,/fish stuffed in it and so on.
This fish pathiri is made with Kng fish/Aikora or with Mackarel/ Aila or even with Sardines/ Mathi. When pressed for time, I have made this with canned tuna, canned sardines and it tastes passably good.
November 25, 2009
Kadala Kari/ Parippu Paysaam with Pidis/ Chana Dal Kheer
It's been a long month and am just glad to be sitting here nearly at the end of it, sighing in relief! Some days dragged their feet, some days got stretched taut like a rubber band only to have to let go and let it snap back with a sting. If I start to tell you what all happened in the last month, I will be here all evening, so suffices to say that our house has finally changed hands and we have moved out into an apartment. Even though I am writing it here now, it's still a bit hard to believe and sink in.
Since this is the country where you can return anything ( well, anything you buy and sometimes what you don't buy) I still get nightmares where our buyer wants to return the house for some weird reason or the other. I guess it will take a while, to settle in.
September 15, 2009
Chicken Samosas..
If you have any leftover grilled or fried chicken or chicken dry curry , u could add onions and chilies and make the filling masala. The filling should be dry for the samosa to hold together.
September 09, 2009
Fasting or Feasting?
It's always nice when your mind can get off a rut and think afresh. Last few weeks whenever I opened my blog and looked at the keyboard, all my mind was filled with, was the status quo. Now, with the advent of Ramadan, there is a relief in the line of thought. With fasting and fast breaking, the conversation has shifted to food, religion, and consciousness.
Everybody knows the goodness of fasting..every body fasts in different ways..on Tuesdays, Fridays, without grains, without meat, without dairy products..or follow lent.. Every religion has some kind of fasting embedded in it. Definitely healthy to get rid of toxins and change your food habits once in a while. Besides the religious aspect, fasting is a great way to discipline the mind and control cravings.
August 21, 2009
Kheema Mutter/Ground Beef with Green Peas...
Every two three days there is a house showing a.k.a."pennukanal" and my cooking is a mad rush now or there is no cooking on those days coz I don't want to mess up my super clean kitchen and clean again. The market is not the right time to sell a house but it's the best time to buy so whenever we take a price cut, we get consoled that wherever we buy, there is a price cut there too. So the loss-gain factor is moot in our case.
Whereas I used to make a variety of food earlier, now its down to the least common denominator. One main item, whatever works with minimal splatter, minimal cleanup, minimal pots to clean. I think of most of our Malabar dishes and they are so labor intensive that they get relegated to the sidelines in the current situation. With Ramzan approaching though, I will have to think of easier items to make.
May 27, 2009
Potato Samosas..
My friend calls up and asks me if I am going to buy potatoes.. I hedge and say I don't feel like going out, thinking she is asking me to leave the comfort of my home on such a busy day..but she was just saying..don't buy potatoes, she just bought a sack of giant oversized baking potatoes and was sending some over.
So how big can they be? Well, they turn out to be a pound each, about the size of my palm and fat. What is the first thing that would come to your mind with potatoes?
Puri Bhaji? Aloo subji? Baked potatoes? Mashed potatoes?
Guess where my mind wandered to? Samosas..Giant crisp hot, mouth burning hot samosas!
I don't usually bother making these Potato samosas... the Delhi style.. love those monstrous sized flaky pastry filled with spiced potatoes, not like the petite Malabar meat samosas and not like the cocktail itsy bitsy samosas made in spring roll wrappers. We usually drive down to buy these samosas from a restaurant nearby or just use the freezer ones.
In my days in Delhi, there was a wonderful samosa shop in our shopping area...walking distance, no need for a car!!
Some evenings,(when mom didn't make something yummy) I used to run down to that halwai and order a fresh batch of samosas and garam garam jalebis.
You can't enter the shop..its a dirty mess of cooking..more like a kitchen in action..people hustling about, kneading, pouring, mixing..all labor intensive actions, while the halwai, a jovial fat guy in a dhoti sat near a couple of large cast iron woks, stirring and frying jalebis in one and samosas in the other.
Visions were flashing... waiting for the fresh samosas to be dunked into the oil..they sink deep down into the wat of oil as they are slid in and then surface up for air as they get fried and puff up. ...and the rush to get home before it cools down and then munching them with pudina/Mint chutney and tamarind chutney..and hot dripping jalebis!!
For me, samosas and jalebis always go together...now though they are both in a different country and divorced and living separately. The crust of those samosas were like eating Matri, a flaky crunchy fried circle of maida that's eaten with tea/coffee as a snack.
Anyway, I had to make them and I did have a recipe that I used to use in my torn old book. My crust is not as flaky as the store bought one but then that's due to the water I mix the dough. For flakier crust, use more oil and very little water. It's almost like making pastry dough. And though the size of these samosas turned out to be small( i can only make the Malabar sized ones!!) and the taste is nowhere near the ones from my memories, the exercise in making these samosas was fun.

You Will Need:
Potatoes: 250 gm, or two giant baking potatoes
Onion- 1 medium sized one
Green Chilies-3-4
Ginger Grated-1 tsp
Green Peas- 1 cup cooked
Coriander(whole) -1 tsp, crushed coarsely
Cumin seeds-1 tsp
Aamchoor/Dry Mango Powder-1 tsp
Red Chili Powder-1 tsp
Garam Masala powder- a pinch.
Salt
Cilantro leaves- 3 tbsp chopped
Preparation:
Boil the potatoes (as a whole in the pressure cooker or cut up and boiled in lots of water and drained.)Peel the potatoes and smash them into small pieces. There should be some tiny lumps, not big chinks.
Chop the onions finely and fry them in very little oil till they turn transparent and then add the chilies, ginger, boiled peas, crushed coriander, and all other spices. Add the potatoes too and mix well. Taste and add salt as needed. Add more or less of spices. It should be spicy and tangy. Add the cilantro leaves in the end.
Prepare the dough: Mix 1 1/2 cup all purpose flour with 1/2 cup whole wheat and 1/2 tsp salt. Add 3 tbsp heated ghee or oil and mix well into crumbles. Add water little by little( you will need about 1 cup of water) till it forms into a tight but pliable dough. Use more oil and less water if you prefer. Let it rest for at least 20 minutes before rolling out. The crust doesn't puff up like puris, just stays as layers and layers of crispiness. Piercing the rolled dough before filling it helps. If the dough feels too springy, let it rest for a minute in between rolling out.
I make the samosas by rolling out the dough into a big thick circle and then cutting it into 4. See the photorial here. But this is another method I saw online and maybe easier for most people. For me, the quarter method is much faster, though the samosas are smaller..maybe better for our waists.:)
Divide the dough into equal balls. Apply a little dry flour to each ball when rolling into a circle of 4″ diameter. Cut each circle into two and lightly dampen the edges of each semicircle with water. Shape each semicircle onto a cone by pressing the cut edges together. Place a spoonful of the potato-pea filling into the cone and seal the edges well (apply some water on the edges if they do not seal well). Repeat this procedure with the rest of the balls.
Deep fry in medium-hot peanut oil in batches on medium flame till crisp and golden brown. Remove onto a paper towel. Serve with pudina and tamarind chutney.
September 15, 2008
Chemeen Ada/ Rice Pancakes with Shrimp stuffing
Ada, as most south Indians know, is a delicious preparation of sweetened grated coconut encased in a layer of rice paste , wrapped in banana leaves and then steam-cooked. As it cooks, the rice absorbs the earthy aroma of the banana leaves. I love the ada whether it is filled with coconut and sugar, jaggery, or jackfruit.
But the similar preparation I was used to at my household, was pathiris and pies made of rice paste, rice flour, or steamed rice. One such pie (pathiri) is the meen pathiri, rice ground to a paste with coconut and spices, and filled with fish/shrimp masala and steamed in banana leaves. While the meen pathiri is traditionally made as a pie, cut into triangles and served, I found it easier to handle the stuffing when it is shaped as an ada. Quite like a pocket pita sandwich. So it can be made either way.
I first tasted the shrimp version of the pathiri when my aunt made it and found it a nice variation from the fish masala as the shrimp adds a hint of sweetness to counter the spicy filling. So this recipe from my aunt(elama) was a must add to my collection, especially since we get more fresh shrimps here than fresh sea fish. And though I cannot recreate the flavor of banana leaves, I reconciled to making pathiris using parchment paper or aluminum foil. Not quite the same, but the contrasting texture of soft and crunchy, the mild coconut flavored rice shell and the spicy shrimp filling is just as satisfying.So I decided to blog abou the shrimp ada before the meen pathiri.

You will need: this makes about 10 adas
For the filling:
Shrimp- 1lb
Onion- 3 medium sized ones
Tomato-1 medium sized one
Green chilies- 4
Red chili powder-1 tsp
Coriander powder- 1 tsp
Turmeric- 1/2 tsp
Curry leaves- 3 sprigs
Salt to taste
Oil- 4 tbsp
For dry roast:
Coconut grated-1/2 cup
Shallots-4 small ones chopped
Fennel seeds-1/2 tsp
Green chilis-2 chopped
Preparation:
1. Wash and marinate the shrimps in ½ tsp chili powder, ¼ tsp turmeric and ½ tsp salt. Keep for 15 mins.
2. Chop the onions, curry leaves and green chilies finely .Heat 2 tbsp oil and sauté the onions, chilies and leaves in that order. When they look translucent, add the chopped tomato and the spice powders. Cover and cook for 5 minutes or till the tomatoes look pulpy and add salt. Add a bit more oil if needed. Stir and sauté till the whole mixture gives out oil and moves as one mass in the pan. Keep aside. In another pan, add the shrimp and let it cook in its own juice till all the juice dries out. Add the remaining 2 tbsp oil and let it fry for a minute or two.
3. Remove and coarsely chop the shrimps (or use a chopper) and add to the onion mix and stir together on low heat.
4. Meanwhile, in a cast iron skillet or a heavy bottom pan, dry roast the ingredients specified above, all together on very low heat till the coconut gives out its aroma and starts turning brown at the edges. Take it off the flame and pulse in a dry grinder to powder it coarsely. No water is to be added.
5. Add the powdered coconut to the shrimp mixture and stir everything together. Turn off and let it cool down before filling.
The rice paste:
Rice flour- 1cup
Water- 1cup
Salt- ½ tsp
Fennel seed powder- ½ tsp
Coconut milk - ¼ cup (or use ¼ cup coconut ground with little water)
The rice shell can be made by soaking parboiled rice and grinding it with coconut and fennel seeds to a wet paste, as RP of My Worshop has described, or you can use rice flour mixed with water to make a pliable paste as Healthy n Spicy has described.
Two reasons for using the longer method of cooking the rice flour. a) so that it remains super soft the next day also. b) To make it easier to roll it out thinly.
6. Heat the water with salt till it boils and then add the rice flour. Do not stir. Turn off the flame and keep it covered for 5 minutes. Open it and stir in with the handle of a spoon and cover it again for 5 more minutes. Spread the flour mix onto a mixing plate and let it cool down. Add the coconut milk/ground and fennel powder and then knead it into dough. It will be a little sticky to begin with but as the dough comes together, it gets easier. The final consistency is a little wet as compared to a bread or a chappathi dough.
7. Cut parchment paper into suitable size squares. Place a lemon size ball on the paper and flatten it with the heel of the hand (like doing karate chops) to avoid sticking to the hand. If that is difficult, place another parchment paper over it and roll it with a rolling pin to a palm sized disc. Remove the top paper carefully. Place 2 tbsp of the filling on one half of the dough and gently fold over the other side (with paper) to align exactly at the edges and seal the edges, pressing down on the paper.
Check out Priya's kitchen for a wonderful description of the ada with emphasis on steaming and parchment paper.
For steaming, use a steamer or rice cooker or any large vessel half filled with water. Place a colander or a steamer basket over the water when the water boils and reduce heat to medium. Place the adas in the basket, cover it and cook for 7-10 minutes. Let it cool down before serving.
August 25, 2008
Masala Eggs...
The laziness that comes from idling away days seeps into the act of blogging too. In the last few weeks, every time I faced a delectable food made by someone, words would stream into my head to share it here, thinking how best to present it, how to photograph it, how to describe it, how to simplify the recipe... well, I didn't do anything at that time since my hands were full with a hyperactive baby and now only the memory of how much I enjoyed it remains.:)
Let me start with the simplest recipe that I encountered.
One of the first things as a bride after the wedding is to visit aunts and uncles as the demure(!!!!)spouse and politely eat whatever is placed in front of you.
No excuses of being full or just having had tea,lunch etc will ring true and rescue you.
I did my fair share of this sometimes fun, sometimes-a-chore ritual a long time ago. After our wedding, we drove down to the town/"naadu"/village for a day full of social visits. We visited a lot of my better half's relatives on his father and mother's side in that one day and ate and drank from many houses. Having to remember all the relatives that were newly introduced to me proved impossible and stressful for me. Hence I tried to remember each relative by what food I ate from there..... K's eggs, A's Unnakaay, Ammai's Neipathal...and so on. Though now I am better acquainted with the people, we still refer to each relative by their specialty foods when we want to clarify who we are talking about.:)
Some food get gulped down and some you relish. One of them that I loved and recalled easily were these Masala eggs. They are too simple to be called a delicacy and yet, they are yummy to me. They are hard boiled eggs marinated in a semi-watery paste of red chili powder, turmeric and salt and then deep fried. It could be shallow fried too. That's the recipe itself. How much of each is up to you. The exterior is crisp and spicy to counter the blandness of the eggs. Could pass off as a snack or a side dish too.

In the flurry of visits to multiple aunt/uncle houses at that time, I did manage to confuse the actual house that I ate these eggs in and for the longest time, I thought my better half's grandmother made this. So at this vacation, while I tried to get the recipe from His Grandmother, I was ribbed and set straight by his aunt K who is the actual author of this recipe. Apparently she made it in a hurry when we visited her, as an instant snack/"palaharam" with tea. :) And here I was thinking I finally know everybody!!
Later in the vacation, when we went over to her house for a dinner, we were served these masala eggs with a lot of teasing and hearty story telling. There was an array of other good food..but these...for me, they still ruled..still had the same taste and texture. Needless to say, only politeness prevented me from overeating.:)
Side Note:
The only time I have used these in a recipe is as a garnish for Egg Biryani. Mishmash makes eggs as a garnish for her Egg Biryani. She uses a different masala but when I made her egg biryani, I used this red chili-turmeric-salt as the marinade and it was great.
So try these as your next appetizer and see.
March 19, 2008
Chicken Malai Tikka

Some more soups were left to blog but I have no photos for them so decided to post them later. Meanwhile my family craved something spicy and meaty and so here it is...Chicken malai tikka.I am sure my readers in the metros in India have their favorite tikka/kebab corner, which they frequent regularly and hence wonder why we bother making this at home.
If I could access Nizamuddin, Karims, Delhi Durbar or Bade Miyan here, I would choose to just sit back and eat. But the food in the Desi restaurants here look reasonably desi, smell good but the food is a watered down version of the real thing. All color and no flavor. So when we meet up, my friends and I take turns making the grilled tikkas as appetizers and each of us have a wonderfully unique recipe.
And on a week night, this is good for dinner....A green salad, some tortillas or pita and a tzatziki sauce or yogurt sauce, all wrapped up makes for a sumptuous meal.

This is one of the typical marinade for chicken kebabs or tikkas or whatever you want to call them. The names have been used interchangeably by everyone for small bites of chicken marinated in a yogurt based spice mix and grilled.The literal meaning of tikka is "pieces of chicken" and the word Kebab or Kabob is generally used for minced meat or cubes of meat on a skewer, usually marinated before cooking. The malai in the name comes from the addition of yogurt, sour cream or cream(malai) in the marinade and even butter to baste it. It adds a creaminess to the chicken's texture and makes it soft. Traditionally made in the clay oven, tandoor, the tikka is cooked surrounded by the high heat for a short time. It imbibes the smoky flavor and cooks fast, leaving it crusty outside and juicy inside.
In the summer I grill it on the backyard gas grill but all through winter, its done in the broil setting in my cooking range. (It does run up my gas bill though!!)
Since my version uses just a whole chicken cut up into small pieces, some with bone in it, I call it tikka. Kind of a smaller version of tandoori chicken. You could make it with boneless cubes too for ease of eating but the flavor is entirely different.. So its your choice, really. The boneless version is good for making chicken tikka masala, a very popular creamy chicken curry.
I have tried many recipes for the malai tikka, some with cream and some with sour cream or yogurt but this combination is what I end up using week after week. The others are really good too and when you do have sour cream or leftover cream at home, its great to use them but who wants to inject fat unnecessarily? So I stick to yogurt which is thickened and that gives it a rich flavor without too much fat. To make thick yogurt, hang the required amount of yogurt in a clean tea towel and place in a large strainer over a bowl. Leave it for as long as you need. After about a hour or more, the whey would have drained out leaving behind thick yogurt. You could also buy Greek yogurt instead and use that.
You will need:
A whole chicken cut up into small pieces. Use a 2 to 3 pound size one.
For the Marinade
Thick Yogurt-1 cup
Juice of 1 whole lemon
Ginger paste-2 teaspoon
Garlic paste- 2 teaspoon
Red Chili Powder- 1 and half teaspoon(Use less if you want it less spicy)
Paprika-3/4 teaspoon
Turmeric-3/4 teaspoon
Coriander Powder-1/2 teaspoon
Cumin Powder- 1 teaspoon
Garam Masala- 2 teaspoon
Cilantro - 1/2 cup finely minced.
Salt to taste
Olive Oil( traditionally butter is used, so u can use either.)-3 Tablespoons
Preparation:
Blend all the marinade ingredients in a blender . Marinate the chicken for at least 2 hours or over night in the refrigerator. Skewer the chicken on either wooden or metal skewers. I usually make it without skewering out of laziness and it tastes just as good. To keep bamboo or wooden skewers from burning, soak for several hours in water before using.
Outdoor: Clean the grill grating and oil with a cloth. Preheat to the maximum heat and grill for 15 minutes, trying not to keep turning them over all the time. Just turn once midway and baste with oil.
Indoor: Preheat the broiler or set the oven to the highest setting say 500 F. Place a grill grating on top of an aluminum foil lined tray. Brush with oil and spread the chicken on the grate. Grill for 7-10 minutes on one side and then turn them over.Total maybe 15 to 20 minutes. Baste with butter or oil in between if it looks too dry. The timings may vary based on your oven's heating and type so use your judgment. If the quantity of chicken is less, it will take less time. When they are done, the pieces would not stick to the grate and only a clear juice will run out.
Garnish with onions, cilantro and lemon wedges..enjoy! Serve hot with Mint Chutney.
Related Links:Mandira's Chicken Malai Kabab
December 18, 2007
Malabar Chicken Biryani..
Eid, Christmas, New Year, all have one thing in common..lots of mouth watering food and a distinct disregard for the consequences of over eating. Here the holiday season is now officially on and eating is the highlight till Jan 1st. So how many parties do you have planned for next week?(How many did u escape from?)
What is your favorite holiday food? Is it the sweets or the appetizers? I for one thrive on the appetizers and then peck on the main course unless its something very different. And of course dessert rules supreme so have to make some space for that too. But a biryani defies these rules and I have to try it, even if its just one bite.
If we were in Calicut, every weekend would punctuated with a wedding, a birth, a salkaram(party) or whatever..everything being a reason to make a biryani..( eg. every Sunday in my grandma's house!)
So I asked my parents (who missed a whole lot of such events being here with me) if they get sick of it and to my surprise they bashfully refuted it. A good plate of piping hot biryani is always welcome for a Calicut wallah, even if you just had one last week.:) No diets will work there.

I had a lot of requests to post a Chicken Biryani recipe but somehow in my house, since there is more of all the other biryanis being made, this one got left behind. But it is just as good as the other ones so give it a shot. Better late than never, here it is finally. The photo is not complete since I ran out of onions and nuts for garnish but here it is. Also a good mix of masala and rice somehow isin't photogenic! So the final photo is how the biryani should look like before it gets attacked.

Chicken biryani is not fun if the chicken gets dried out and tastes like cardboard. So start with halal small chicken and you are on the right track. Do marinate as much as possible for better taste. If the marination time is more than 2 hours, omit the yogurt in the marinade as it is a meat tenderizer and will break down the meat too much. In that case, add the yogurt when u start cooking. Do not skimp on the ghee-oil while frying the onions for garnish as this is a celebratory dish..not diet food. That oil poured over the rice gives the crucial flavor while dumming or cooking in vapor.
Do not leave the rice in the oven after the alloted time as it will dry out the whole masala and rice.(Spoken from an unfortunate experience.:() Use basmati rice that you are familiar with and not a new sack of rice opened for the occasion. (Another unfortunate experience when the rice got sticky!!)
Do make it in the holidays and let me know.
Eid Mubarak and Merry Christmas!!
You will need: Serves 6 people with a good appetite.:) or 8 people
Chicken - 1 Small chicken of about 2-3 lbs
Onion – 400 gm or 4 medium ones
Tomato - 200 gm or 2 medium sized ones
Small Hot Green chilies – 100 gm or about 17 in number
Ginger - 50 gm or a 2 inch piece
Garlic pods – 50 gm or 8 cloves(big)
Pepper Powder – 1 tsp
Turmeric Powder - 1/2 tsp
Plain Yogurt- 3/4 cup (thick)
Fennel Seeds(Perinjeerakam/Saunf)- 1 1/2 tsp
Poppy Seeds (Khus khus) - 1 1/2 tsp
Mint leaves (Pudina) - 1 cup chopped
Cilantro leaves (Malli ela/Dhania) - 1 cup chopped
Curry leaves- a handful
Lemon juice- 2 tsp or juice of 1 lemon.(not lime)
Biryani Masala-1 tablespoon. Recipe is noted below.
Clarified butter (Ghee) - almost 1 cup or 1/2 cup mixed with 1/2 cup oil
Cashew nuts – 20 gm or a small handful
Raisins- 20 gm or a handful
For the rice:
Basmati rice - 1 kg/ 4 cups
Cinnamon (Karuvapatta) - 1 stick of 3 inch
Cloves (Carambu) - 4
Cardamom (Elakkai) - 4
One bay leaf, salt.
Lemon juice- 1 1/2 tsp or juice of 1 lemon
Salt to taste
Biryani Masala:
Cinnamon 2 inch piece
Cardamom 8
Cloves 8-10
Nutmeg 1
bay leaves- 1
Mace 5-6
Caraway seeds 1 tbsp
Star Anise-1
Dry roast all together and grind to a fine powder.
Preparation:
1. Clean the chicken and cut into medium sized pieces. Wash and drain well.
2. Soak the fennel seeds and poppy seeds in a bowl with water for an hour at least and grind with very little water to a very fine creamy paste. If it still feels grainy, add a tablespoon of grated coconut or a couple of cashew nuts to it to grind it well. Keep aside.
3. Grind together the ginger, garlic and green chilies into a very coarse paste. Pulsing them instead of non stop grinding works better. Chop the tomatoes into cubes and slice the onions. One onion should be sliced extra fine. This one is for the fried onion garnish.
4. Marinate the chicken with the poppy seed mixture, ginger, garlic, chili, and all the other spices and ingredients except the onions, biryani masala and herb leaves. Add salt too and keep covered for two hours at least. Marinating is very important in the case of chicken to help it to absorb the flavors. (But don't marinate the chicken over night as the texture will change. If you have to marinate overnight, omit the salt, lemon juice and yogurt and add that the 1 hr before cooking.)
5. Heat three fourth of the ghee/oil in a heavy bottom pan. Add the garnish portion of the sliced onions and fry, till they turn golden brown and crisp. Add a sprinkling of sugar to speed up the process. This should take about 10 minutes on medium low heat.. Remove the onions and stir fry the cashew nuts on medium heat till it turns brown on all sides. Drain and remove. Add the raisins now and stir till they plump up. Remove onto paper towels. This ghee/oil is used for flavoring the rice so save it.
6. Heat up the remaining oil and add the rest of the sliced onions and saute it till it becomes translucent. Add just the marinated chicken, and saute it on all sides for 3-4 minutes on high heat. Add the rest of the marinade and the biryani masala and the coriander, mint and curry leaves and mix thoroughly. Cook it uncovered on medium high heat while stirring constantly till the visible liquid is reduced to half.
Then keep it covered and cook on low heat for about 20 minutes. Check frequently to prevent burning and wait till the oil starts to separate. There should be some gravy left and the chicken should be almost cooked, not-coming-apart cooked. Add water only if there is no liquid for the chicken to cook. Check taste and add more salt or lime, pepper etc if needed.
7. Preheat the oven to 300 degrees Fahrenheit.
8. Clean and soak rice for 10 minutes. Keep aside. Heat 3 tbsp of the remaining onion ghee/oil and add the whole spices- cinnamon, cardamom, cloves and bay leaves. Sauté for a second and add the drained rice. Stir fry the rice till it turns opaque and add 6 cups water (three fourth of the quantity required for ghee rice). When the water-rice mix comes to a boil, cover and cook on slow heat till all the water is absorbed. This would take about 4-7 minutes.
9. In an oven proof dish, spread half of the chicken masala(it should have some thick gravy)and place half of rice over it. Sprinkle some lemon juice to prevent the rice from sticking. Spread the remaining masala and top it with rice followed by lemon juice. Pour the ghee/oil(leftover from frying the onions) on top of it and sprinkle some garam masala, fried onion, nuts and raisins.
Close it with a layer of aluminum foil , crimp it along the sides and then put the lid and put it in the oven for 20 -25 minutes. Remove and let rest for another 5-10 minutes before opening.
10. Serve with coconut chutney (biryani chammandi), Pickled onions (Ulli surka), Yogurt and Papadam.

Alternately, if you are just cooking a small quantity, when the chicken is almost cooked and the gravy reduced, spread all the half cooked rice over it,right into the saute pan. Sprinkle nuts, raisins and onions and close with a tight fitting lid. Heat a flat cast iron skillet or the Indian Tawa, place the saute pan on it and cook on high heat for 20 minutes and then turn off the flame. Let it rest unopened on the tawa for another 15 minutes and now the "dum" work is also done.
Open and serve the top rice as white rice and mix part of the rice with the masala and serve separately.Enjoy!

Calicut Biryanis are usually made with a special rice called Kaima as the grains are smaller and impart a nicer texture to the Biryani. Kaima is a small aromatic flavorful rice also called "Jeera Rice", it stands apart just like Basmati. Available in all Indian stores here. You could use basmati too if you prefer. The photo below shows the difference in both qualities of rice.

This is a picture of an earlier batch of biryani made with basmati rice and has the requisite onions, raisins and nuts as garnish.
August 02, 2007
JFI-Molagu Thottu Kootan/ Green Chili Chutney

My veggie garden has started yielding long green chilies, bell peppers and some spicy chilies. They are supposed to turn red when the heat is assimilated. But they can be plucked when green too for a milder flavor. They taste like a thinner version of bell peppers then.
So for the JFI- Chilies,hosted by the multi talented Nandita of Saffron Trail, I picked only some of them (leaving the rest to ripen) and added some other long chilies in my refrigerator and made a traditonal thottu kootan. It literally means "a curry to be tasted (not poured)".
A thottu kootan is a simple chutney-like side dish, a mixture of sour, sweet, and spicy flavors to offset the richness of a meat curry or to enhance the lightness of a lentil curry. Traditionally, this is a must on the Ghee Rice menu along with Mutton stew, and thick Lentils(Parippu).
A thottu kootan can be made with either tomato or green chilies, okra or bitter gourd, though not all together. We use long green chilies for this which have a lot of flavor but are not as spicy as the tiny ones. You don't have to remove the seeds nor add any more red chili powder. This is not an extremely spicy dish.. it is more for the inherent flavor of the chilies that are often overlooked in the shadow of its spiciness.
You will need:
Long Green Chilies- 10 long ones
Garlic Paste- 1/2 tsp
Ginger Paste- 1/2 tsp
Onion- 1 small one
Fennel Powder- 1/2 tsp
Coriander Powder- 1 tsp
Turmeric- 1/2 tsp
Tamarind Extract- 5tbsp (If made from fresh tamarind)
Sugar-1tsp optional (if the tamarind is too sour)
Canola/vegetable Oil-2-3 tbsp
Salt-1/2 tsp(to taste)
For Seasoning:
Mustard Seeds-1/2 tsp
Curry leaves-one sprig
Fenugreek Seeds-1/2 tsp
Preparation:
1. Slit the green chilies up to the stem but keep them intact at top. Slice the onions finely. If using fresh tamarind, soak a small lime size ball in warm water and extract the juice. If using the store bought tamarind, use very little (1tsp or less)as it is in concentrated form.
2. Do the seasoning first: Heat the oil in a heavy bottom pan. After a minute, lower the heat and add the mustard seeds and cover till it finishes spluttering. Now add the curry leaves and the fenugreek seeds, onions, green chilies and saute for about 5 minutes on medium heat. Add the ginger-garlic paste and keep stirring. When the raw smell disappears, add the turmeric, coriander and fennel powder. Stir for 2 minutes on very low heat to fry the spices and then add the tamarind extract and salt. Let it cook on medium heat till the chilies soften and the gravy thickens. ..about 6-7 minutes.
Serve hot with ghee rice and curry or with rotis.
JFI -Chilies
June 20, 2007
Kadukka Nirachathu (Arikadukka) /Stuffed Mussels
So most of you familiar with Malabar cuisine have already guessed correctly what the kadukka or kallumakai or mussels ended up as..It is Kadukka Nirachathu or Arikadukka as some call it is a very popular snack in the Malabar region.
Arikadukka are Mussels stuffed with a mixture of ground raw rice paste, shallots and spices and then steamed and fried with the shell on. This is a much sought after item on the "salkaram"(party) as well as Ramadan menu. Some separate the mussels after steaming and then dip then in a batter of rice flour and spices and then fry then but we prefer to fry the mussels with the shell intact. It adds to the fun of peeling and eating them as if they were pistas or groundnuts and inhibits the wary guests.
These beauties are from Kerala..
The name itself conjures up the image of large batches of the delicacy being made by my mom and my aunts all sitting in the open kitchen facing the backyard. from making the filling to cleaning the mussels to frying then, this is definitely a group activity made easier by all the gossip and laughter that flies around.
Mostly made at home, I think it is now available in some speciality restaurants such as Zains in Calicut. (This time, my parents got some Kadukka nirachathu all the way from home and they served as a much needed shot of nostalgic taste.)
Kadukka or mussels are easily available in Northern Kerala and is used in a multitude of recipes...curries with plantains, mangoes, fried, and made into spicy gravies. But the taste and texture of mussels is showcased wonderfully best in this delicacy. In Kozhikode, we get our yummy kadukkas from south beach (near Thangals Road..Rs.60 for 100) but recently my folks say the best kadukkas are from Telicherry coast. Since tasting that is now left for my next visit home, I stand by the Kozhikode ones for now.
The mussels should not be too small or too big and should be raw and fresh, not frozen and not refrigerated. The ones you get in Kerala are long and narrow with blue green shell, while the ones here are a little short and squarish. I have made it with the ones available here too, but they are not as meaty and their shells are very delicate. Still the rice filling gives it its distinctive taste and its good.
A bit of warning..
The following post contains graphic images not suited to vegetarians and those weak of heart. For the true followers, its not easy to explain the method without graphics so if any of you are put off by the sight of mussels, just bear with me.
Also, if you don't have to guts to play with raw mussels, don't attempt to make this. Though fish makes me queasy, I have no qualms about mussels and the anticipation of the yummy snack makes it all worthwhile. And last but not the least, the process is a labour of love and requires at least an hour of your valuable time and concentration. If you have company to help you, all the better.
Don't attempt this on a day when you are out to prove a point or spoiling for a fight.:) It is bound to go wrong then. And use only parboiled rice, not basmati or any rice you find at home. It will not solidify and will be sticky inside and would absorb a lot of oil while frying.
When made properly, the kadukka can be removed completely from the shell and served.
The first recipe is using rice flour instead of ground rice, keeping the difficulty of grinding rice in mind. Use coarse rice flour, such as Puttu Podi.
You Will Need:
Mussels(Kadukka)- about 20-25
Coarse Rice Flour-2 cups
Water-1 1/2 cup
Coconut-1 cup grated
Red Shallots(Chuvanna Ulli)-8-10
Onion-1 medium sized one
Fennel Seeds(Perunjeerakam)-1 tablespoon
Green Hot Chilies-8
Curry leaves-one sprig
Turmeric- 1/2 tsp
Red Chili Powder-1/2 tsp
Salt to taste
Oil for frying
Preparation:
1. Wash the raw mussels properly under running water, scrubbing the surface completely clean. Allow it to drain in a colander. If they are already open, discard them as they are not good. Ideally, they should open slightly and close again when tapped. Use mussels the same day they are bought. Do not refrigerate or freeze and then use them as it changes the taste.
2. Prepare the dough: Grind the coconut, fennel seeds, shallots, green chilies to a coarse paste without adding any water. Boil the water (use exact measurements as specified) with 1/2 tsp salt or to taste. When it comes to a rolling boil, add the rice flour and stir with a long handle of a spoon. (The rice flour should be grainy to approximate the texture of ground raw rice.) Switch off the flame and after stirring completely, cover and let it cool for at least 10 minutes. Open and add the ground mixture and turmeric and red chili powder, chopped curry leaves. Spread into a mixing plate and knead into a grainy but not too dry dough. Add water by spoonfuls if needed to mix well.
3. Chop the onion finely and fry in 1-2 tbsp oil till light brown. Drain the oil and add the onions to the dough and mix thoroughly.
Do not add salt liberally as the shellfish already has sea water and hence is a bit salty to begin with. Add a bit less than what you feel is needed.
4. Open the mussels one by one by sliding a blunt knife in thorough the slits and forcing it open. Once open, it won't close again. Take care not to crack the shell. Try to remove the hairy substance at one corner by pulling it out.
5. Stuff each mussel with the rice filling and shape neatly.
6. Use a steamer or cooker and steam the stuffed mussels for about 30 minutes. They may look soggy when you take them out but they firm up on cooling. You can store them at this stage for a couple of days in the fridge and fry as needed.
These mussels are are from here..
7. Heat enough oil in a cast iron wok (cheenachatti) or deep pan. When the oil is hot, slide in the mussels one by one. Fry them in batches suited to the size of the pan till golden brown. Drain onto paper towels and serve.
If made the previous day, they can be reheated in a microwave for a minute or less.
Traditional Filling:
Parboiled Rice-2 cups soaked in boiling water for at least 3 hours and then drained. Grind the rice to a paste adding all the other ingredients as before(except the fried onions)but without adding water. This is not easy as you need a wide base grinder equipped to handle heavy duty grinding without water. An electric grinder or a Sumeet or Preethi food processor should be fine.
Then add the onions, spices and salt and proceed as above.
May 28, 2007
Nadan Erachi Porichathu /Country Beef Fry

Beef fry is made famous and infamous by the various thattukadas and restaurants in Kerala. Every restaurant along the highway from Kannur to Trivandrum has their local derivative of the Beef fry ranging from dry to semi-dry served with porotta or borotta. More of a bachelor's favorite it is easy to make and crowd pleasing.
My name for it as "country fried beef" is a pun and comes from "Nadan", the malayalam word for "anything relating to the homeland (nadu)" which we translate quite roughly as "country"....:)So it is no way related to the American country fried steaks, smothered with gravy.
In my house, beef fry is little more than a sauteed extension of Beef Varatiyathu, where the meat is cooked with spices and herbs and then further sauteed with curry leaves, mustard seeds etc. The simple fried version is reserved for tiffins for long trips and for pickles taken to US for the beloved kids starved of nadan grass fed beef.
With US being the largest consumer of beef, you would think the meat here would be out of the world. Well, it is good for steaks and grills, with all the marbling and fat content, but when it comes to a dry meat fry (nadan erachi porichathu),nothing compares to the meat back home. Organic beef here is the closest that tastes similar to that.
After my wedding, at one of the earliest salkarams at my better half's relatives house, I wsa introduced to another side of the meat fry. Decadent, deep fried, fiery spicy and "can't stop eating it" yummy. One version was tiny pieces fried and mixed with chukkappam, button shaped chips made of rice flour. The other version was bigger pieces as a side dish for rice or porotta.
Also saw a hitherto before unknown side of my better half who couldn't put the plate down. As a newly married, it made a indelible impression..so the way to a person's heart is through their stomach.....of course, I had to get the recipe from his aunt which she happily gave as it is not so much of a recipe as a state of mind.
And since then, I keep trying the recipe with varying degrees of frying to replicate the taste. The proper way is to deep fry it but I still can't get myself to do it that all the time, being squeamish of the oil, (as RP makes fun of me), but love the clean spicy taste. This is my current final recipe for the nadan beef fry. For the best taste, dunk it in a deep fryer, but otherwise try it my way.
You Will need:
Beef: 1 lb
Hot Red Chili Powder- 3 tsp, more or less as per taste.
Turmeric-1 1/2 tsp
Shallots-4-5
Salt to taste
Preparation:
Clean and cut the beef into small or very small pieces. Mix the red chili powder, turmeric and salt with the beef, adding 1 tsp vinegar. Keep aside for at least 15 minutes. Pressure cook the marinated beef for 1 whistle or 2(Depends on the quality of beef)till the beef is tender but not crumbly. US beef is soft so doesn't need a lot of cooking so vary the times according to your experience.
When the pressure cooker cools, open it and let the gravy be absorbed into the meat on slow heat. Taste and adjust the salt. Add no oil at this point. Heat oil in a nonstick preferably or a cast iron skillet or cheenachatti, add curry leaves and shallots sliced and then add the meat. Saute till the beef becomes dry and slightly crispy on the outside. Add more oil if it starts sticking to the bottom. If you like it hard and crunchy, keep frying and adding more oil. Serve hot.
April 03, 2007
Spicy Fish Cutlet

One of my earliest food memory is of a 5-6 yr old(me) sitting on the kitchen counter, waiting for my mom to finish frying cutlets anxiously. I ate and sometimes fought with my brother for the first one. The first greedy bite almost always lead to a game of hot potato.. too hot to swallow and too good to spit it out. When I finally managed to taste it, I was making A-one signs with my hand to show appreciation. (A-one Sign: Hold your thumb ad forefinger together to form an "o" and raise the other three fingers up.)
Since then, cutlets are a comfort food, fried and spicy, but I need it really straight off the frying pan. Now my son and better half have taken over the baton of loving cutlets, whether its meat or vegetable or fish. And now I like making them than eating them, though I love them if someone else has made them and I am at the receiving end.
The fish cutlets are an oxymoron..fish is good for you, fried is bad for you..:)..but they are so easy to make here, as all the ingredients are straight from the pantry..canned tuna, potatoes, eggs, bread crumbs.. so they get made on a regular basis. My mom doesnt't use the canned tuna for the cutlets as there is a plethora of large fish around her in Calicut. The luxury! This recipe originated with my ma-in-law and now I have adopted it as my own. It is also a good dinner item..Slap it between two slices of bread with some dressing, salad leaves and you have a fish sandwich.
You will need: (Makes 14-16 cutlets)
Light Tuna Cans(in water or oil)- 2
White Potato-2 (Approx. 3 /4 lb)
Onions- 2 medium sized ones
Green chilies- 8 (use less or more as per taste)
Garlic- 2 cloves
Black pepper- 2 tsp
Biryani Masala/Garam masala- ½ tsp (optional)
Lemon juice- 2 tsp.
Salt to taste
Coriander/Cilantro leaves- 1 cup washed, dried and chopped finely
Canola Oil- 2-3 tbsp
Egg or 1 Egg white–1
Bread crumbs- 1 cup
Preparation:
1. Chop the onions, garlic and chilies finely into tiny dices. Open the can lid completely and press into the can and drain all the liquid away. If you are using the tuna packed in oil, drain the oil seperately and use half of that for frying the onions. Else use the canola oil.
If you are using fresh fish, use a larger fish such as Salmon, King Fish or Swordfish as they hold up well. Marinate them with a bit of salt and pepper, and place them in a pan with 1 tbsp of oil, covering the pan to steam cook them. Remove the skin and bones, flake the flesh and keep it ready.
2. Heat the oil in a shallow non-stick pan and add all the onions, green chilies and garlic. After a couple of minutes, add the tuna too. Keep stirring and slightly fry the ingredients till the tuna's can smell goes away and the onions reduce in size. Add the garam masala and salt. This should take about 6-8 minutes. Take care not to let the mix stick to the pan and not to add too much oil in the beginning itself. You can always add a bit more if it starts sticking.
3. After 15mins, take the mixture off the flame and add the lemon juice, and pepper. Adjust the seasoning.
4. Meanwhile, wash each of the potatoes, wipe them dry and cover with plastic wrap. Place them in the microwave and adjust the setting for the baked potatoes. All the potatoes can be cooked at the same time. Alternatively, the washed potatoes can be pressure cooked with ½ cup water for a single whistle.
5. Peel the potatoes and mash them with your hands/potato masher or the back of a spoon. There should be no lumps. Add the fish mixture to the potato, and add the chopped coriander leaves and salt. Mix and taste and add more salt or lemon juice if needed.
6. Make lemon sized balls of the mixture and shape it into an oval or round shape.
Beat the egg (You can use just egg whites too) with a pinch of salt. Keep a plate with bread crumbs also ready.
7. Dip each oval ball into the egg and then into the bread crumbs. Give it a final shaping. Heat oil in a pan and shallow fry the cutlets till brown on either side.
This is a slightly time consuming snack and works best in large batches, so I make them and freeze them for the days when we get home from work famished and raid the freezer for anything resembling food or for impromptu guests.
Freezing Tip: After shaping them with the bread crumbs, place them wide apart on a plate or tray and freeze them for at least 12 hrs. They will turn rock solid and will not stick to each other anymore. Then, you can seperate them from the plate and collect all of them in a ziplock freezer safe bag and store in the freezer for upto 2 months. When you need to use them, remove as many as you need, thaw them outside for an hour or microwave them for 20-30 seconds(more or less as per microwave)and then fry as usual.
March 31, 2007
JFI-Bruschetta With Tomatoes.

When the April JFI was announced by RP of My Workshop as tomatoes, my first reaction was a tangy sweet and spicy chutney but that I had blogged about last summer.I sat and day dreamed of my garden with big boy tomatoes, plum tomatoes, cherry tomatoes...and then looked outside at the swinging door to my forlorn and cold garden.
As I watched each of my fellow bloggers comes up interesting combinations with tomato, my mind was still stuck..Maybe a tomato tart that shows up in all the magazines in the peak of summer, or maybe rasam or maybe pasta sauce....But the days flew by and I was too lazy to cook up any of that. This despite using tomato almost every day! So today while I made my mid-noon snack of Bruschetta with a tomato salad and pondered, it struck me. What better way to highlight a tomato? All the freshness and the sourness of a tomato tempered with garlic and olive oil and allowed to soak into crusty bread!
For those who are unfamiliar with the term, Bruschetta is grilled slices of bread rubbed with garlic and topped with extra-virgin olive oil, salt and pepper. The toppings can be spicy red pepper, fresh tomato, vegetables and/or cheese. Bruschetta is usually served as a snack or appetizer.
So without much ado, here is a simple recipe for the tomato topping for the tru tomato lover.
You will need:
2 ripe plum tomatoes, seeded and diced
1/4 tbsp finely minced garlic
2 tbsp cup coarsely chopped fresh basil
2 tbsp finely chopped fresh parsley
1/4 tsp fresh lemon juice
1 tbsp extra-virgin olive oil
1/4 tsp crushed red pepper flakes
1 small loaf of bread(baguettes), cut in 1/2-inch-thick slices
2 cloves garlic, cut in half
salt to taste.
Preparation:
In a bowl, mix all ingredients except bread and garlic cloves. Add salt and pepper to taste. Set aside, unrefrigerated for at least 15-20 minutes. Heat oven to 350°F. Toast bread on a baking sheet till slightly crisp. Rub cut side of garlic on each slice; top with tomato mixture. Serve as appetisers or have as a snack.
March 15, 2007
Flavored Cream Cheese

What's not to like about Cream Cheese on toasted bagels or bread?
My workplace has a tradition of one of us bringing in bagels and cream cheese for breakfast for everyone. We get it from a nearby bakery where the bread and bagels are made fresh on its premises daily. As you walk in, the aroma of freshly baked bread wafts all around you tantalisingly luring you to buy some even if you just went in for a cup of coffee.
They have a display counter (similar to ice cream tubs under a glass case)with endless varieties of cream cheese to choose from. Some very interesting flavors such as strawberry, scallion, maple pecan, olive and some very peculiar (unless you are inclined towards that)such as smoked salmon, anchovies. So each time, we linger over the choices finally settling for one trusted and one adventurous flavor.
After trying out some of those on a regular basis, it just didn't feel right to settle for plain cream cheese at home and that's how the blending started at home.
So here are four different flavors that I like but this is just the tip of the iceberg. So if you have your favorite recipe for a flavored cheese that you have blended, write in and I will add that here.
Preparation: All of them start the same way. Leave a tub of cream cheese outside the refrigerator for about 10-15 minutes to help mixing in. All the ingredients have to be chopped into even and extremely tiny pieces so that the cheese coats it evenly. These blended cheeses will stay fresh for a 3-4 days(except the ones with onions) but I prefer it fresh so I don't keep it for so long. How much you make is based on how much gets used up at a sitting. The proportions are just indicative and feel free to change as per taste.
1. Spicy Jalapeno-Olive:
For the days when you need to kickstart your day..
Cream Cheese: 3 tbsp
Pickled Jalapeno Slices( or fresh green chilies)-3-4
Green Olives-3-4
Finely chop the olives and chilies and use a fork to mix it with the cheese. Add a couple of drops of lemon juice if it looks too thick. The pickled chilies have their liquid so you may not need any more.
2. Walnut-Raisin:
Hmm.. my favorite when I have a sweet tooth..
Cream Cheese-3 tbsp
Walnuts- 1 1/2 tbsp
Raisins/Cranberries/Dried Cherries- 1 1/2 tbsp
Maple Syrup/Honey- 1 tsp
Chop everything finely and blend. The Honey helps in making it a spreadable mix.
This stays well in the refrigerator for 3-4 days.
3. Vegetable Spread:
A healthy serving of veggies in the morning..
Cream Cheese-3 tbsp
Carrots finely diced-1 tsp
Cucumbers- 2 tsp finely chopped without the seeds.
Chopped Onions- 1 tsp or substitute with scallions(spring onions)
Chopped Cilantro/Parsley- 1/2 tsp
Green Chilies(optional)- 1
Lemon Juice- 1/2 tsp
Salt to taste.
Mix everything together. Take care to scoop out the seeds of the cucumber before dicing as it adds too much water.
4. Sundried Tomatoes:
This is for a true Italian food lover. The flavor of the sundried tomatoes is very strong in this so try it if you like that pungency.
Cream Cheese-3 tbsp
SunDried Tomatoes- 2 tbsp
Dried Basil- 1tsp
Red Chili Flakes(optional)- A pinch
Salt
Blend the sundried tomatoes to a paste in a chopper. Add the rest of the ingredients and adjust taste. Use vinegar if it is too bland to add moisture and sourness.
5.Herbed Cheese:
Sorry, no photos on this one.
Cream Cheese-3 tbsp
Chopped Cilantro or Fresh Parsley- 2 tbsp
Chopped Mint-1/4 tsp
Lemon Juice- 1/2 tsp
Black Pepper-1/4 tsp
Salt to taste.
Blend the ingredients by hand and adjust taste.
Related Links: Some time back, Akshayapatra had blogged about flavored butters here.
And while you are all thinking of summer vacations and planning trips to India, I just wanted to bring to your attention a wonderful resort, Over the Hill, in Kerala designed and managed by my friend and her husband. It is located in Poovar, 30 kms from Trivandrum airport in Southern Kerala. Do check it out.
February 19, 2007
16 Bean Adai!

I go through a lot of blogs and try out the recipes whenever I am bored with the routine food. Some of these recipes are familiar but not cooked, some are total strangers and these I never know if I got it exactly right. The only clue I have are the other photos and I keep checking to see if the end product looks similar. Most of the time, cooking from other blogs is a leisurely activity compared to the intensity involved in cooking one of the home recipes correctly, chronicling it and photographing it. So I hardly have any photos of other's recipes that I have tried.
Indonsungod's and Saffron Hut's adai is an exception as it had a high curiosity factor for me, being already fond of regular adai. It was a weekend morning and the sun was pouring through my windows when I made these for a late breakfast. So after the family ate, I ran to get some photos.

My mother's recipe calls for 1 cup of rice and 1 cup of assorted skinned lentils such as Massor, Chana, Tuvar,Moong and Urad. So I tried it first with the variety of skinned and unskinned lentils as in Indosungod and it came out delicious without losing any bit of its crunchy texture.
Then emboldened, I made it with 16 beans as did Saffron Hut. So does 16 beans make it a protein powerhouse? Yep! The 16 beans which she ingeniously used in the adai is originally a soup mix but anybody can make these adai with any assortment of beans or lentils. The color of the adai was greenish due to the presence of the beans with skins. The texture and taste is similar but a little rougher. The only issue was how to get rid of the natural bloating due to the beans. I did some of the tricks explained by Nandita here and would further welcome any suggestions that you all have to combat the indigestion.
Do refer to the saffron hut and indosungod's sites for their version of the recipe.
You will need:
16 bean soup mix or any assortment of lentils-1 cup
Urad dal-1/2 cup
White Rice-1 1/2 cup
Green chili-6-8 chopped
Ginger-1 inch
Curry leaves
Shallots-4-5 chopped finely
Cilantro-4 tbsp
Hing or Asafoetida-1/2 tsp
salt to taste
Preparation:
1. Soak the beans, rice and urad dal separately for 6 hrs or overnight.
2. Drain, wash the beans twice and grind them with the ginger, cilantro and green chilies to a semi fine paste with enough water..not too coarse. Add water as needed.
3. When it is ready, add salt, asafoetida , shallots and chopped curry leaves and mix. If you want to reduce the spice, the green chilies can chopped and added instead of grinding it.
4. Pour it and cook it as you would dosa or uttappam. Take care to cook both sides and add drops of oil as needed. Serve this with a spicy tomato chutney or coconut chutney .
Other 16 Bean Recipes:
Linda's 16 bean soup
Asha's 16 bean masala
February 16, 2007
White Bean Hummus w/Pita

A twist on the hummus..but a very simple and very fingerlicking recipe. Toast some pita bread and it is an excellent way to get bean protein into your kids. I ran out of chickpeas and made this one but now I am hooked on the clean taste which according to my better half is closer in taste to the Arab Hummus. Use as a spread or dip or serve with toasted pita bread.
You will need:
1 can of white canellini beans(which look like white kidney beans)
3/4 cup Sesame Seeds
3-4 tbsp Olive Oil
1-2 tbsp Lemon Juice
Salt to taste
Preparation:
Rinse the beans thoroughly and drain. Grind the sesame seeds with the lemon juice till it is a fine paste. Add a little water if the grinder blades get stuck. Now add the beans and blend till smooth. Drizzle olive oil from the top while the blender is running to aerate the hummus. Turn off and check the taste. Add salt and more lemon juice if needed. If it feels too thick, blend with a bit more olive oil. I like the olive oil but if you are worried about the fat content, substitute more lemon juice or water.
Garnish with more olive oil, parsley, chopped olives etc.
February 14, 2007
Heart Shaped Cookies

Happy Valentine's Day!
Roses and Hearts all wrapped up in a love boat..
These are my mom's donut cookies reinvented as heart shaped cookies. She made them shaped as donuts cut with two circular metal lids. One was an old 777 sambhar powder's tin lid, and the other the cap of a vanilla essence bottle. I loved doing the cutting, figuring out how many I can get from each batch and now I see the same thrill on my son's face when he does the cookie cutting with cookie cutters.
He also sprinkled the sugar on the cookies after frying them.
We grew up on these and always thought donuts looked and tasted as these cookies. So imagine my surprise when I first saw a Dunkin Donut. It looked like my donuts on steroids! And it was so cakey in texture!
So now while I love the cholesterol laden donuts from Krispy Kreme(and some from Dunking Donuts), I had to try and recreate the old donut-cookies for nostalgia's sake.
So here is the recipe, straight from my mom. Be warned, it is not too sweet and it is fried.:)This is also my entry to Trupti's Little Chefs In The Kitchen Event.
You will need: To make about 24 cookies
All Purpose Flour ( Pilsbury or Gold Medal)-8 tbsp
Yogurt-1 tbsp
Melted Butter or Ghee-1tbsp
Powdered Sugar- 4 tbsp
Baking Powder-1 tsp
Vanilla-1tsp
Egg-1/2 beaten egg
Oil for frying
Cinnamon sugar- Mix ½ tsp cinnamon powder with 2-3 tsp powdered sugar and keep aside.
Preparation Method:
1. Mix all the dry ingredients together. Pour the melted butter, yogurt and vanilla into the mix and blend evenly by hand. Now slowly add the mixed egg, a little at a time, just enough to form a soft dough. Do not pour the egg all together. I judged it to be half an egg but depending on the size of the egg, you may need more or less. So add a drop as you knead along to moisten the dough till it reaches the correct consistency. The dough should feel dry and not sticky.
2. Keep for 10 minutes and then take a small ball and roll it out with the rolling pin. Sprinkle some flour as you roll if it sticks to the rolling pin. The thickness should be around 3-4 mm. Use a cookie cutter and cut out the shapes.
3. Heat enough oil in a pan or kadai, for deep frying and when it is hot enough, lower the heat to medium high and slide in the cookies, 5-6 at a time depending on the size of your pan. Fry them as you would fry puris. Turn them almost immediately after sliding them in and let it fry on each side for a minute or so till they turn golden in color. The heat should not be too low or too high.
4. Drain onto paper towels and sprinkle some cinnamon sugar on them while they are hot.
These stay fresh for about 4-5 days.
February 09, 2007
Something To Snack On..

We have been having a great (!@#$) week with first our cooking range getting replaced(it had conked off)and now with the heating system playing havoc on us. Just in time to get the brunt of the cold as the Northeast has finally entered into deep winter. So while the temperature outside is 15-25 F, when I came home from work yesterday, the temperature inside was 47 F. The furnace was getting repaired today but not till noon. So we dressed in more layers, turned up the room heater but it was still so cold, I turned on the oven!
It's only at such times that I realise how much of our creature comforts are taken for granted. I remember growing up in the Delhi winters with no central heat, with all of us huddled around the heater or under the blanket, constantly munching and guzzling something hot. I tried explaining such a scenario to my son and he didn't get it. He was asking why we didn't get the heat repaired.:)Kids!
So I kept warm by frying snacks on my new range. Something I don't normally do but maybe the circumstances made me yearn for comfort food..the snack mixture that my mom always had on hand. She would make huge batches of it for us. We used to sit down with a good book and a bowl of mixture in the afternoons after coming from school. Very easy to make and very unhealthy. And of course you can't stop eating it.
It is a mix of fried sev or noodles, peanuts, curry leaves, poha and ribbon pakoda. Keeps well for a week or more. And definitely better than whatever you buy from the Indian store as it is freshly made.
I know there are healthier version of this made with cornflakes and raisins etc but today, I am going all out.
Update:Now the heating system is back on so we are warm again(Thank God!) and I do have a new cooking range so all I need to do is find a good movie to enjoy this snack mix with.
You will need:
3 cups Gram Flour(Besan or Kadala Podi)
1 cup Rice Flour
1-2 tsp Red Chili Powder
A pinch of Turmeric
Asafoetida(Kayam/Hing)
Salt to taste
1/2 tsp Cumin Powder
Peanuts- a handful
Beaten Rice(Aval/Poha)
Curry leaves- 4-5 sprigs
Oil- Enough for deep frying.
Special Equipment:Idiappam press.
1. Make a dough of the rice flour, gram flour, chili powder, turmeric, a pinch of asafoetida and salt. The dough should be wet (Idiappam consistency)and plaible enough to go through the noodle press but not too wet. Add water slowly as needed. Uses about 1 1/2 cup water.
2. Heat oil in a deep frying pan or wok(kadai)and when it is hot enough, test by dropping one tiny piece of dough. It should come to the surface promptly. Set the dough in the press with the noodles mould. Reduce heat and press the noodles directly into the oil, doing about three rounds. Turn the heat back up and let it fry for about 30 seconds on each side. It gets cooked real fast on high heat, so stand close. Drain onto paper towels or newspapers. Repeat for about 5-6 times. Sprinkle a bit of chili powder and salt (if needed).
3. Change the press design to the ribbon and press soem ribbons into the pan now. Ribbons take some more time and they need to be cooked on low heat for about 2 minutes on each side. Repeat as needed.
4. Now fry a handful of peanuts till golden brown and drian. Fry the curry leaves similarly and drain. Fry the poha or aval too. I used the red aval as that was what I had at hand. The white ones are crispier. That cooks instantly so you just need to put it in a deep strainer and hold it under the oil and when it puffs up,immediatley remove it.
5. You can fry bhoondis or droplets too. It is a little tricky as you have to slightly thin the dough with water to make it pourable consistency. Hold a large slotted spoon over the oil and pour a spoon of batter over it. Shake the slotted spoon slightly to allow the drops to fall seperately. As it puffs up, remove and drain.
6. Now mix everythiing in a large bowl, slightly crushing the big pieces and add a dash of asafoetida and salt or chilipowder if needed.
Store in an air tight container.