January 06, 2011
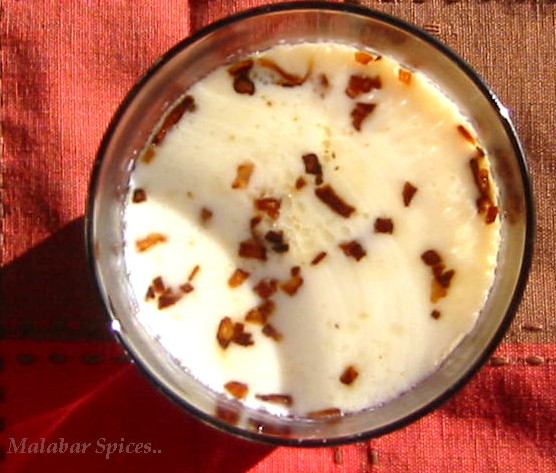
Palada Payasam...and a Happy Rest of the Year.
In the Malayalam new year, which begins with Vishu, the big deal is Vishu kani... the auspicious first thing that you see when you wake up which sets the tone for the rest of the year... a prosperous year, a healthy year, a happy year.. all the usual trappings we yearn for. For those who want to know more, there is a link above to the vishu custom. The concept creates quite a treasury of material for jokes in the layman's language and the malayalam movie industry. Anybody remember Meesha Madhavan? If your day doesn't go well, the common question is, " Who did you see as kani in the morning?"
Alas, for the New years day, there is no such symbolism.. just a late awakening, still recovering from whatever late night party you happened to be at...legs aching if u were at a dance, head abuzz with a medley of sounds and voices, a hangover for many.... quite a somber beginning to a new year!!
For me the first post of the year is always a dilemma. I want it to be short, sweet, crisp.. it should be inspiring, joyful and poetic, like one of the verses on New Year's cards. (Does anybody send cards to anyone now? Does anyone collect them still?)
But the search for the perfect words will instead mean that I won't write at all for the month of January and that propelled me to just get started! Here's to wishing a very productive and prosperous year to all my readers and friends. May this be the year of change.:)) May this be the year where we resolve to be resolute to our resolutions.
As for me, I decided to start my blog year with a sweet recipe. All those on a diet can move on to the next blogs where you will find yummy healthy food....just not here today. Well, we all need sugar after a gruelling workout, don't we?:))
The last few weeks were great with a air of festivities all around and a lot of visiting families to complete the festive feeling. The expectations for the holidays start half a year early and just keeps building up but the holidays itself go so fast!! Even a blizzard, two feet of snow and multiple bouts of flu and cold couldn't keep the spirits down.
Cleaning the house, refrigerator and pantry after all my guests left, I got stuck with a quart of milk nearing expiration date, a sweet craving, some unused sweetened coconut la languishing in my freezer , a bit of palada, (not enough for a party)and one too many cans of condensed milk. My better half recently asked if I really know the contents of my pantry and I bravely said yes, despite finding endless packs of the same stuff.
So, half the can of the evidence or a bit less went for the payasam and the remaining contributed to the sticky consistency of coconut macaroons. I have two recipes for the macaroons.. one with just coconut flakes and egg whites and almonds which is what is common. But my sis-in-law put me onto the eggless version which has just coconut flakes and condensed milk which is much better in taste, reminding of coconut burfi back home, with a fraction of the work!! Flavoring it with cardamom instead of vanilla and aniseed, Indianized it instantly.
For the payasam, the only ingredient you need is a thick bottom pan, as milk burns instantly and doesn't withstand long cooking. I use an uruli, a traditional thick bottom pan made usually of bronze but now available in aluminium too, which is fool proof for making payasams. It's great for doing any kind of milk based cooking as it never burns!! Get one if you are a fan of payasams. A copper bottom pan available locally may suffice but I am not sure.
By the way, see this link for a multitude of payasam cook off in California. Did any of you attend it?
There is no recipe.. just follow the instructions at the back of the packet!But for those who need it, here it is..
Palada Payasam
A really thick bottom wide pan or an uruli.
Double Horse Palada-1/3 pack
Milk- about 1/3 gallon (which is 4-5 cups)
Condensed Milk-1/2 tin or a little less.
Salt- a tiny pinch
Cardamom powder- crush 5 cardamom into powder.
Preparation:
Boil 2 cups water and steep/soak the palada in the hot water( off the flame) for 15 minutes. Drain the water and then add the palada to the milk and cook for 15 minutes or till the palada is soft and cooked. Then add the condensed milk, cardamom powder and salt and cook further for 10 minutes. If it looks too thick, add 1/2 cup milk. The consistency and sweetness is to each one's taste so use your judgement. I like my payasams not too thick and a bit less sweet than headache inducing sweet. These proportions may end up too loose and not too sweet for you so change as you need.
Garnish with ready bought roasted cashews(or you could fry a handful of cashews and raisins in ghee) and raisins. Serve hot or lukewarm or cold.
The rest of the can of the condensed milk went into the Eggless coconut macaroons which I will post next.:)
November 25, 2009
Kadala Kari/ Parippu Paysaam with Pidis/ Chana Dal Kheer
It's been a long month and am just glad to be sitting here nearly at the end of it, sighing in relief! Some days dragged their feet, some days got stretched taut like a rubber band only to have to let go and let it snap back with a sting. If I start to tell you what all happened in the last month, I will be here all evening, so suffices to say that our house has finally changed hands and we have moved out into an apartment. Even though I am writing it here now, it's still a bit hard to believe and sink in.
Since this is the country where you can return anything ( well, anything you buy and sometimes what you don't buy) I still get nightmares where our buyer wants to return the house for some weird reason or the other. I guess it will take a while, to settle in.
October 21, 2008
Wah! Wah! Gajar Ka Halwa/ Carrot Halwah..

The last of the warm weather.. dark mornings, brr.. awakenings and stepping on the cold tiles in the kitchen now requires me searching out the warm socks and jackets. Outside too, fall is setting in, with the leaves changing color backstage, getting ready for their annual fashion show.
A slight dip in the temperatures evokes memories of even tempered places elsewhere and the invitations from my West Coast families are so tempting..sigh.. This is the weather that sends me running to the comfort food zone...warm, sweet and rich food..It's festival time too every where so what better to make than sweets..
When the first hint of winter sets in, the juicy super sweet blood red carrots would start appearing in the markets. When they flooded the market in super abundance, my father couldn't resist the deal and would get kilos of it just because it was fresh, cheap and so obviously good for you. A quarter would get peeled and get used for snacking, a quarter for later and the rest would get converted to my favorite form of eating this vegetable..gajar ka halwa!! My way to get the big five veggies in my diet (at that time.):)
So when I started writing the recipe down, I couldn't pin down the exact ingredients. We just make it with any amount of carrots and adjust the ingredients according to taste. This is the closest I could get but use your judgment and reduce or increase the quantity of sugar and milk(enough to get the carrots cooked to a mush). We used to use "Khoya", a form of concentrated milk solids in the end so that you get tiny morsels of it along with the halwa..like adding powdered kalakand to the halwa. Khoya is available at Indian stores but you could substitute with heavy cream added earlier or even concentrated ricotta cheese. Though the khoya here is not as fresh as the ones back home (here it's a little dry and not as creamy) it still adds a lot of flavor at the end.
Serves 6-10( reduce quantity in proportion if you want to make less)
you will need:
Carrots- 8 cups grated
Whole Milk- 9-10 cups milk
Sugar-approx.1 1/2 cups..add more or less as per taste.
Cardamom seeds- 1 teaspoon seeds crushed into powder
Water- 3/4 cup
Ghee-3 tablespoons...substitute ghee +khoya with 1 cup cream
Khoya(Milk solids)- 1/2 cup(optional)
Raisins, Almonds, Cashew nuts- to taste
Preparation:
Wash, peel and grate the carrots. Grating gives the best result but is not so easy on the arms. If possible, convince the muscle building husband/brother in law or brother to do the grating. So if you want, use a grater/chopper attachment in a food processor and finely chop the carrots and then pulse it in the mixie/blender twice...don't grind it to a paste. This will homogenize the texture.
Set the water and half the milk to boil in thick bottom pan( a pressure cooker pan or non stick pan will do) and when it starts boiling, add the grated carrots. Cook on a medium flame for 1 hour (or less)stirring occasionally. When all the milk has been absorbed, add the rest of the milk. The approximate proportion of milk is a bit more than the quantity of carrots.
Mix well and cook on medium heat again till all the milk has been absorbed.This should take about another 40 minutes more or less (depending on quantity)and the carrots should have been full cooked by now. The milk should be on a simmer all the time, else the flame is too low. The time is really an approximation and may take more or less.
After that, the milk will soon start to evaporate so keep an eye on the flame. Add the sugar and mix well and keep cooking. After all the milk is gone and the carrot starts darkening in color, add the ghee. Keep stirring and mix well till the halwa starts to move together as one mass without any much liquid left. Add the crushed cardamom powder and the crumbled khoya. Mix well and saute for just 2 more minutes.
If you don't have khoya, use condensed milk but omit sugar in the recipe, or use 1 cup heavy cream after the carrots gets cooked and keep cooking. The cream will give it the richness and you won't need to add ghee after that.
The substitutes should be added in the beginning..only khoya is added in the end. The khoya just adds a rich milky taste at the end and it should be as tiny morsels in between the halwa.
Garnish with cashews,almonds or pistachios. Serve cold, hot or at room temperature.
This is my entry for the JFI sweets hosted by Srivalli..cooking for all seasons.

On another note, I was given this really cool award by Geeta of Paytpooja. An award by a fellow blogger is one thing that never fails to brighten up the day. Thanks Geeta!
The rules of the award are: Put the logo on your blog. Add a link to the person who awarded you. Nominate 10 other blogs. Add links to those blogs on yours, and leave a message for your nominees on their blogs. I am happy to pass on this award to my fellow blogger friends.
So I nominate the following for the cool blogs. Enjoy!!
When my soup came alive
Live to eat
Solai's chettinad kitchen
Peppermill
Cooking and me
Cooking for all seasons
A Delighted Foodie
Comfort food network
June 08, 2008
Croissant Bread Pudding..

I started the guessing game and then got so caught up in other activities that I forgot to release the comments. I moderated it so no on could cheat. My better half who amuses himself reading the comments couldn't find any for the latest post and asked if I stopped the comments. That then reminded me that I still haven't published the rest of the post. Blogging has a way of making you talk to yourself. I could be driving or shopping and something would click ...bang..one part of my head would start formulating sentences for the next post.If only I could write in my mind and it would get translated to the computer...
As always the range of the guesses is amazing...let me see..who got it right?Bervin, Nabeela (hey, I need an invitation to your blog now), Indo, Afailingcook,Creating Humus, Ranji,Umm and Anon D. well, almost right, coz nobody guessed croissant bread pudding.:)
Seagull and Sajitha will understand why I like this recipe.. It does remind one of the famous "chattipathiri" a Malabar specialty dessert that has been my post drafts but not yet posted.
According ot the Joy OF Baking site which is a encyclopedia of baking recipes, "Bread Pudding is an old fashioned dessert that had humble beginnings in 13th century England. It was first known as a "poor man's pudding" as it was made from stale leftover bread that was just moistened in water, to which a little sugar, spices and other ingredients were added. Fast forward to today, and you will find that we still make our bread puddings with bread but the breads we use are often made especially for this pudding and the types are wide ranging; breads like brioche, challah, croissant, panettone, French, Italian and sometimes even raisin bread or scones."
Bread pudding is common in all cuisines in one local form or the other.
Malabaris have the Chattipathiri, which is rotis/chapathis/tortillas made of flour dipped in a mixture of egg, milk and sugar, layered with poppy seeds,eggs, butter,nuts and raisins and baked. Arabs have Umm Ali,made with layers of phyllo pastry and condensed milk...yum!! As for the story behind the unusual name.. Asha had regaled us with the story some time back.Then there is the Shahi Tukda which is fried bread soaked in a milk and sugar bath, probably a derivation of the Arab dessert.
Well, to cut my rambling short, this is one recipe that was enticing me ever since I saw Barefoot Contessa on Food TV carefully slicing old croissants and then gleefully dunking them in a rich bath of eggs and heavy cream and baking it. The 8+4 eggs and cream daunted me while the pudding haunted me till I saw 4 croissants still sitting on my counter top, too old to eaten as is though still good enough. So I searched for a lighter recipe. Guess what I found..a site dedicated to just Bread Puddings!
But this recipe from Joy Of Baking is what I finally used. I followed with only 2 variations..I like nuts so topped the whole thing with sliced almonds and since I used croissants instead of bread, I reduced the butter. You could add raisins too or even cranberries, dried fruit etc. So this is what I ended up with..a slice able cake like dessert, good cold with whipped cream or ice cream, or served warm as is.
4 large croissants or 6 small ones
4 cups whole milk or half and half(or 1 1/2 cups heavy cream and 1 1/2 cup whole milk)
4 eggs beaten
3/4 cup of sugar (maybe a little more as per your taste)
1 teaspoons pure vanilla extract
1 cup raisins (optional)
2 tablespoons of melted butter, cooled
Preheat oven to 350F.
1. Brush the melted butter all over the baking dish. Cut croissants into halves along the length and place into a buttered baking dish. Sprinkle the croissants with the raisins and nuts. I opted out of the raisins as my family is not heavily into it.
2. Mix the egg yolks, sugar and butter together in a bowl. Then stir in the heavy cream or milk and vanilla essence.
3. Pour the custard over the croissants. Press down on the pieces until the croissants are soaked with the custard. Let the croissants rest for at least a couple of hours so that it is fully soaked. Pour the left over custard (if any) over the croissants and press down just before baking to make a more custard rich layer. Top the pudding with a layer of almond slices or any other nut that you prefer.
4. Place the baking dish pan in a larger one filled with 1-inch of hot water. Place both into the oven. Cover the larger pan with aluminum foil, tenting the foil so it doesn't touch the pudding. Cut a few holes in the foil to allow steam to escape. The water bath makes the custard moister and bakes it evenly.
5. Bake the pudding for about 45 minutes until golden on top. If you insert a knife into it, it should come out clean, similar to when you bake a cake. Cool 10 minutes and serve warm or refrigerate and later serve cold with whipped cream or ice cream..
April 14, 2008
Kalakand..Something Sweet On Vishu! and RCI-Bengal
Thanks for all the input on the template. I have reverted to the old template for now while I work on getting the new one customized to my liking.It feels odd to go back and forth between templates now, but since Blogger has made that part easy, it was just a matter of one click. Now let me see if I can get the new template to look so streamlined.

Last year Vishu fell on a Sunday and I had time to celebrate it with a nadan meal. Hence now when I look back at it, there is a memory made. This year, It falls on a working day so the same level of excitement is missing. Still, anybody visiting my blog should have a visual feast, right? I know I should have a true Keralite dish today of all days, but other preoccupations have been keeping me busy and away from the kitchen. So though I don't have any sadya laid out, there is Kalakand for you to sweeten your tooth on.
Don't you notice that "happy memories" are what how or what we make of an otherwise ordinary day? Birthdays, festivals, anniversaries..all are just days till we take the pains to do something special, maybe cook something,maybe call friends over or maybe even eat out. And isn't it so natural that these memories are indelibly tinged with food? What we ate, where, who made it, how we ate it, did we like it or not..the details may change but the memories for me definitely are all about the place and the food.
My associations with Kalakand are more with Diwali than Vishu, when all our neighbors brought over a plate of delicacies. My mother used to separate them on the basis of their demand in the house and invariably the kalakands, the gulab jamuns and the burfis were the first to go. Some other nondescript sweets would languish unwanted just as the popular ones were fought over. Of these my favorite was the kalakand. Kalakand has a semi-crunchy, incredibly soft and crumbly texture and is really white in color. It's one of the really time intensive Bengali sweets that I really wouldn't be making, if I wasn't out of the country.

This is a microwave version of Kalakand, very easily made with local ingredients. Some enterprising immigrant adapted the recipe for kalakand with ricotta cheese to make this pleasing sweet many years ago and according to the web legends, this recipe has been around for 20 years or more!!
My friend A introduced me to it just last year and now when I searched, there were so many recipes similar to this everywhere. So I am guessing I am late in learning how to make it, and though it is only somewhat near the taste of a real kalakand, it satisfies my sweet urge instantly. Did I mention it is made in a microwave..no long hours of stirring and cooking?:)) No milk getting stuck and burnt and you prying it off. This sweet tastes like a cross between the snow white kalakand and the brown "palgova" that I used to get in the Co-operative milk store in Palayam in Calicut. So if are familiar with either, you will like this.
So Happu Vishu and if you are on you way home to no feast, you could still try making this sweet.
You Will Need:
Powdered milk- 4 tablespoon
1 Tin(14 ounces) Ricotta cheese (whole milk)
Butter- 2 tablespoon
Condensed Milk-1 small can
Cardamom - 5 crushed into powder, discard skin
For Garnish:
Almond -2-3 tablespoon chopped up
Pistachios-2-3 tablespoon chopped up
Preparation:
1. Soften the butter and mix it in with the ricotta cheese, condensed milk and dry milk powder in a microwave safe glass square dish. Use a whisk to smoothen out the lumps and blend it well. Try not to be tempted to lick the condensed milk can clean.(yum!) You might cut your finger on the edge!!
2. Set the microwave for 40% heat or level 4. (Check your microwave manual on how to do it if you still have the manual.) On this setting on the microwave, cook for 10 minutes. Open, stir well, take a taste test..(yum!!) It will still taste like condensed milk but richer.
3.Put it back in for another 5 minutes at the same 40% setting. Open, stir and put it in for 5 minutes at 60% setting. Open, and by now you get the picture...stir again and taste. Now it will take on the flavor of peda or palgova..milk sweets. Add the powdered cardamom and stir it in.
4. Now heat it at 75% for two minutes. You have almost reached the end so go slow and keep checking to see if it is turning brown. It can get burnt very fast now so I prefer to keep it slow and check after every minute. Heat it on full heat for another 1 or 2 minutes till it looks golden brown and its ready. You can cook it a bit longer if you want a more crustier texture to it.As the microwave power and time varies, it may take you a couple of trial and errors before you will get the optimal time taken to get the mix to a stage where the milk solids are starting to come together.
Sprinkle the top with more crushed up almonds and pistachios. Place it the refrigerator to cool. When it has cooled and become firm to the touch, you could cut into easily into any shape and size you like. Stays fresh in the refrigerator for a week or so.
Since this is a Semi-Bengali Dish, I hope its ok if I sent it over RCI-Bengal, hosted by Sandeepa.
January 09, 2008
Godambu Payasam../Whole Wheat Kheer...
Of course, once in a while we do come across some people we can talk to, without getting into a family friendship status but mostly now the pattern and the language of friends are mostly dictated by everybody in the family getting along well.

Godambu Payasam is a happenstance dessert recipe. My good friend had come over to visit me after 10 lo..o.o.n..g years during which time we each had got married, got kid(s)and still found time hasn't moved much from the hostel days. We could still talk despite being interrupted by our respective little ones. But we just kept tripping over the sequence of events over the years, Memento style.
We were meeting in Calicut and my mom was putting together a hasty lunch and was floundering for dessert. Then she remembered this payasam she used to have as a kid and in more recent times from her closest friend's house who is from the Telicherry side and made it regularly. So from one friend to another....
I remember liking it instantly thinking it is familiar but that I didn't remember mom making it often. We usually have this whole wheat as Godambu Veragiyathu which is the grains cooked with coconut milk and fennel and shallots and topped with ghee and sugar.
My friend liked it too and she kept requesting me to blog it but when I asked my mom, she said... add a bit of this, a bit of that.. and its only now when she came here, that I could pin her down to make make it again and again and take notes.
We loved the taste of the coconut milk and jaggery and the creamy wheat kernels which still had a bite to it but then thats just us. Whats not to like about jaggery and coconut milk? A lot of people are not fond of the same wheaty taste and dub it a poor man's payasam. So try it and let me know which camp you fall into.

What is a whole grain?
Whole wheat grains contain all three parts of the grain intact:The bran, the endosperm and the germ. Some grains have a fourth part-inedible husk/hull. Whole wheat berries are wheat kernels that have been stripped only of their inedible outer hulls.
Skinned wheat are wheat berries whose bran is scrubbed off lightly...by hand or by machine. It's less nutritious than whole wheat, but more popular since it's not as chewy as hulled wheat and it cooks faster.
It is commonly used in the Malabar area and is available in as "Kuthiya Godambu" A reference to the way it was made in earlier days..by soaking, semi drying and then the bran is removed by hitting it in a tall mortar-pestle kind of equipment.(Ural..see this picture in Mathy's Kandasamy's site)It was done by the 2-4 women of the house, gossiping and alternately hitting the long stick...the same way Puttu podi used to be made in the pre-mixie days.)
There was an old Hindi movie by Gulzar which featured this ural activity charmingly. Click here to see it if you are interested.
The closest approximation to the skinned wheat here would be "pearl Barley" which has some of its bran removed too. So you could try this recipe with that too. Cracked wheat will give a similar flavor but not the creamy sago-like texture. The wheat and the milk will stand apart like new people meeting at a common party. Close but not blending in.
You Will Need:
1/2 cup skinned Whole Wheat
1 cup jaggery melted in 1/2 cup water and filtered.
1 tsp cardamom powder
1 cup thick coconut milk
3-4 cup second milk of coconut or substitute half with water.
Nuts, raisins as per taste.
Preparation:
Soak 1/2 cup skinned wheat in warm water for 10 minutes. Cook it in a pressure cooker with the second milk of coconut till just before the first whistle comes. Try not to let the whistle blow... it makes the milk a bit agitated. Then lower the heat and cook for 10 minutes on very low heat. Open and check to see if it is creamy and cooked. Recook the same way for another 3 minutes if its not ready. Add more second milk or water if all the milk looks absorbed.
Once the grains are creamy and fully cooked (the whole mix looks opaque similar to cooked oats and tastes soft), add jaggery syrup and cardamom powder and a pinch of salt(literally a tiny pinch). Let it simmer for 5 to 8 minutes and taste it. When the sweetness is to your liking, lower the heat to a minimum and add the thick first milk. Let it simmer without over boiling.
My photo looks thick since it was taken on the second day after making the payasam so it thickened further. The consistency should be looser just as a regular payasam. So add the milk accordingly and adjust taste. The proportions are really up to individual taste. Some like it drop dead sweet and thick with coconut milk, I like it milder and a little lighter, so feel free to modify as needed. You could further fry nuts and raisins in ghee and add it to the payasam if you like that.

A first day consistency photo. The white specs are from the coconut milk I hurriedly made.
Coconut Milk: For two cups of thick coconut milk, I used 2 cups of grated coconut. From the same coconut, I extracted 4 cups of second milk. To extract the milk, first grind the coconut with just 1 cup of water and take out the milk.. then regrind it with water twice to extract the thinner milk.
This is my entry for the RCI-Kerala Hosted by my good friend Jyothsna of Curry Bazaar.
Related Links: Another yummy payasam made with Wheat..from Simply Spicy.
May 13, 2007
Caramel Custard


After 18 years, The first legal shipment of Indian mangoes to the United States landed at Kennedy Airport last week and would soon be available everywhere in the supermarkets. AH!Finally, somebody heard the collective prayers of homesick desis. Every summer we buy mangoes from wherever (as long as it looks like mangoes) and close our eyes and try to simulate the taste of the mangoes back home. Every weekend phone call to my folks was filled with them regaling me with how many mangoes they had to give away as the supply was more than what they could consume! Then my friend Sra tempted me more with her photo and write up on mangoes some weeks back!
Friday started the weekend with the hot news that the local Indian groceries had the coveted Alphonso Mangoes and my friend rushed to get it for us. They are $35 for a dozen!!!!
Needless to say, after a minute of heart searching, the yearning to eat a mango ripened in the hot Indian sun won over the pragmatics of the money. But it all fell flat when my friend reached there with happy anticipation, only to be told curtly,"Sab Khatam, Monday ko aao."(It's all finished, come on Monday):(
So the quest continues. Maybe this week will be better. I am waiting to see which of our happy bloggers got to eat the Alphonsos first! Meanwhile, I decided to make a comfort dessert to fill the heart.
Caramel custard was a staple in my house growing up. Some like the custard less sweet with the caramel syrup adding the bitter-sweetness and some like it sweet.
It is supposed to be easily digested and full of protein so good for kids and adults alike.(Unless they have egg allergies or cholesterol.)As a kid, I remember my mom making this on a daily basis once when my sibling was recovering from Typhoid and for a long time, I associated it with illness.
But it is a creamy easy dessert with minimal preparation so here goes..
You will need:
Eggs-3
Sugar-1/2 cup (use a little more if you like it sweet)
Milk- 2 cups
Vanilla essence-1 tbsp
(Use the same measuring cup for everything.)
For the caramel:
Brown sugar(preferable) or plain white sugar-3 tbsp
Baking Ramekins-4-5 moulds or one deep baking dish.
You will also need a large shallow metal or oven proof bake ware to set the moulds in and bake.
Preparation:
Caramel Base:
Heat the brown sugar mixed with 1 tsp water in a nonstick pan on medium heat till the sugar starts melting. Do not use anything to stir and just shake the pan to spread the heat. When the sugar starts turning into golden brown liquid, let it simmer and then pour it equally in all the ramekins. Tilt the dish all around to coat the bottom evenly and a little up the edges. The syrup will harden quickly so pour and spread into one mould at a time.
Take care not to let the syrup bubble too much and burn. It will taste too bitter. Of course, if you like the bitter taste as a contrast, go right ahead. If you are using one baking dish, pour the whole syrup into it and tilt around.
The Custard:
Preheat the oven to 375 F.(190 C)
Blend together the eggs and the sugar using a whisk. Add the vanilla and milk and whisk well to get a very smooth liquid. The milk should not be boiling as it will curdle the eggs. But if it is warm it dissolves the sugar faster and speeds up the baking. Pour this liquid carefully into each of the moulds till three fourth full. Leave a little space at the top.
Bake in a pre-heated oven to 375 deg for about 35-50 minutes till a toothpick inserted through it comes out clean. Do not take it out of the moulds. Cover and let it cool in the refrigerator for 3-4 hours.
How To Serve: Just before serving, using a thin knife, loosen the edges of the custard. Place a serving plate (big or small based on the size of the moulds) top side down so as to cover the custard mould. Invert the mould along with the plate and carefully lift up the mould.
Viola!..The cooked custard is now perched regally on the plate luxuriating in a caramel bath.
May 01, 2007
Chicken Curry In A Hurry..

Invoking the summer gods with the Okra has worked (:)) as it is warm and sunny here finally. What a difference in last week's rainy and gloomy days and this week's sunny days!!
But the days suddenly have become hectic and cooking has taken a back seat for a moment. After a long time, studies are back on the horizon (for a test) and all the yummy recipes seem so time consuming and labour intensive. Focusing on remembering what you read is not so easy with a rusty brain, and stressing it further with a complicated meal planning is just not right.
Nevertheless food has to be cooked unless you want to brave the greasy restaurant staples on a daily basis. Blogging too has thus been quite on the slow track. So today, I am stealing some time to rescue my readers from the corny hindi video.:)
Rummaging through my cookbook, I came across a handwritten malayalam recipe tucked in my recipe drawer, called Chicken Shahi Kurma. Though daunted by the name, the recipe looked easy and It turned out to be a creamy chicken curry which fools you into thinking that it is rich and took ages to cook. No cream, no coconut milk, just good ole ground cashews to thicken it. Prep time is minimal if you use a 2 skinless, boneless chicken breasts and the cooking time is 15 minutes. Curry in a hurry indeed!
You will need:
Chicken-1 ½ lb, (700gm) boneless, cleaned and cut into small pieces.
Onions- 1 1/2 medium sized ones
Green Hot Chilies-6-8
Garlic cloves-3
Ginger-1/2 inch piece
Carrot-1 large one
Turmeric powder – 1/2 tsp
Red Chili Powder- 1 tsp
Fennel Powder-1/4 tsp
Black Pepper Powder- 1/4 tsp
Cashew nuts-7
Whole spices: 3 cloves, 2 cardamom
Lemon juice-1tbsp
Plain Thick Curd (Yogurt)- ½ cup beaten
Curry leaves- 1 sprig
Cilantro(Coriander)- 2 tbsp
Salt - to taste
Oil-2 tbsp
Preparation:
1. Cut the chicken into 1-2 inch even sized pieces. Wash the chicken and lightly toss it with lemon juice and rinse again. Drain well onto a slotted drainer. Slice the onions finely and dice the carrots. Soak the cashew nuts in ½ cup warm water for 10 minutes. Cook it in the microwave for 1 minute to speed up the soaking. Then wet grind it with the cleaned ginger, garlic and green chilies to a very fine paste. Add water only as you need to grind.
3. Heat the oil on a medium flame in a large shallow pan, add the whole spices and the onions. Saute the onions till they are light brown. Keep stirring and add oil if the onions are sticking to the pan or browning too fast.
4. Add the ground paste, spice powders and saute well for at least a minute, or till the red chili powder gets cooked. Then add the chicken and carrots and stir well till all the excess moisture dries up. It would be good if the chicken gets sauted on all sides before getting cooked. Then lower the heat, add 1/2 cup water, salt and cook covered for about 10 minutes or till the chicken gets cooked. Keep checking and add a little bit water if it starts sticking to the pan.
5. Check to see if the chicken is cooked. Add the chopped leaves and then lower the flame to a minimum. Add the beaten yogurt and adjust salt seasoning. If the yogurt is not sour, add a tsp of lemon juice to balance the flavors.
Serve hot with pathiri, appam, bread, puttu or just paratha.
April 07, 2007
Rich Chocolate Cake

I collect chocolate cake recipes like some one collecting coins or stamps. Both my mother and my mother-in-law have made an indelible impression on my son and he believes they make the best cakes. Can't dispute that, and I mostly make it their way. But I do try out every recipe that comes my way to see if it is any better.
This is my friend Asha's recipe for her favorite chocolate cake and of course I had to try it. Initially, the ingredients list daunted me and I held it thinking if I should cut down the butter or the sugar or both. The age of low fat cakes!!!An oxymoron!
Then I remembered an old Doordarshan (yes, I grew up in pre-cable TV era in India)serial where a couple made a dessert from grated carrot (Gajar Ka Halwa) from a cookery show, but substituted the Ghee(clarified butter) with oil, omitted the sugar as they were old and diabetic, and cooked the carrots in water instead of milk. Needless to say it tasted nowhere near a Halwa and they blamed the cooking show!
So this time, I made it with no substitutions, in its full fat form, resolving to eat less instead. You have to try it once. It has a melt in the mouth rich and moist quality,that I normally associate with only high end bakeries and patisseries.
I made it in the morning just before we left for Longwood Botanical Gardens in PA and could only take photos of it placed on the hood of my car on the garden's site map, so bear with the photos.The photos don't do justice to it and when I make it next, will certainly change it for a better shot. Thanks a lot, Asha, loved the cake.

You Will Need:
Sugar - 1 1/2 cup
Egg - 2
Butter - 1/2 cup (melted)or 8 tbsp
Cocoa Powder- 3 heaped tbsp.
Yogurt - 1 1/4 cup (in India, Nandini's or Nestle's 'set curd' works very well)
Soda Bicarbonate - 1 1/2 level. tsp
Sunflower/Canola Oil - 1/4 cup
Vanilla Essence - 1 tsp
Salt - a pinch (Don't add salt if the butter is salted)
Maida and/ or Whole Wheat flour- 1 1/2 cup(Mix half and half)
Walnuts/Almonds -1/2 cup ground to a powder
Preparation:
Sift the flour with the soda and salt (if using) and keep aside. Beat the eggs slightly and keep aside. Preheat the oven to 350 F or 175 C.
Powder the sugar and beat with the melted butter till the sugar dissolves. Touch it to see if there is any granular texture left. Add the eggs and mix well. Add the canola oil, cocoa powder,vanilla essence and yogurt one by one till well mixed. Use a whisk or a fork while blending. Add the flour slowly, blending it in as you go. Do not add at one go as it makes lumps which would be difficult to mix. The mix should be smooth textured and then add the ground walnuts. Adding it earlier makes it difficult to figure out if the batter is well mixed in or not.Do not over mix after the flour is added.
Prepare a baking pan (8x8 inch or cicular pan) with a coating of oil and then sprinkle a dusting of flour on it evenly. I use the disposable aluminium baking trays easily available at supermarkets.
Bake in the middle rack for about 35-45 minutes. It is cooked when a toothpick inserted in the middle comes out clean and the whole house smells of cocoa and butter. Cool and cut into squares.
PHOTOS FROM THE LONGWOOD GARDENS, PA.
March 10, 2007
Pecan Pie and An Anniversary

It has been one year since I started blogging and I just can't believe it! What seemed so much effort in the beginning is becoming second nature now.. presentation, photos and writing. It is definitely the fact that all of you read and respond that makes a difference to my day.
I started blogging to get over some personal issues which now thankfully are in the past. But in the journey, I am so glad to have made so many new friends, both fellow bloggers and readers who leave a comment. I also renewed some friendships from my college days which had got covered with dust over time as we all got busy in our lives.
So to thank you all, I present an easy celebratory dish.. The Pecan Pie. It is a foolproof dish (especially if you can buy frozen pie crust), filled with nuts stuck in a gooey caramel like base. It is decadent enough to make you crave for it long past the taste is gone. I first had it during Thanksgiving from my better half's office bakery and then had to try it. It is so easy to make that if you like nuts, you will love it as a dessert or as a mid day unhealthy snack.:)
The recipe I used to use came from the back of a corn syrup jar, but recently I found this recipe at Simply Recipes,(A great site for all kinds of recipes) which called for less sugar and turned out really good. So here is the recipe reproduced.
You will need:
2 eggs, slightly beaten
1 cup light corn syrup( substitute recipe here)
1/4 cup brown sugar
2 Tbsp molasses or maple syrup
2 Tbsp melted butter
2 Tbsp flour
1/4 teaspoon salt
1 teaspoon vanilla
1 1/4 cups pecans, coarsely chopped (substitute with walnuts)
1 9-inch pie shell, chilled for an hour if freshly made, defrosted for 10 minutes if frozen. (See pie crust recipes.)
1. Preheat oven to 375°F. Spread pecans along the bottom of the pie shell. Mix the remaining ingredients and pour over pecans. The pecans will rise to the surface of the pie.
2. Bake at 375°F for 45-50 minutes until the filling has set. About 20 minutes into the cooking you may want to use a pie crust protector, or tent the edges of the pie crust with aluminum foil to prevent the pie crust edges from burning.
3. Remove from oven and let cool completely.
Serves 8.Serve with ice cream or by itself.
January 23, 2007
Paliayakka/ Sago or Tapioca Pearls Payasam

Thanks to all you who made me smile throughout the day with your near correct, imaginative, funny, not anywhere near correct combinations. I never there would be such a response. Makes me almost want to create an event about guessing! And all because I was too lazy to write the recipe down and so just posted the picture!
I thought it would be sadistic if I kept up the secret today too so while I don't have the time for the full recipe now, let me just introduce you to another Malabar speciality.
It is indeed Sago Payasam, called Paliayakka, a probable corruption of the word Pal-Vayakka (Milk-Plantains). It is made of sago pearls(Tapioca pearls or sabudana),sugar,fennel seed powder, coconut milk,and plantains.
It is also called Bubble Payasam by my son. He doesn't care for the bananas but its the bananas and fennel seed powder that gives its unique taste.
I will surely add the recipe today. Meanwhile, do check out our post on some luchboxes at the Daily tiffin.....
You will Need:
Sabudana or Tapioca Pearls-1 cup
Thick Coconut Milk-1cup
Thin Coconut Milk-2 cup (or 1-2 cup coconut grated)
Sugar-8 tbsp( adjust as per taste)
Ripe Plantain-1 cut at an angle into 5 thick pieces.
Shallots-1
Fennel Seeds-1/2 tsp
Cardamom-3 crushed.
Preparation:
1. Grind the coconut with the fennel seeds, cardamom, shallot and 1 cup warm water. Extract the thick first milk and keep aside. Add one more cup of water to the coconut, grind again and extract as much of the second milk as you can. If you are using frozen coconut, ensure that the coconut is defrosted and soaked in warm water
to maximise the milk. If you grind it without defrosting properly, it will curdle into oil. If you are using coconut can milk(don't :( ),mix one quarter of the can with water to thin it. Grind the seeds and shallots seperately and add to this half of the milk and strain it through so no bits remain.
2. Cook the sabudana in the second milk (or even water) in a pressure cooker and allow only 2 whistles. When it cools, open it and check if all the bubbles look tranparent. If they look white in the middle,there is some cooking left so add more liquid and let it simmer for another 5-8 minutes.
3. Now add the sugar, the plantain slices and the thick milk. Adjust the quantity of the milk so that it looks really fluid.
The payasam will thicken later and is best eaten hot, so when serving later, you may need to microwave it.
Note-Worthy Points:
The liquid need is approximately 3 times the quantity of the sabudana. The sugar retards the cooking, so add that only after the sabudana is fully cooked. There is a very thin line between fully cooked sabudana and over cooked sticky, gummy sabudana so take care as it nears completion.
Bubble Payasam:
This is my son's version of the payasam. Cook the sabudana with 1cup milk thinned with 1 1/2 cup water in the pressure cooker for 2 whistles. Add 1/3 cup(or more) condensed milk and 1 cup milk to the cooked sabudana. Add either cardamom powder or vanilla essence to flavor it. The payasam should be really liquid so adjust the quantity of milk. Serve hot or cold.
There is a egg added pudding version of this, sold as Tapioca Pudding in Grocery stores, which everyone in my family loves. It involes adding warm beaten egg to the cooked pearls but I haven't mastered that so no recipe for that as yet.
January 15, 2007
Plantain Pinwheels

I love the traditional appetiser(almost an entree)of Pazham Nirachathu..., plantain filled with coconut, nuts and raisins, sealed with maida and then deep fried in oil. It is one of the items on the Ramazan Iftar menu. I was always on the eating end of this particular preparation and never really learnt how to make it from scratch. My last few attempts with the willful plantains available here turned out to be disasters with the filling coming out, the bananas breaking up and so forth. If anyone has a foolproof method of making it, do send me the recipe.
Meanwhile, my friend was recently at a party in Calicut where she had this eclectic presentation of the plantain filled, and she suggested I try making it. It seemed simple enough from her description and had everything from the traditional recipe in its ingredients.
So I did and was thrilled to get all the flavors of the original recipe in a much more bite sized and low fat morsel. It works well as an appetiser as well as a delicious dessert with cinnamon icecream. Even as a weekend breakfast!
You will need:
1 Medium ripe Plantains
Coconut Grated-1/2 cup
Sugar- 1 tbsp( more or less as per sweetness required)
Cardamom Powder-1/2 tsp
Cashew nuts-2 tbsp chopped
Raisins- 1 tbsp
Ghee or oil-2 tbsp
Preparation:
1. Saute the coconut,nuts and raisins on slow heat till it gives out its aroma and is slightly toasted. Add the sugar and cardamom powder and mix well till the sugar is blended in.
2. Peel the bananas and cut into half. Now cut each half into about three thick slices along its length. Heat a non stick pan, reduce the heat to medium low and add the ghee or oil. Gently saute the slices for about 30 seconds on each side or till it turns golden yellow, which is an indicator that it is cooked. It is very important that the banana be just ripe. If the banana is too ripe, it breaks down fast(as you can see in my photo, some were just a bit too ripe.),and then you cannot roll it easily. It has to be just a bit unripe for the perfect texture.
3. Drain each slice onto paper towels. When it cools, spread a thin layer of the sticky coconut filling on each slice and roll it up carefully, securing it with a toothpick. Thats it, keep doing that for all the slices and serve hot or cold.
October 02, 2006
JFI-Thari Kanchi/Rava Payasam

Thari Kanchi is not a kanchi(gruel or porridge) at all. It is a light sweetened hot drink made from milk with very little semolina and seasoned with nuts and raisins. Traditionally had while breaking the fast in the evening, it is supposed to settle the stomach. It also eases the cramps that arise from the sudden rush of food after a day of abstinence from any food and water.
Semolina (also known as Farina here) is known to be easily digestible and is given to kids as porridge. Though this drink, once seasoned with ghee(clarified butter) and nuts, is nowhere near the lumpy porridge.
Try it once and you may end up making it all through winter.Nothing like wrapping your cold hands around a steaming mug. Omit the shallots in the seasoning if you cannot bend your mind around it or if you cannot find it. It does add a characteristic taste and texture but try it either way.
This is my entry for JFI-Ghee & Butter being hosted by Cooking Medley!
You will need: For 4-5 servings
Farina/Semolina/Sooji/ Rava- 2 tbsp
Milk- 2 1/2 cups
Water- 1 ½ cup
Sugar-4 tbsp
Cardamom- ½ tsp powdered
Seasoning:
Ghee/Clarified Butter- 1 tbsp
Only Tiny Red Shallots- 1 finely chopped
Cashew nuts- 3-4 chopped
Raisins- 5-6
Preparation:
Combine the milk with water, bring it to a boil and add sugar. To this, add the rava/sooji and sugar. Simmer on low heat for 5-8 minutes, until everything merges well and the semolina cooks. Be careful not to let it boil over. Add the cardamom powder and add more sugar if needed. Take the mixture off the flame and let it absorb the flavors. The mixture should be the consistency of a watery shake/smoothie.
Seasoning: Heat ghee in a pan, and sauté the cashew nuts, raisins and shallots on low heat till they turn golden and remove from fire and pour over the milk mixture..
P.S. The water is added to regular full fat milk to thin it. If using low fat or fat free milk, use full 4 cups milk. There is no need to use water.
The drink will thicken after some time, so do not add too much semolina considering the drink to be too thin. If later it does turn too thick, just simmer it with more milk.
Do not try to use onions or any other kind of shallots or frozen shallots as substitute.
September 14, 2006
Black Rice Payasam/Kheer

I first came across the black sticky rice dessert at a Thai/Malaysian restaurant and was intrigued by the lilac color. The desset was a rice pudding/kheer/payasam flavored with coconut milk. When raw, Black rice appears black and rounded, medium grain. Upon cooking, its colour changes to a deep purple and it is a non-glutinous rice.
It has a relatively high mineral content (including iron)and, like most rice, supplies several important amino acids. Black or purple rice is unmilled, leaving a dark husk in place, which colors the grains when it cooks.The husk leaves a chewy bite to the dessert. As it is unhulled, black and purple varieties of rice are classified as brown rice too. So payasam can be healthy too, I guess. Yum.
I bought the rice at an Asian Supermarket and used it instead of our regular rice for rice pudding(payasam). Cooked it with water first and then with milk and condensed milk and it came out a beautiful lilac color, with a nutty chewy taste. The only drawback is that it has a longer cooking time so cooking it on gas is a long process. It has been suggested to soak it overnight to spped up the cooking. It has not yet been tried as a rice dish but since we like the wild rice, my guess is that it would taste similar.
You will need:
Black Rice- 1/4 cup
Milk - 4 cups
Condensed Milk- 1/2 tin (more or less depending on your sweet tooth)
Preparation:
1. Soak rice overnight. Boil rice in plenty of water till half done. Better still, add 1 cup water and pressure cook till one whistle comes, and then cook for 5 mins on very low heat. Drain excess water and keep aside.
2. Heat milk, bring to a boil, add the rice and let it cook on low heat till the rice is fully smashed. This may take anywhere between 10-20 minutes. After it is cooked, add condensed milk and let it simmer for 10 minutes.
The more the rice is cooked before adding the milk, the better. I pressure cook the rice even after adding the milk but it gets messy.
Serve hot or cold.
I am sending this to Anthony's Kitchen increasingly popular Curry Mela.
Black Rice Desserts,Payasam,
August 31, 2006
JFI- Milk/ Rose Falooda

When Vineela declared Milk as this month's theme for Jihva for Ingredients, I knew what I wanted to post right away.
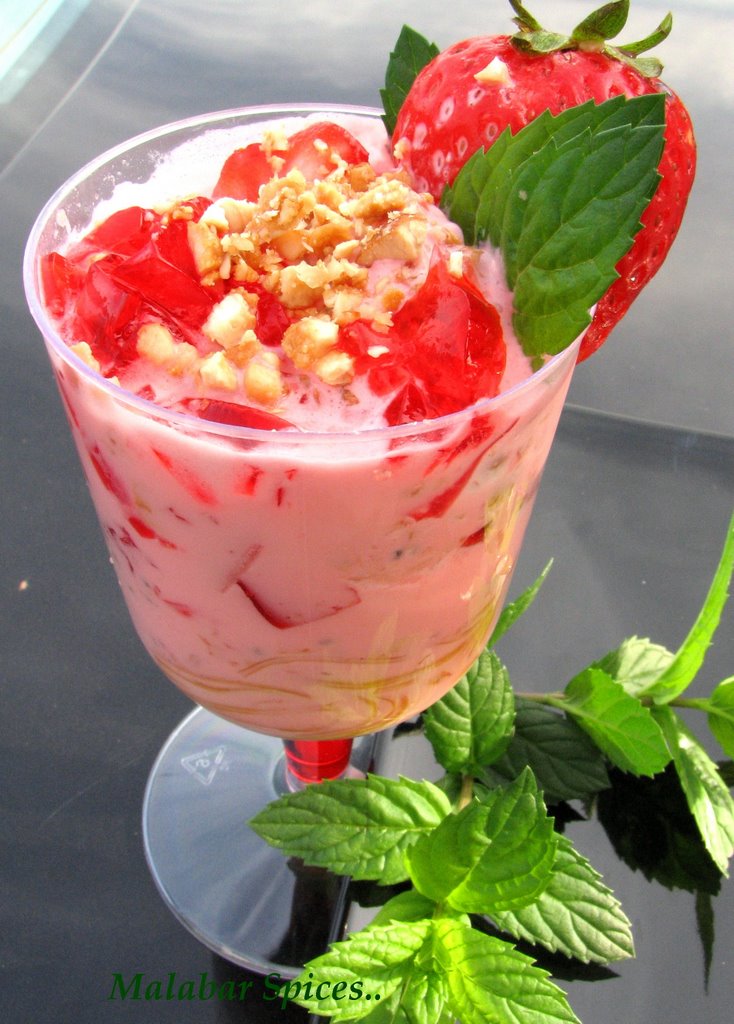
Falooda, the refreshing drink/dessert made by layering the contrasting tastes and textures of noodles, milk, jelly, fresh fruits, icecream, takamaria seeds, crushed nuts etc is a wonderful summer delight. Quite like the American tradition of a sundae.
Falooda, is also the commonly known in North India as the thin transparent noodles which are usually colorless, flavorless and chewy, used to top the kulfi and falooda drink in Delhi. It is Iranian in origin, but is very integral to India now.
It varies in taste across the span of the country, in keeping with the local flavors and preferences. The popular flavors in which falooda are available are rose, pista, mango, chocolate, fig, and many others. One of the best faloodas tasted, is from a place in Chandni Chowk, Delhi, near Paratha wali gali. It was a rabdi falooda, rabdi being milk cooked and reduced to a grainy, thick consistency and then sweetened with sugar. It was decadent enough to linger in memory.
During my childhood, my personal favorite was the falooda from the Park Restaurant at Manachira Tank in Calicut, Kerala. In later visits, as Park restaurant closed, my loyalty shifted to a small place called Kalanthans in S.M.Street. The fruit was fresh, the jelly firm, the ice cream excellent and one of my Uncle’s friends owns it. In my recent trips to Calicut, we still seek out and sample falooda from whichever is the current favorite haunt.
However, I could not quite place it, but something was different. It didn’t match up to our finicky memories. That’s when we started experimenting and creating our own rendition of the taste.
The characteristic taste is the slipperiness of the takmaria seeds and the noodles, both unusual ingredients. Takmaria is the seed of Basil plant, and when soaked in water swells up to a gelatinous mass of bubbles. The thin noodles is made from corn flour. I have tried making it, unsuccessfully and now just prefer to buy it from the Indian store. A close substitute is the Rice cellophane noodles available at all Asian supermarkets.
The rose syrup at the bottom is usually Roof Asfa, a rose concentrate available at any Indian store.
A dash of strawberry syrup is also good if the former is unavailable.The mango brings out the tropical flavor the best, but this time, it’s a rose theme, so the rose essence is offset by the fresh strawberries. As for the ice cream, the Indian store’s flavours work very well, especially the Rose or the Kesar Pista.

You will need ( 4 servings)
Takmaria/Subja Seeds (basil) seeds -2tsp
Falooda sev or Rice noodles-8 ounces
Milk- 1 1/2 cup cold, mixed with 2 tbsp sugar.
Rooafzah syrup- 1 tbsp in each glass.
Ice Cream-1 quart (Vanilla/ Kesar, Falooda)
Honey Roasted Cashewnuts-1/2 cup
Fresh Fruits- Apple, Banana, Mangoes, Strawberries.
Strawberry Jell-O- 3 ounce packet.( Can use Lime Jello too for added color)
Preparation:
1. Make the Jello as per the packet instructions and allow it to set fully. Cut the jello into tiny cubes. Soak the falooda seeds in water for at least 1 hour. They look like poppy seeds and swell up when soaked. Set aside.
2. Boil 1 1/2 cup water and add the noodles or falooda sev. Cook for 4 minutes and take it of the flame. Add ½ cup cold water to set the cooking and let it stay in water till use.
3. Cut the strawberries, bananas, apples and mangoes into very small pieces. Fold the cashews between a paper towel and crush with a glass into pieces. Take care not to crush completely.
4. Use 4 ounce tall glasses for serving. No stirring is to be done while compiling the dessert. Start by drizzling a tablespoon (approx.) of the rose syrup at the bottom of the glass. Lyer 2 tablespoon of the noodles, then ¼ cup milk, then 1 tsp of each fruit and 2 tsp of cut up jello. Add 2 tbsp of vanilla and 2tbsp of rose/strawberry ice cream. Top with crushed nuts.
The quantities of each are relative to the size of the serving glass, so change accordingly. It can be prepared ahead and set out, adding the milk, nuts and ice cream only at the time of serving.
The only other falooda I found was Ashwini's from Food For Thought. If you come across any more, I would be happy to add the link.
Icecream Drinks,Indian Desserts,Rose Falooda,Malabar Recipes